# SharePoint
SharePoint is a web-based collaborative platform that integrates with Microsoft Office
## Overview
SharePoint is a web-based collaborative platform that integrates with Microsoft Office.
SharePoint is primarily sold as a document management and storage system, but the product is highly configurable, and usage varies substantially among organizations.
> **Warning:** **Breaking Changes in Version 5.0**: The SharePoint connector has been upgraded to use Microsoft Graph API v1.0, replacing the deprecated SharePoint REST API v2.0. This update includes breaking authentication changes that require immediate action. All existing workflows must be updated with new authentication. Review the [Migration Guide](#migration-guide) and [Version 5.0+ Authentication](#version-5-0) sections below.
## API Information
The SharePoint connector uses Microsoft Graph API v1.0 with the base URL: ****. This connector was migrated from SharePoint REST API v2.0 to Microsoft Graph API v1.0 in version 5.0 to align with Microsoft's API modernization and provide access to new features.
More information can be found in the [Microsoft Graph SharePoint API documentation](https://learn.microsoft.com/en-us/graph/api/resources/sharepoint?view=graph-rest-1.0). Details regarding API limitations and throttling can be found in the [Microsoft Graph throttling guidance](https://learn.microsoft.com/en-us/graph/throttling).
## Version 5.0+
> **Warning:** **Authentication Change Required**: Version 5.0 uses Microsoft Graph API Sites scopes instead of SharePoint API scopes. The Tenant Name parameter has been removed. You must create new authentication for all workflows.
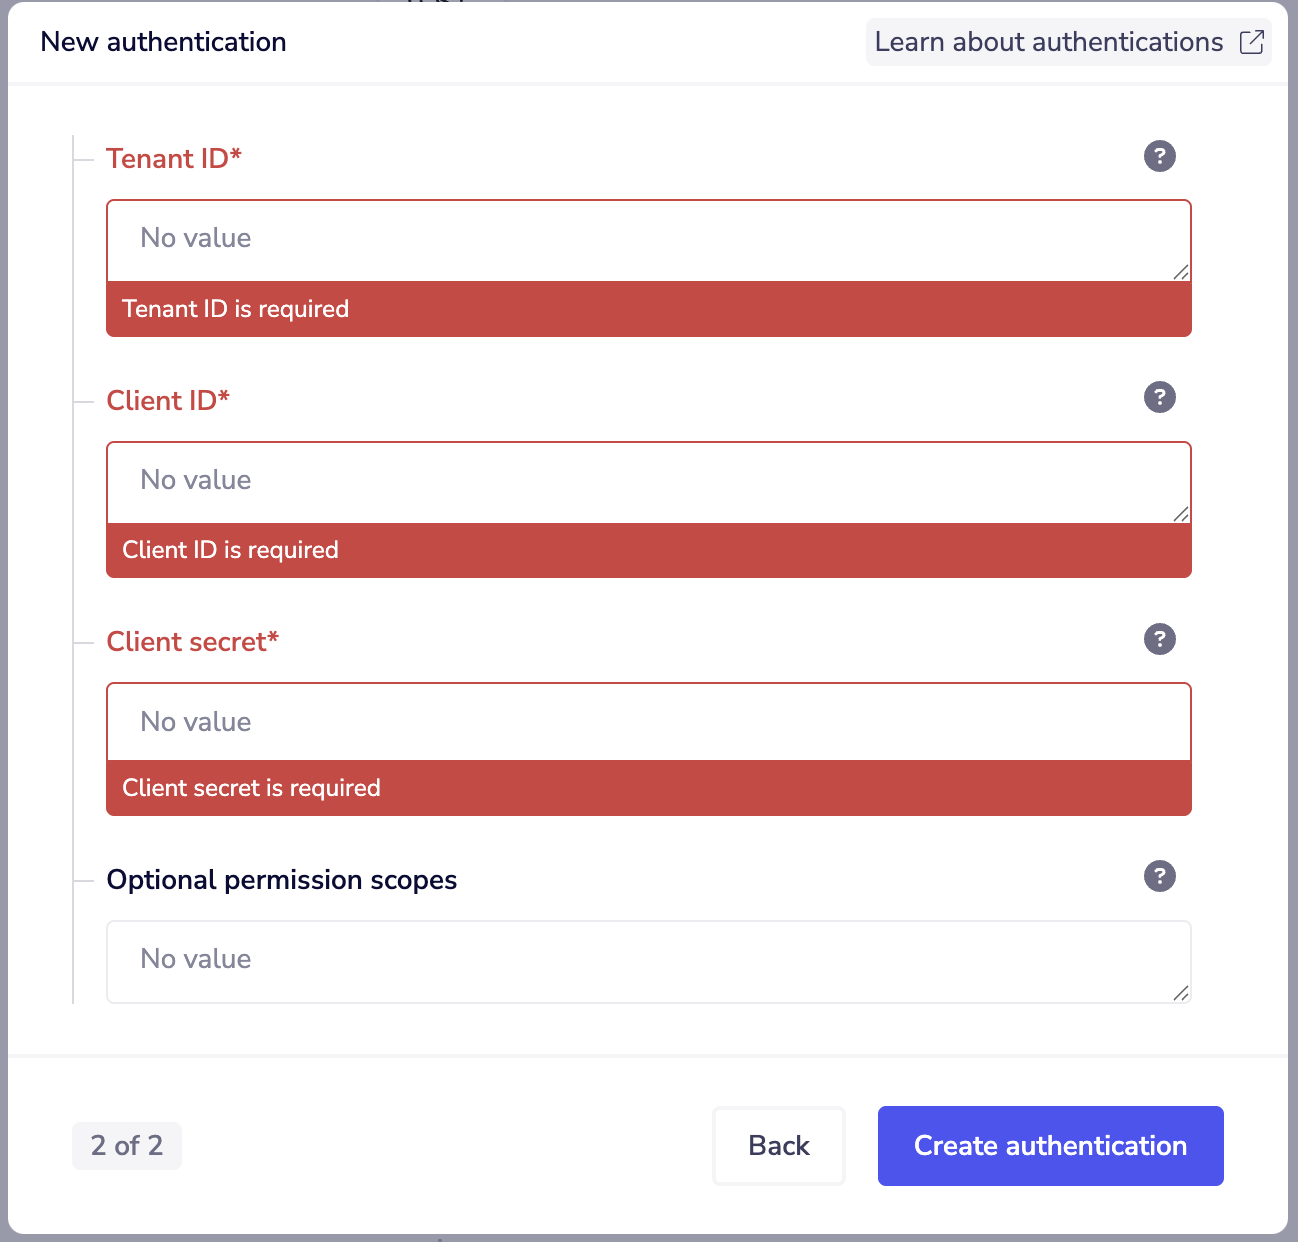
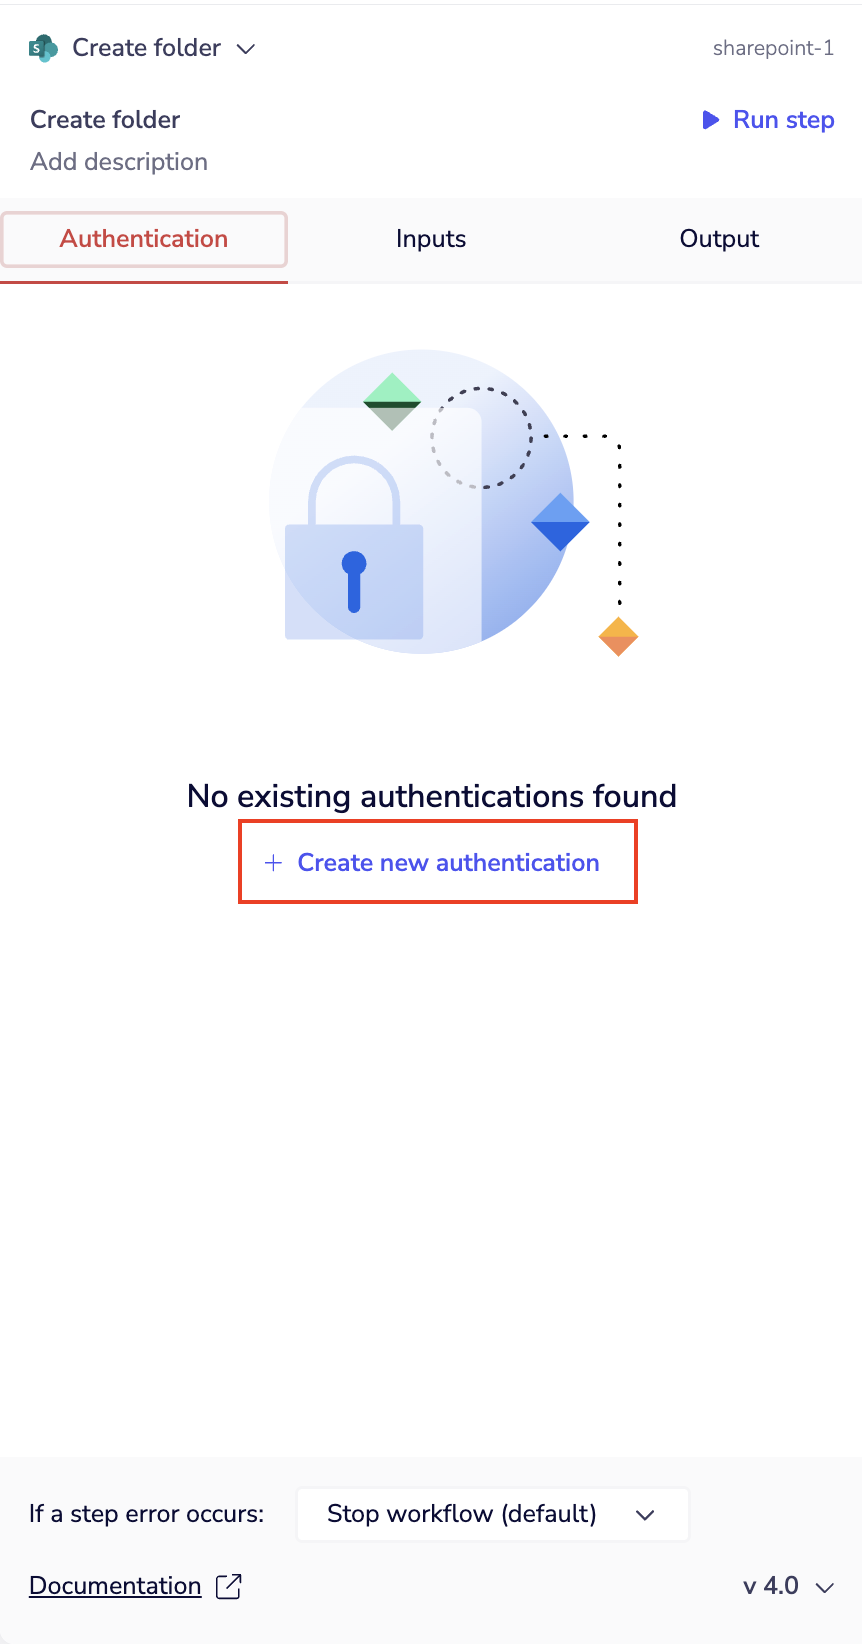
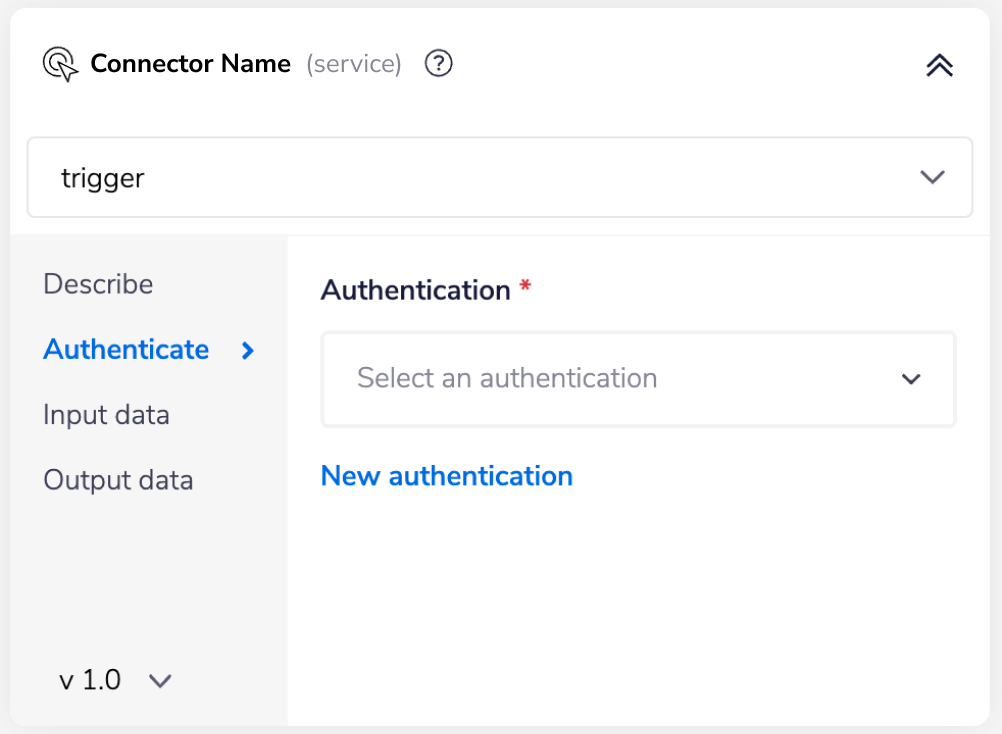
Within the builder, click on the **SharePoint connector** to display the connector properties panel. Select the **Authentication tab** and click on the **Create new authentication** button.
In the Tray.io authentication pop-up modal, **name your authentication** as **Production**. Consider who/how many people will need access to this authentication when choosing where to create this authentication (**Personal** vs **Organisational**).
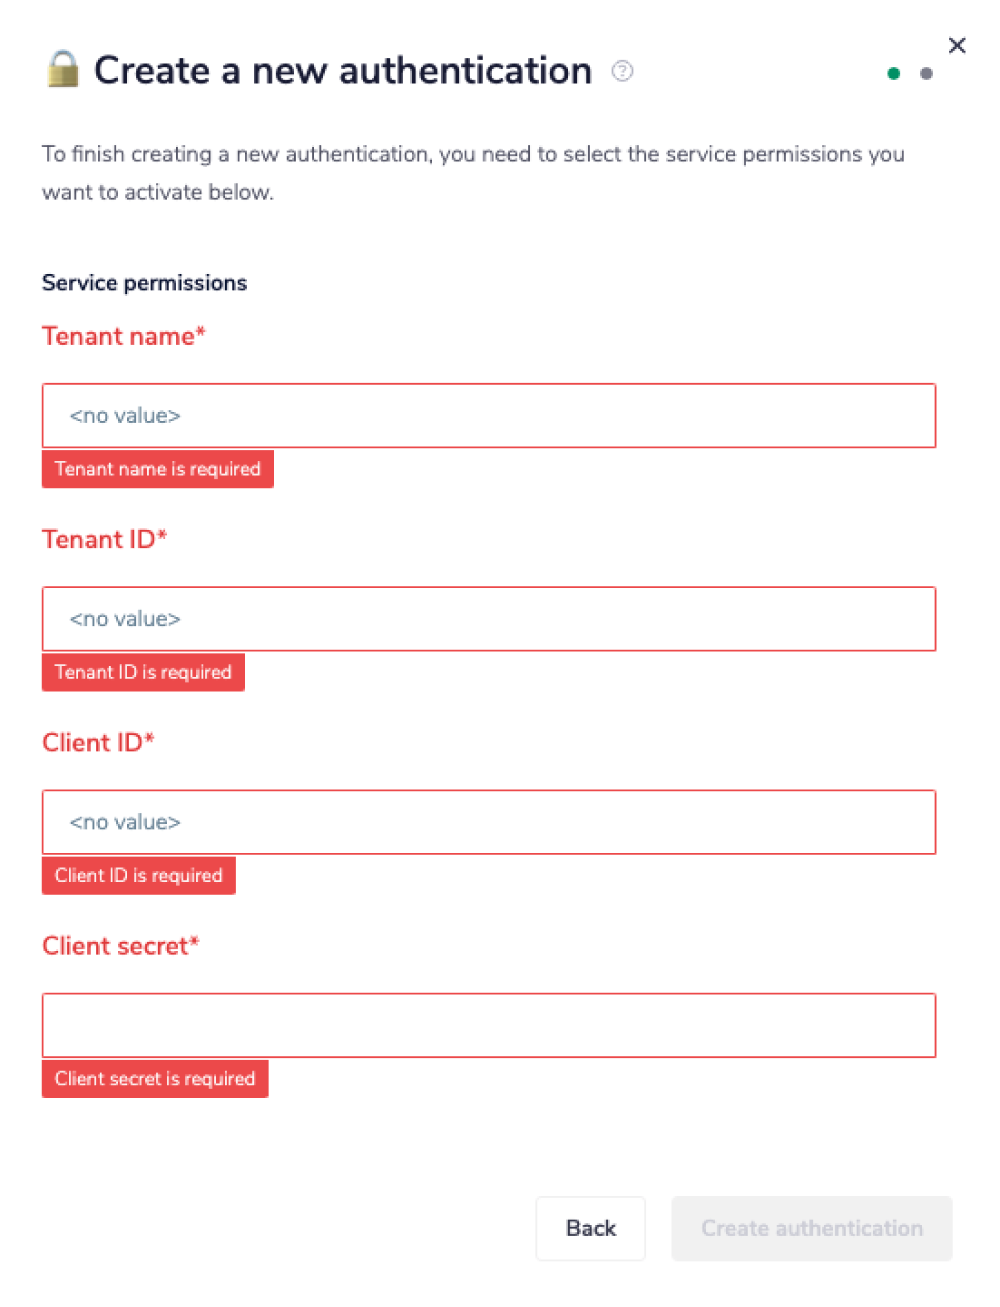
The authentication form requires your **Tenant ID**, **Client ID** and **Client secret** credentials. Note that the Tenant Name field is no longer required.
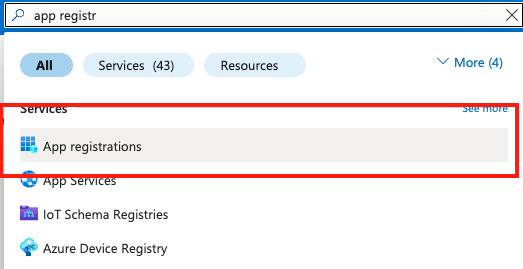
To obtain these credentials, access the **Azure Portal** at **** and search for **"app registrations"**.
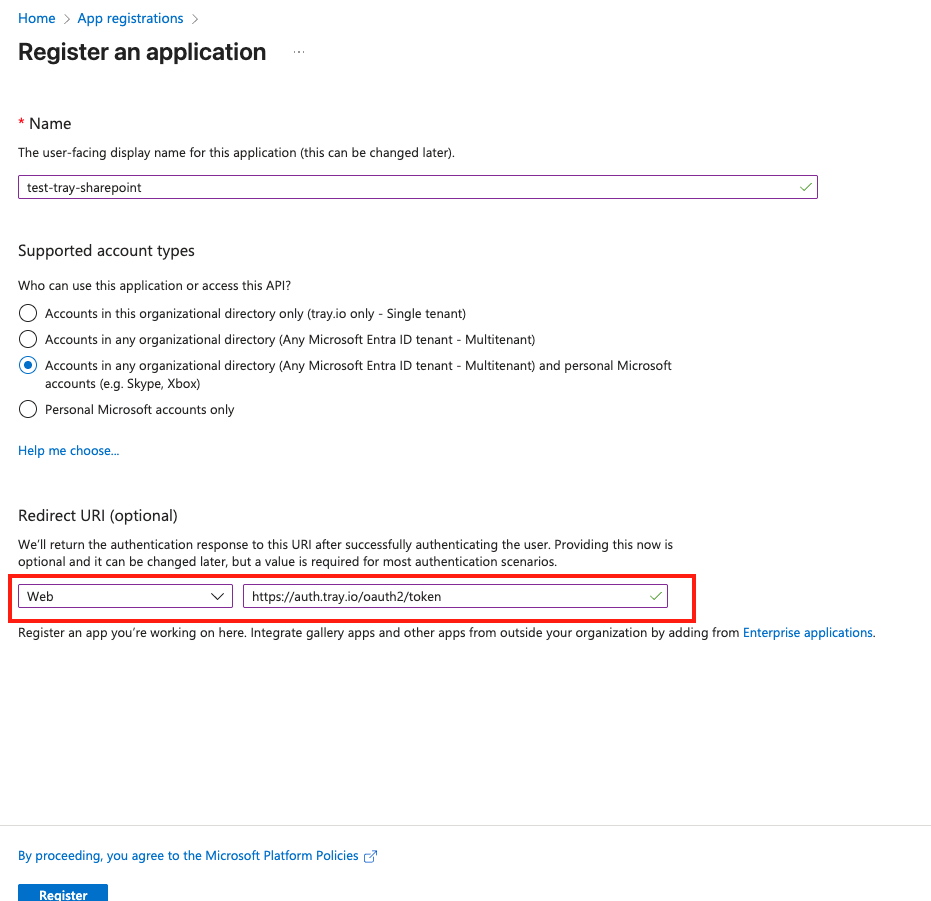
Choose your application or **create a new one**. If you create a new one, give it a **name** and set the **redirect URI** to: **** and click **Register**.
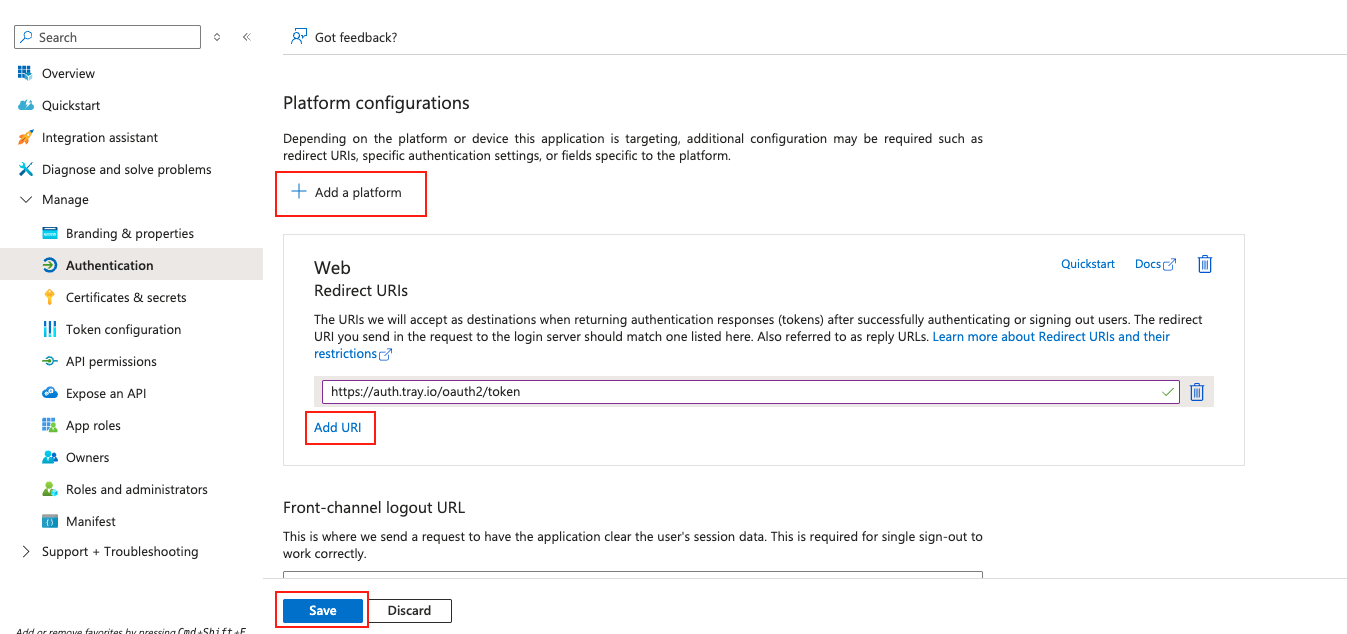
Alternatively, you can add the redirect URI from the **Authentication section**. Click **Add a platform**, select **Web**, then click **Add URI**, type **** and click **Save**.
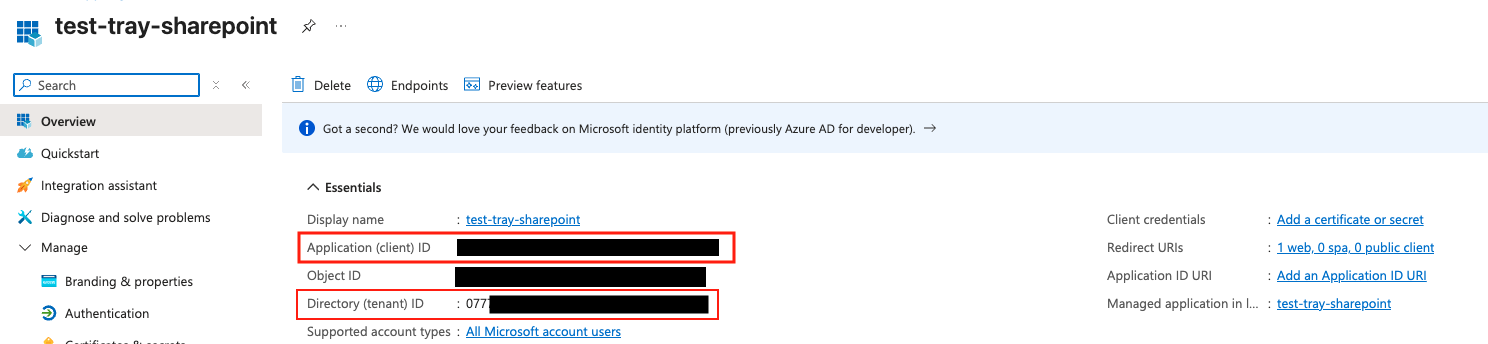
From the **Overview section**, copy the **Client ID** (Application ID).
Then click on **Certificates & secrets**, click the **New client secret** button, give it a **name** and set the **expiry date**, then click **Add**.
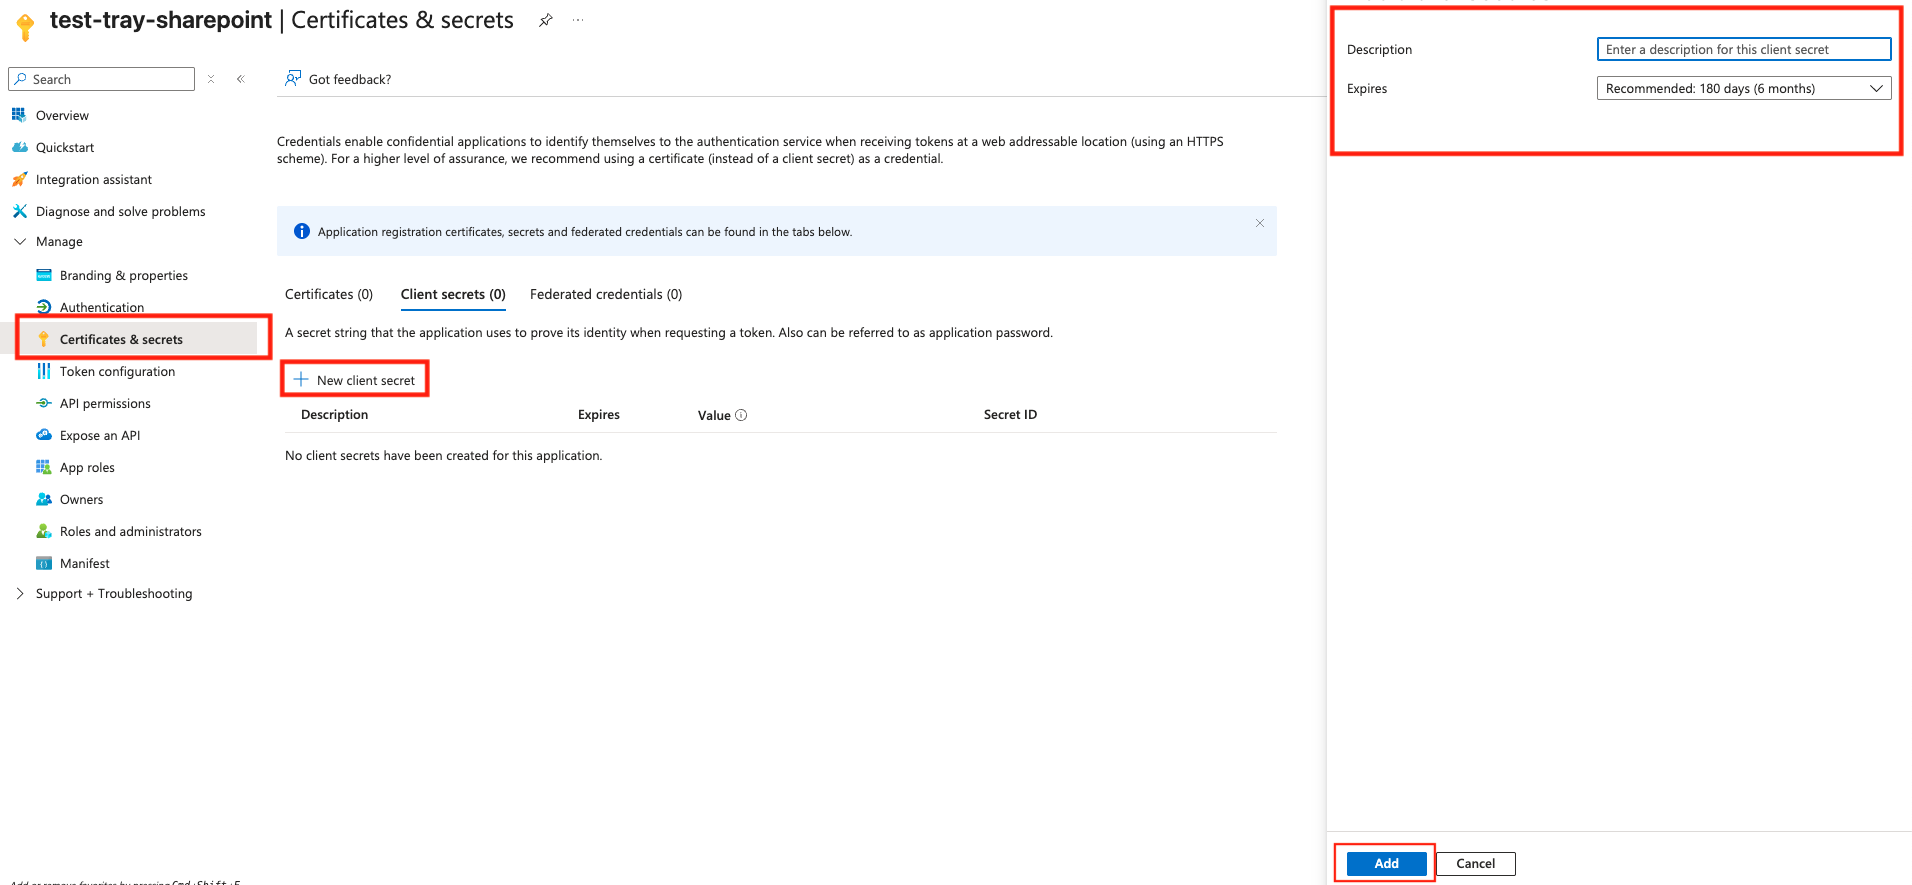
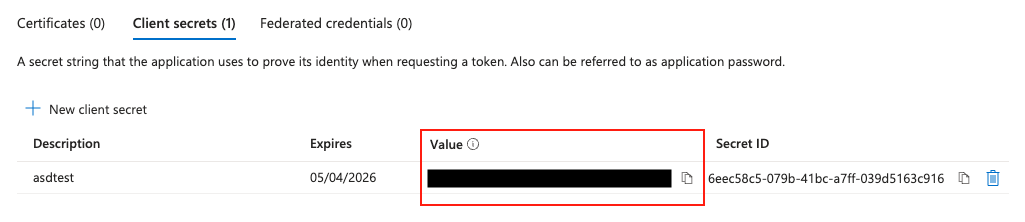
Copy the **Value** (not the Secret ID). **Copy immediately after creation** as the value will be hidden afterwards.
### Configure Microsoft Graph API Permissions
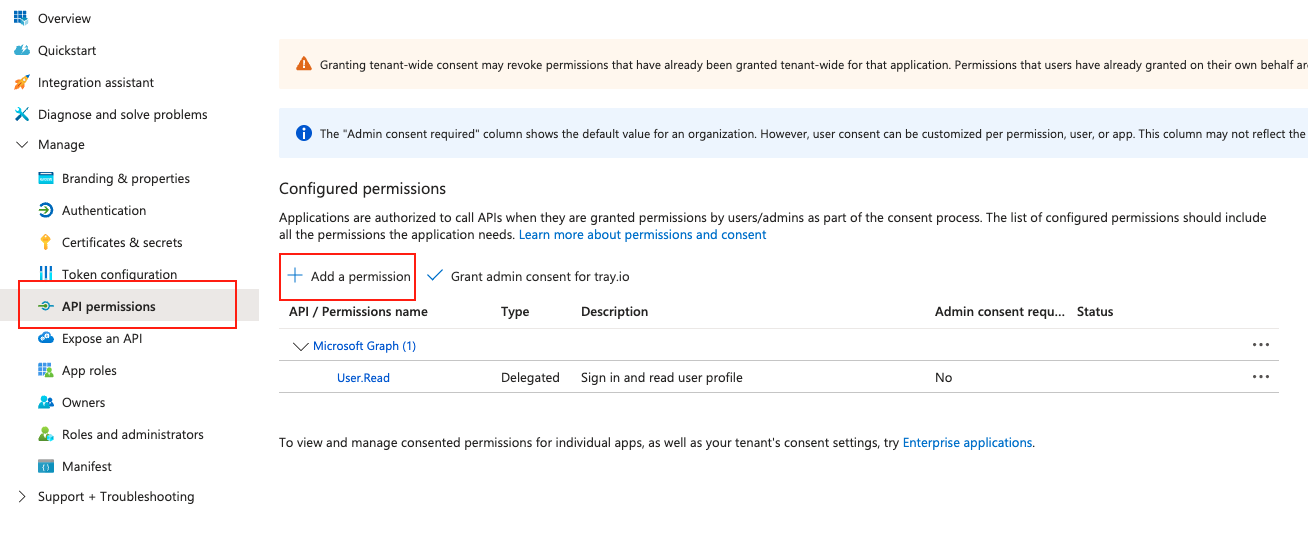
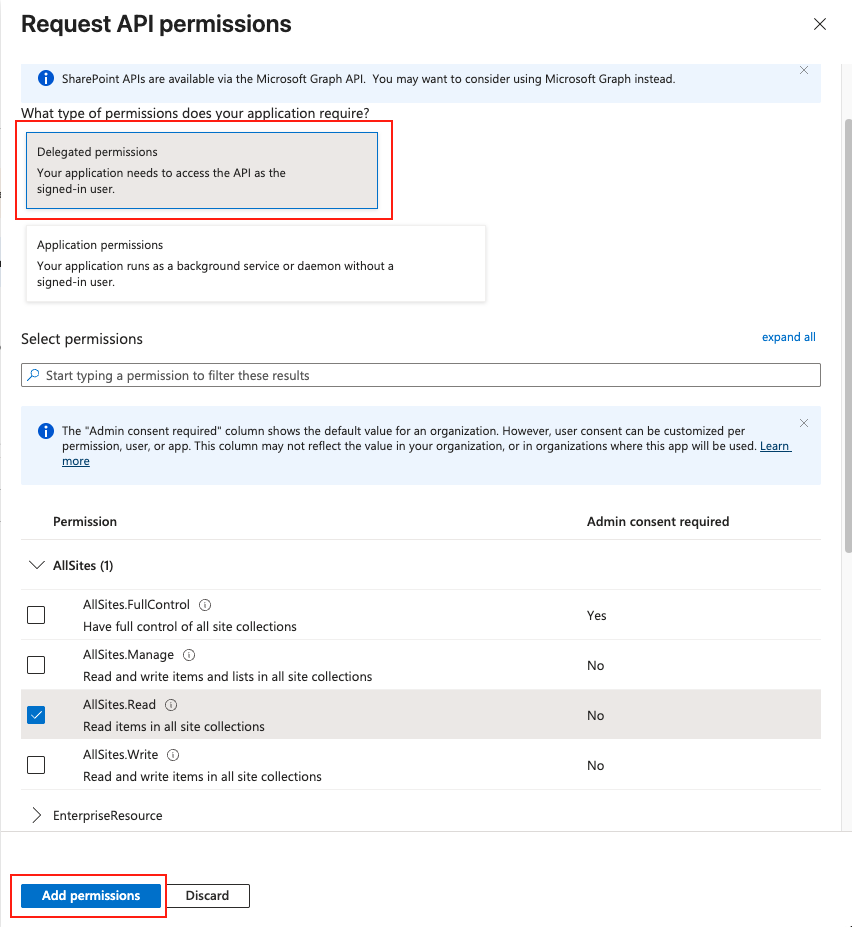
Next, configure the required Microsoft Graph API permissions. Go to **API permissions** and click **Add a permission**.
Select **Microsoft Graph** from the list of APIs.
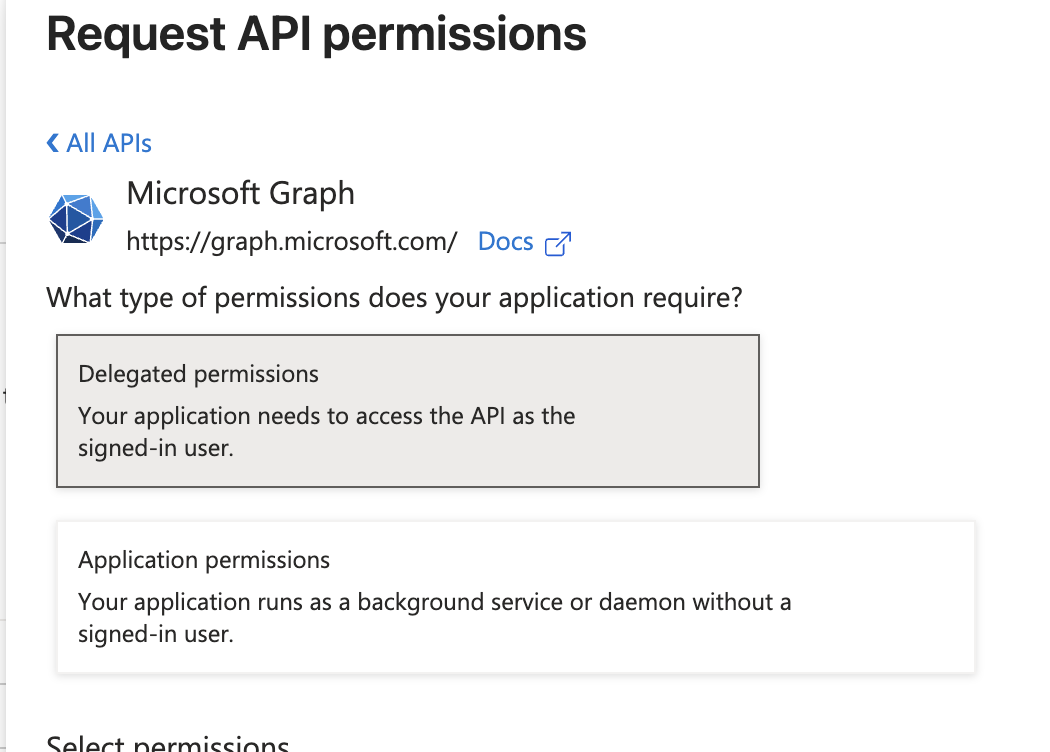
Select **Delegated permissions** to allow the application to access the API on behalf of the signed-in user.

Enable the **offline\_access** scope to maintain access to data.
### Required Microsoft Graph Sites Scopes
Configure the following Microsoft Graph Sites API scopes:
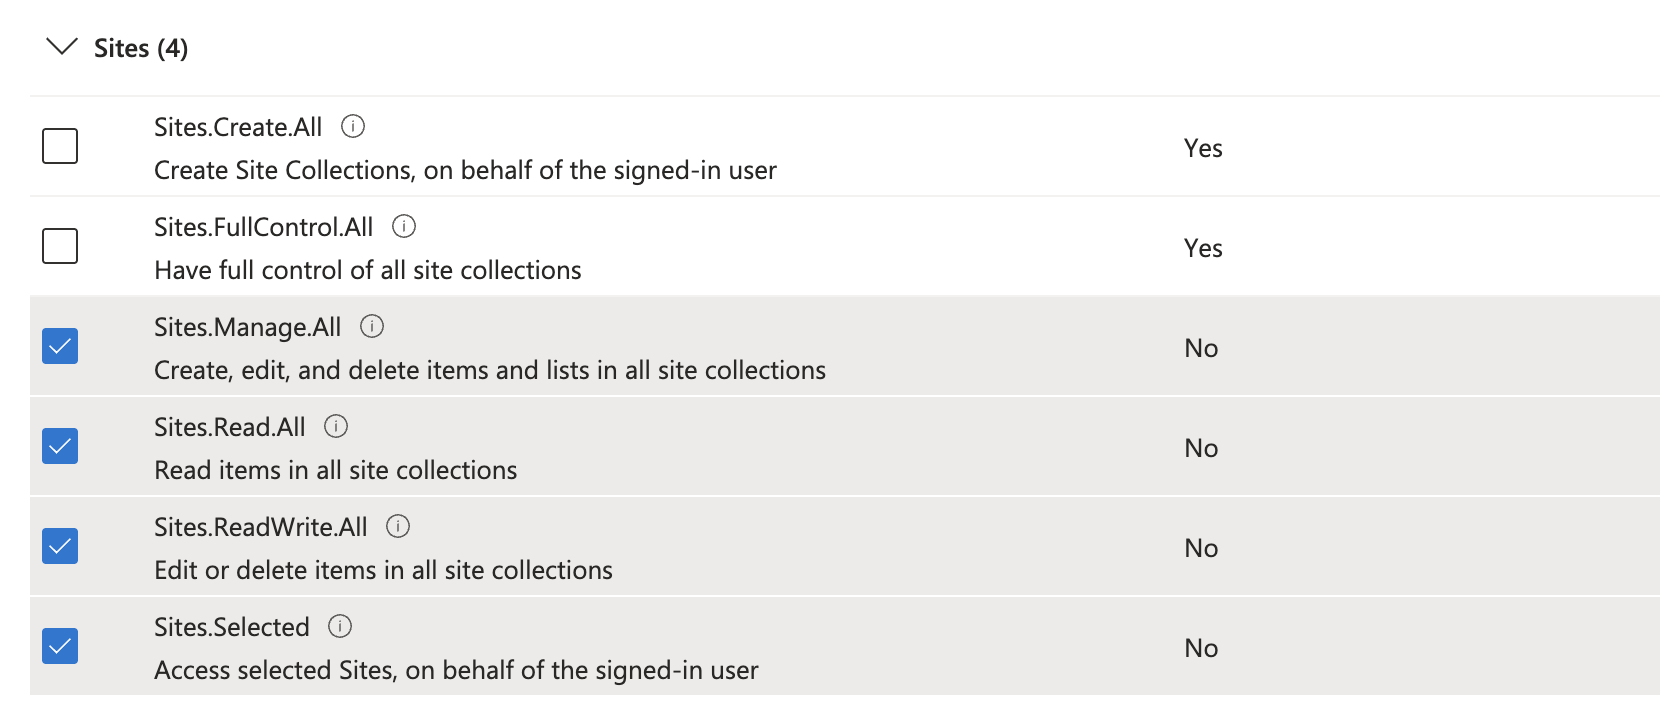
Select the following scopes:
* **Sites.Manage.All** - Create, edit, and delete items and lists in all site collections
* **Sites.Read.All** - Read items in all site collections
* **Sites.ReadWrite.All** - Edit or delete items in all site collections
* **Sites.Selected** - Access selected Sites on behalf of the signed-in user
After selecting all required scopes, click **Add permissions**.
Once you have added the **Client ID** and **Client secret** to your Tray.io authentication form, click **Create authentication**. Your connector authentication setup should now be complete. Run a simple operation to test and verify you can retrieve data as expected.
## Version 4.0 (Legacy - Prior to Version 5.0)
> **Warning:** **Deprecated**: This authentication method no longer works as of version 5.0. Microsoft has deprecated the SharePoint REST API v2.0. Use the [Version 5.0+ authentication](#version-5-0) method instead.
Within the builder, click on the **SharePoint connector** to display the connector properties panel. Select the **Authentication tab** and click on the **Create new authentication** button.
In the Tray.io authentication pop-up modal, select **Production** environment.
The next page asks you for your **application credentials**.

To get these fields, we'll need to access ****.
Next search for **"app registrations"**

In there choose your application you want to use or **create a new one**. If you create a new one, give it a **name** and set the **redirect URI** like so: "****" and hit **Register**.

Alternatively you can add one from the **Authentication section**. In there you have to add a "platform", if you don't have one click on **Add a platform** and in there select **Web**.
Next in the Web platform click **Add URI**, type "****" and hit **Save**.

From the **Overview section**, make sure to copy the **Tenant ID** and **Client ID** from there.
Then click on **Certificates & secrets**, in there click on the **New client secret** button, give it a **name** and set the **expiry date** and hit **Add**

Make sure to copy the **Value** and not the **Secret ID**. **Make sure to copy right after creation** as the value will be hidden afterwards

Next you need to **give permissions** to our oauth app. To do that, go to **API permissions** and click **Add a permission** button

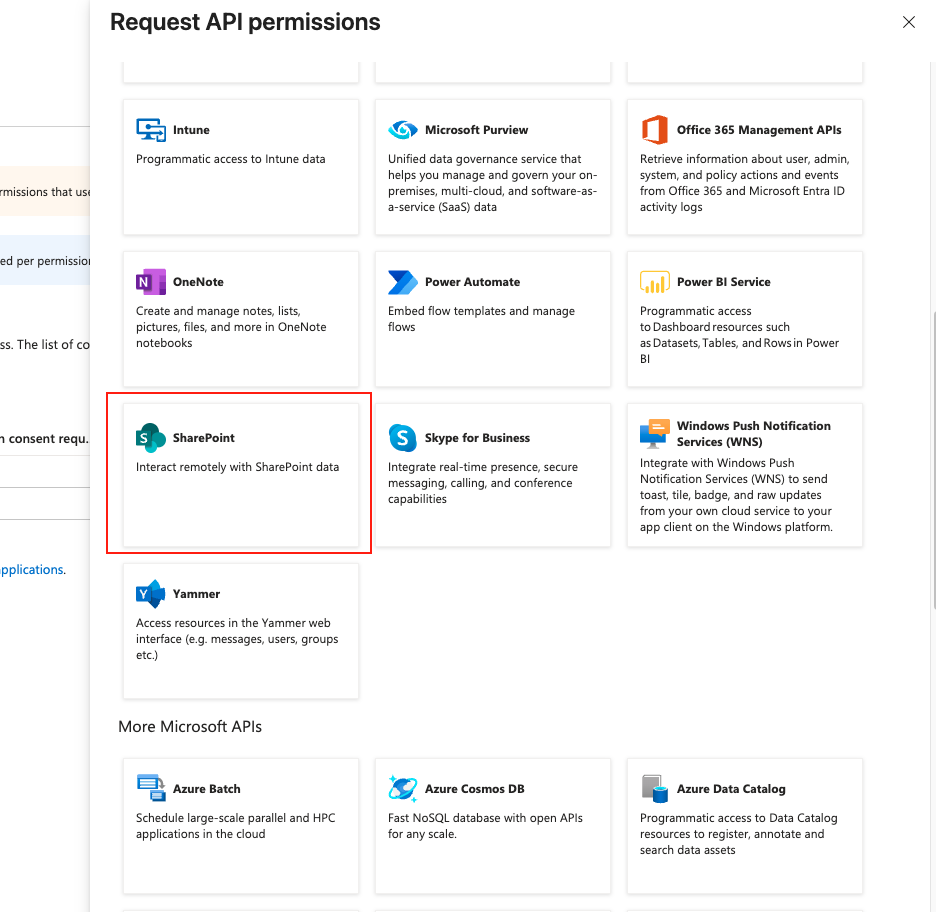
A new window should appear with some APIs, search for **"SharePoint"** and click on it.
Then select **Delegated permissions** and choose the **permissions you need**, then hit **Add permissions**
Next, to get the **domain name** you can go to **** and then into **My Apps** and search for **"SharePoint"**.
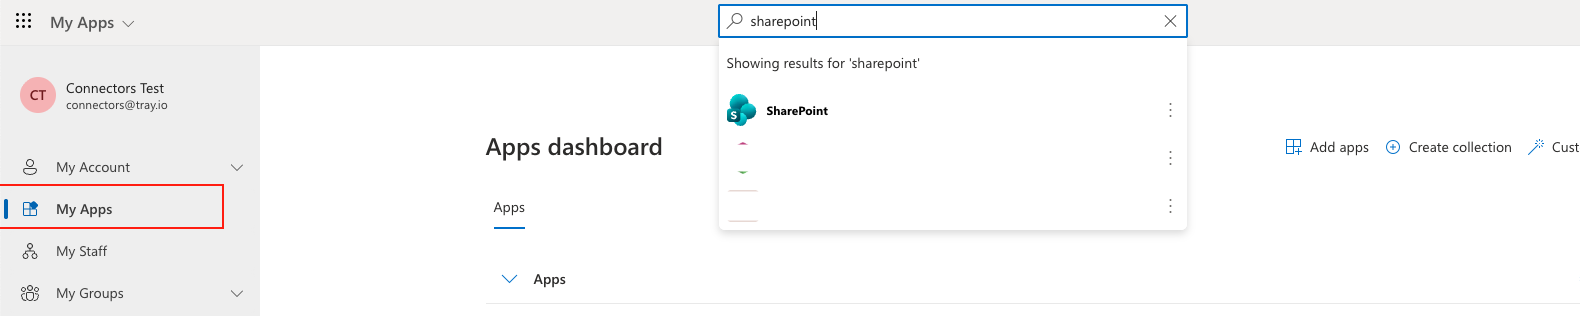
Once you click on it should open your **SharePoint instance**. You need to **copy the domain name** from the url. If you URL look something like this: **"..."** your domain to copy is **"exampledomain"**.
After you copied down **Client ID**, **Client Secret**, **Tenant ID** and **Domain name** and added these fields to your Tray.io authentication pop-up window click the **Create authentication** button. Your connector authentication setup should now be complete. Please **run the simplest operation available** to test and make sure you can retrieve data as expected.
## Version 3.0 (Legacy - Prior to Version 5.0)
> **Warning:** **Deprecated**: This authentication method no longer works as of version 5.0. Microsoft has deprecated the SharePoint REST API v2.0. Use the [Version 5.0+ authentication](#version-5-0) method instead.
Within the workflow builder, highlight the SharePoint connector.
In the SharePoint connector properties panel to the right of the builder, click on the Authenticate tab and the 'New authentication' button.
This will result in a Tray authentication pop-up modal. The first page will ask you to name your authentication and select the type of authentication you wish to create ('Personal' or 'Organisational').
The next page asks you for your 'Tenant name', 'Tenant ID', 'Client ID', and 'Client secret' credentials.
The 'Tenant name' is your organization's domain that was created when you signed up with Microsoft SharePoint.
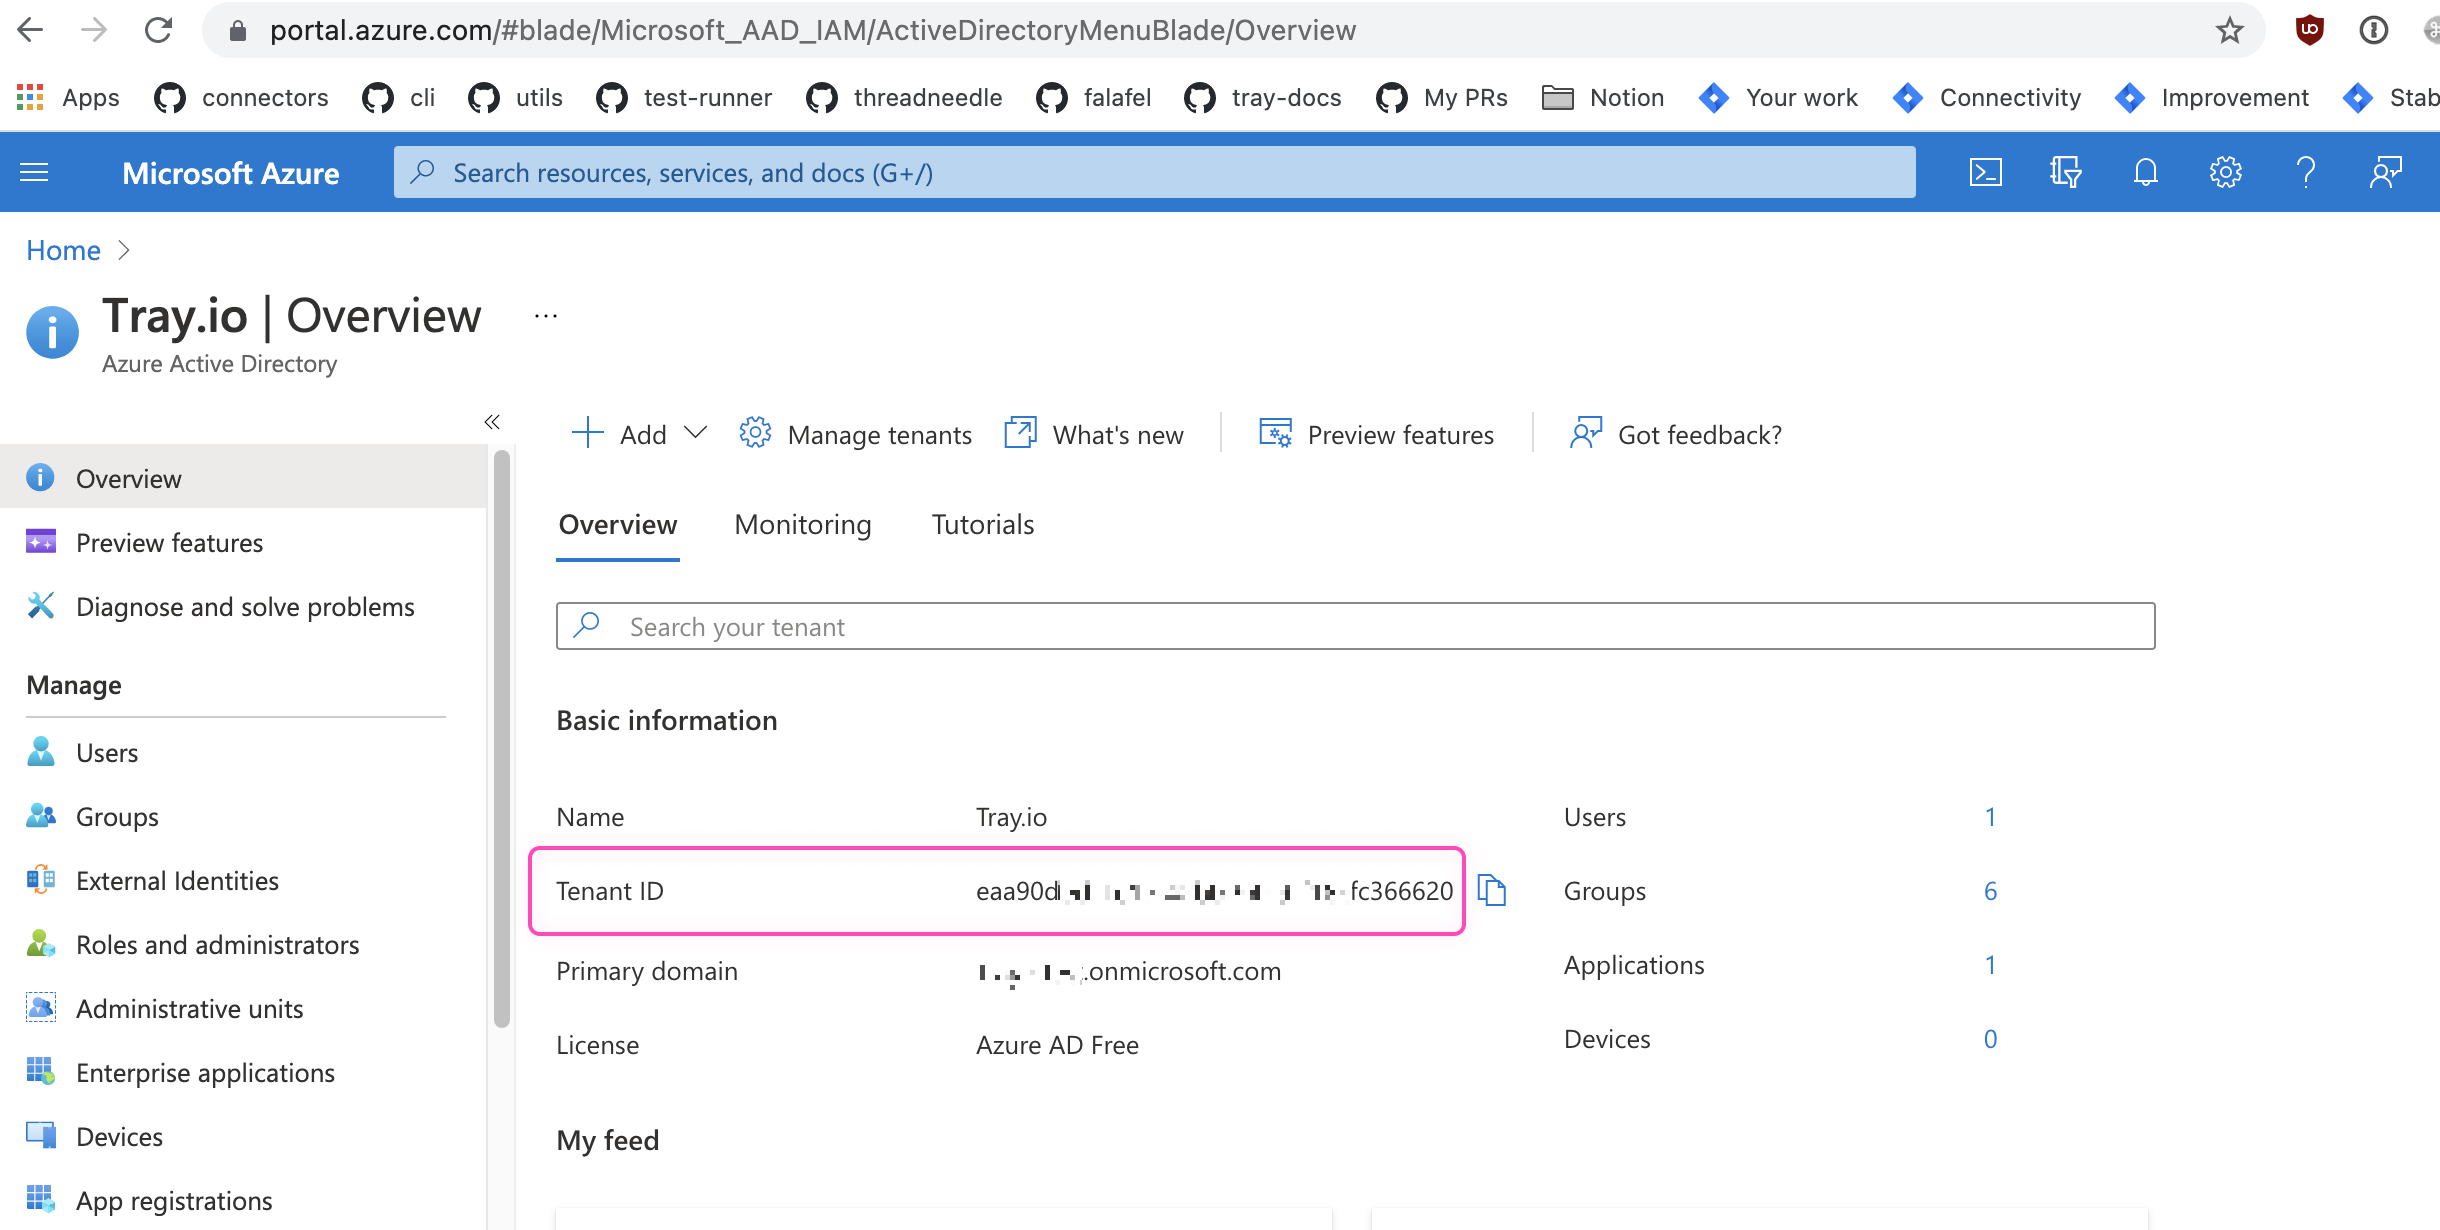
The 'Tenant ID' can be found in the [Azure Active Directory](https://portal.azure.com/) on the Overview page.
In order to get the remaining credentials, you would need to register your app and give it the required permissions.
To learn more about registering your app refer to the [Register SharePoint Add-ins document](https://docs.microsoft.com/en-us/sharepoint/dev/sp-add-ins/register-sharepoint-add-ins).
To register your app, go to: `https://[TENANT-NAME].sharepoint.com/_layouts/15/AppRegNew.aspx`.
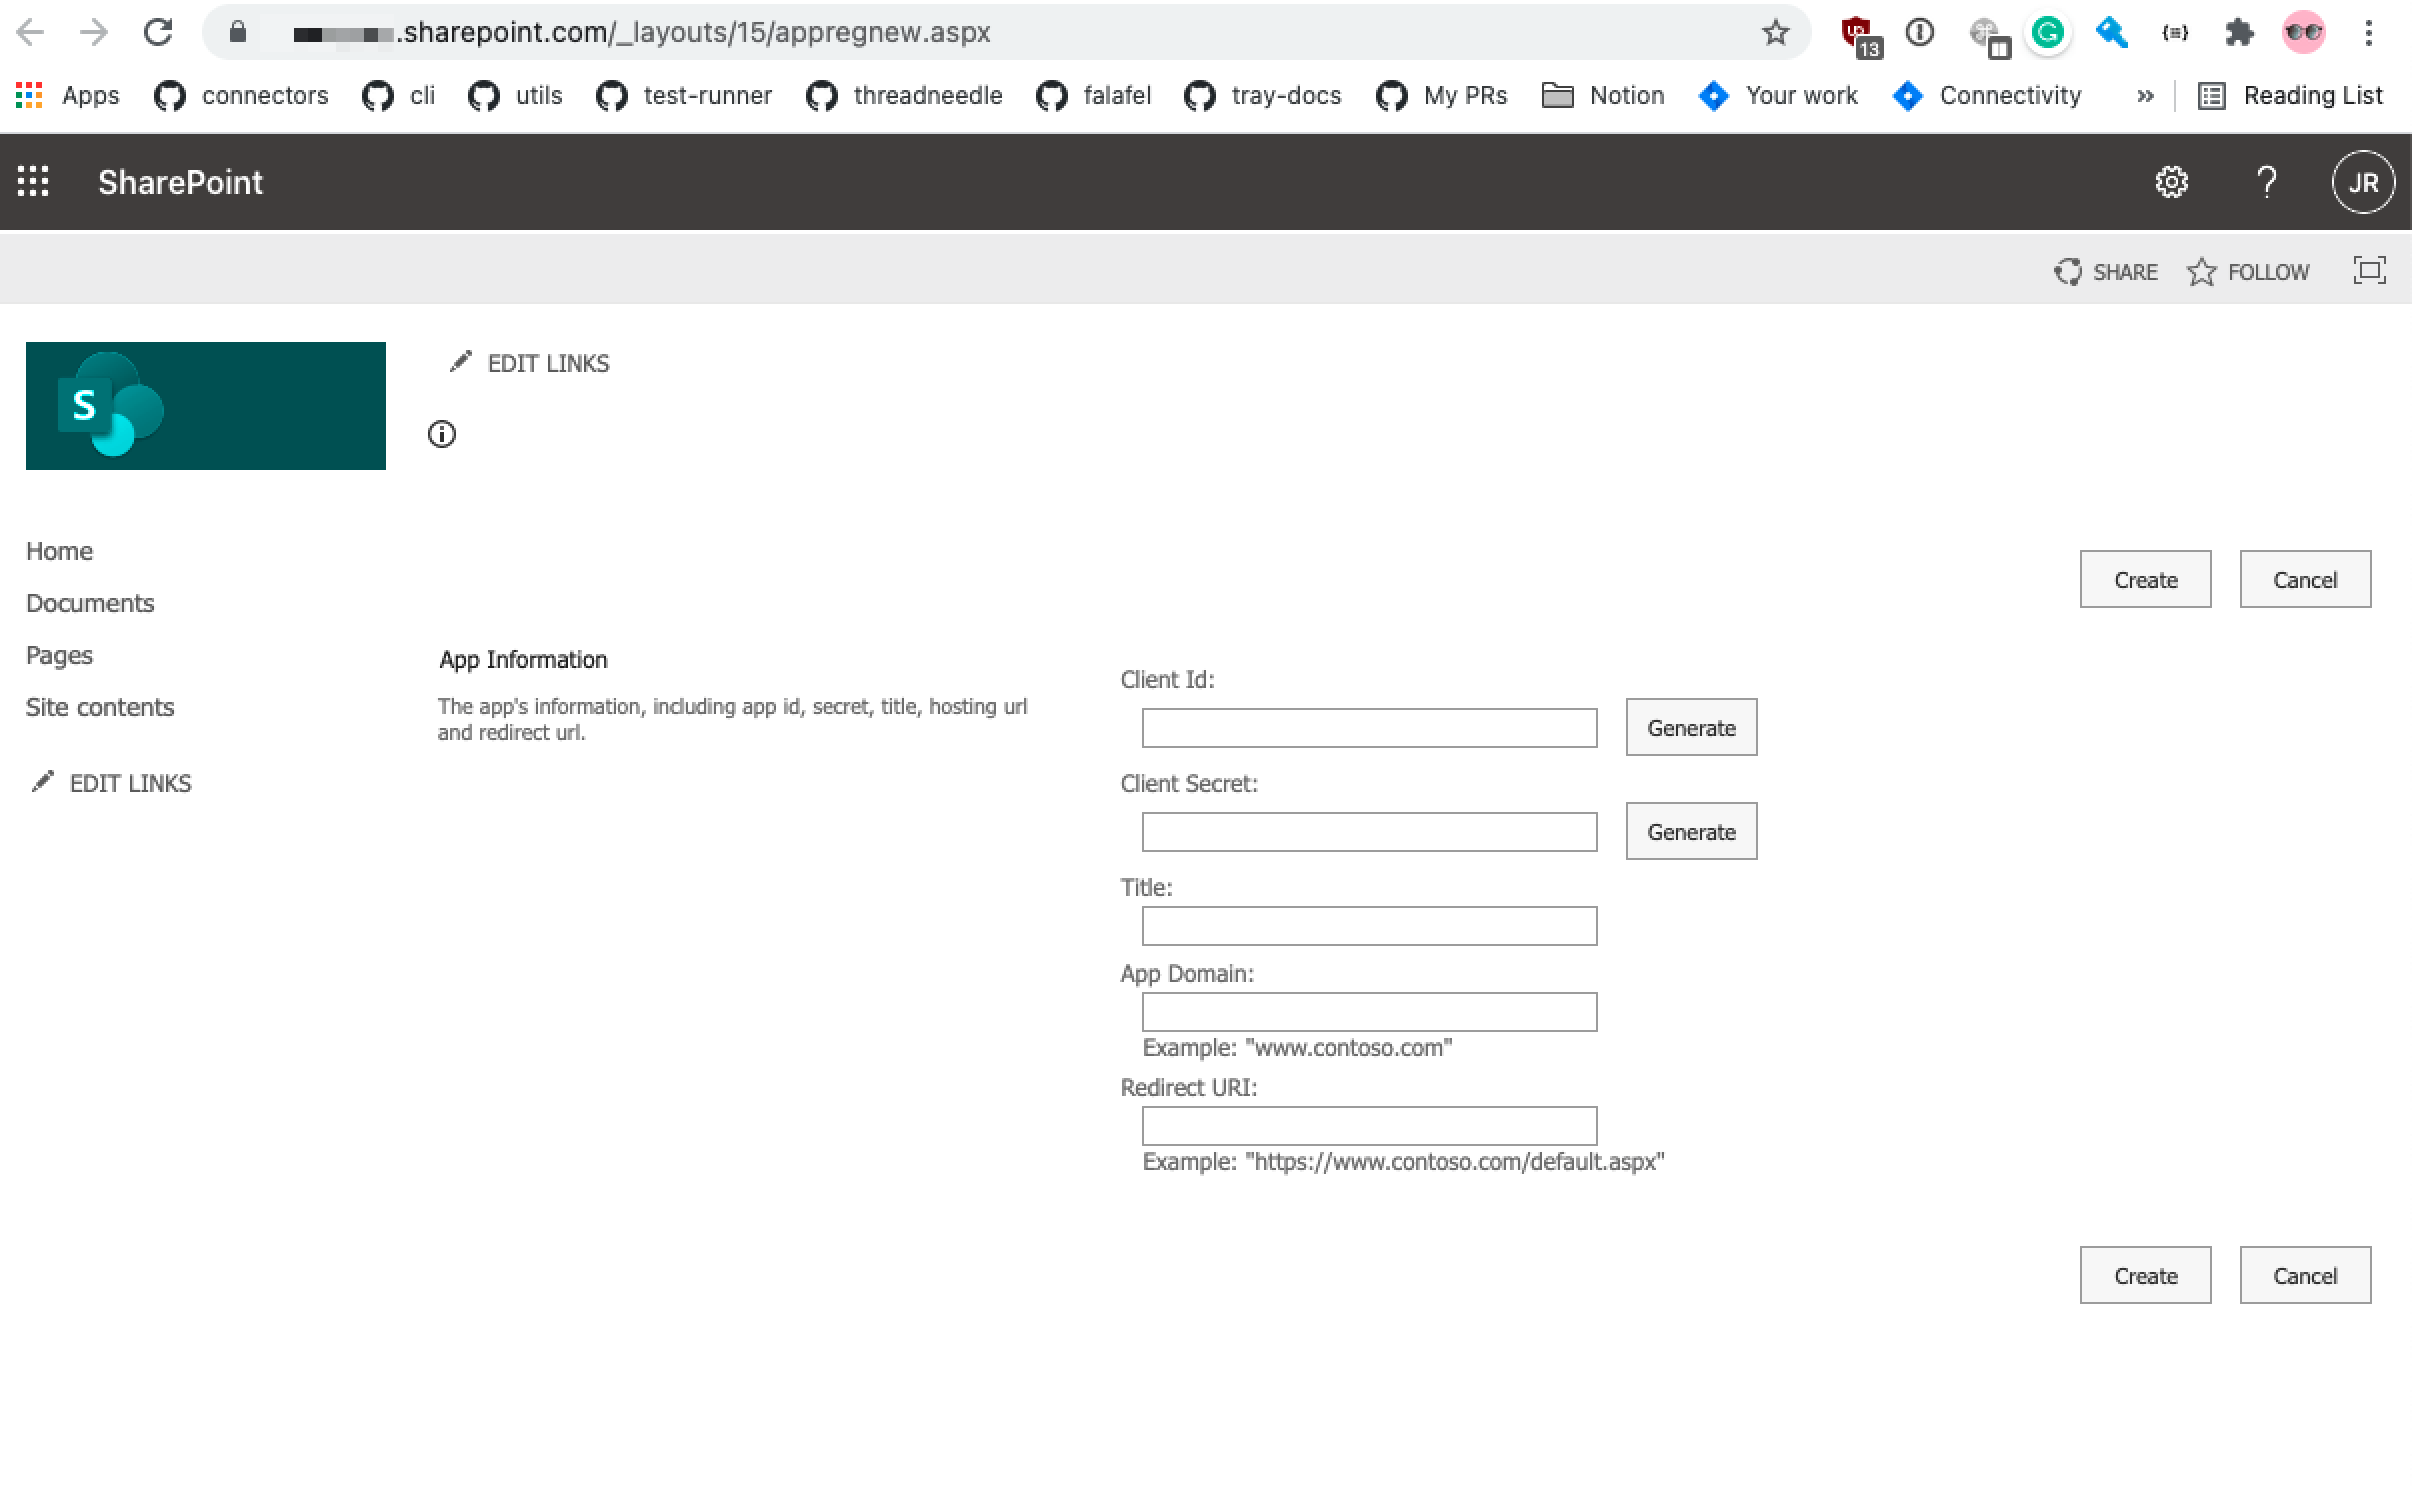
Fill in the required fields as explained below:
**Client Id**: The 'Client Id' can be generated using the 'Generate' button beside the 'Client Id' field.
**Client secret**: You can generate the 'Client secret' using the 'Generate' button beside the 'Client Secret' field. The newly generated client secret should look similar to this: `xvVpG0AgVIJfch6ldu4dLUlcZyysmGqBRbpFDu6AfJw=`.
**Title**: A user-friendly title for the application, for example, `Contoso photo printing add-in`. Users are prompted to grant or deny the permissions the add-in is requesting. This title appears as the name of the add-in on the consent prompt.
**App domain**: The add-in domain must match the URL bindings you use for your web application. Do not include protocol `https:` or `/` characters in this value.
**Redirect URI**: The redirect URI needs to be `https://auth.tray.io/oauth2/token`.
Once you have added all the information, click on the 'Create button'.
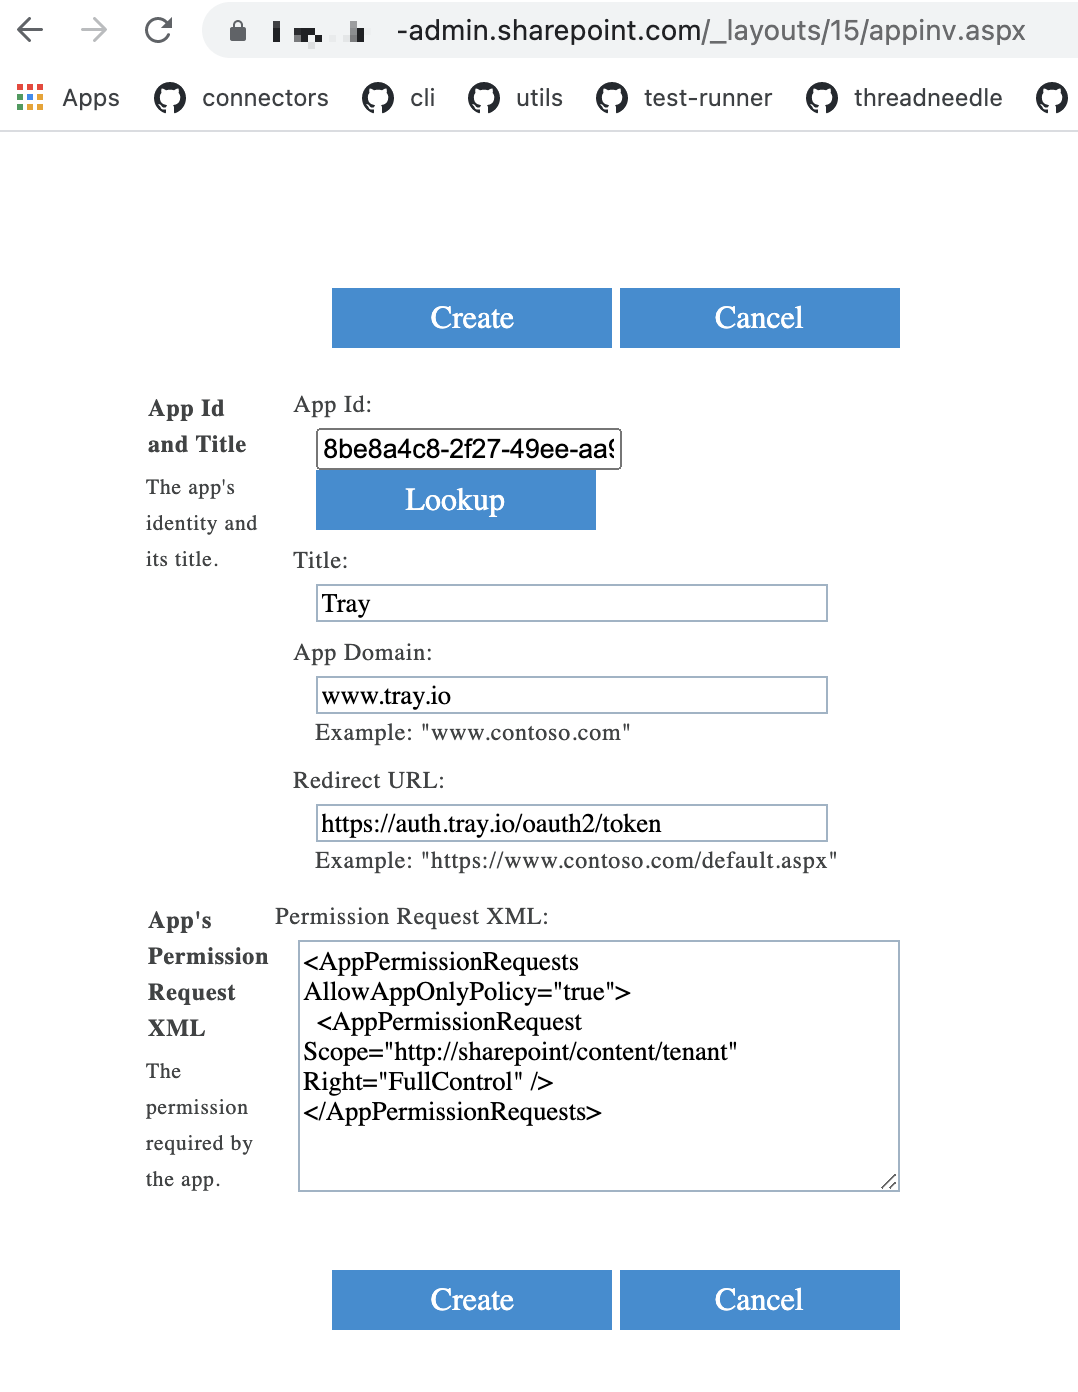
Now the next step is to grant permissions to the newly created app by going to:
`https://[TENANT-NAME]-admin.sharepoint.com/_layouts/15/appinv.aspx`
> **Warning:** **IMPORTANT!**: The link that you have may not contain the 'admin' keyword as
> you can see in the above link. The link won't work without the admin keyword
> So, do not forget to add the `admin` keyword after your tenant name.
Once you are redirected using the above link, to add the permissions, provide the 'App Id' that you have just created.
Once done, click on the 'Lookup' button. It will autoload all the information for the below fields except the permissions.
Add the permissions based on your need. To learn about the permissions refer to the [Granting access using SharePoint](https://docs.microsoft.com/en-us/sharepoint/dev/solution-guidance/security-apponly-azureacs) document.
Once you have added these fields to your Tray authentication pop-up window, click the 'Create authentication' button.
Go back to your settings authentication field (within the workflow builder properties panel), and select the recently added authentication from the dropdown options now available.
Your connector authentication setup should now be complete.
### Version 2.3 and earlier
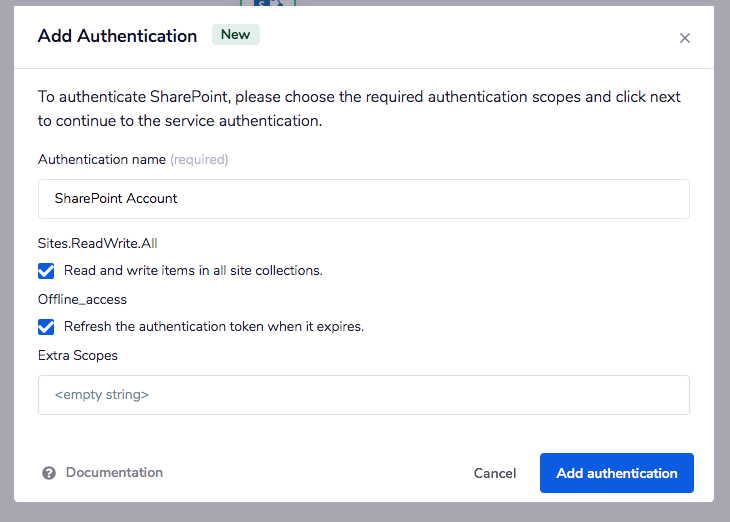
Authentication for the Sharepoint connector version 2.3 and earlier is done through a simple OAuth2 login process.
After clicking `Add authentication`, you will be redirected to Sharepoint's login screen.
## Available Operations
The examples below show one or two of the available connector operations in use.
Please see the [Full Operations Reference](#operationsFull) at the end of this page for details on all available operations for this connector.
## Notes on using SharePoint
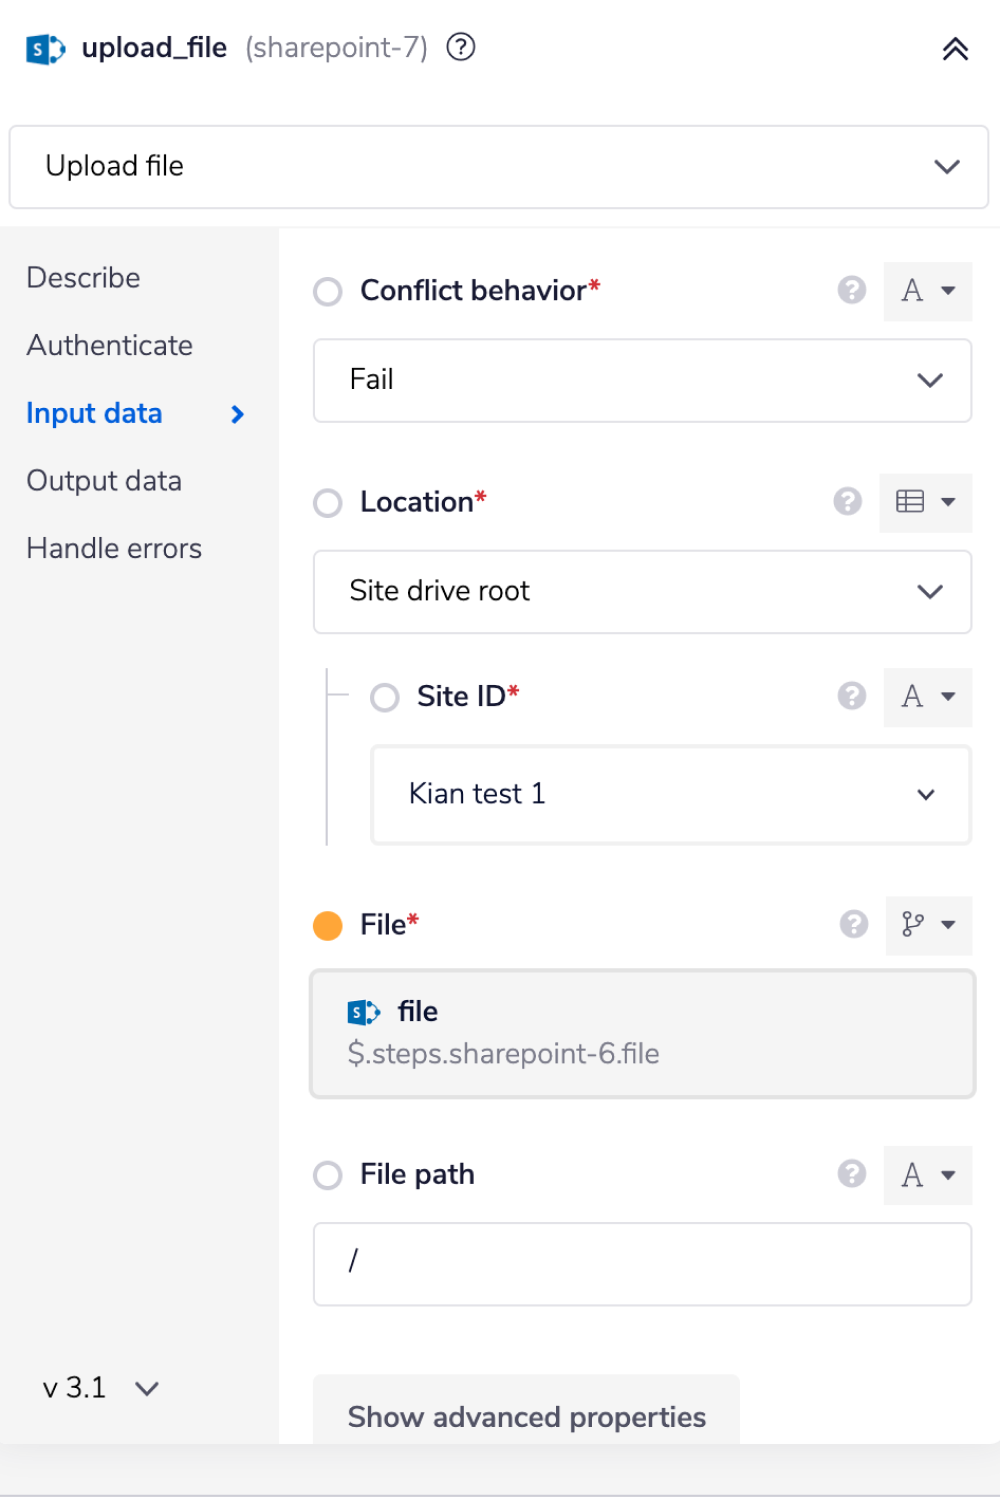
### Upload File
The 'Upload file' operation can be used to create new files or update existing files.
To upload a file, the operation needs the following information.
* **Conflict behavior:** The first input tells the workflow how to deal with conflicts. Conflicts happen when a file with a certain name already exists. The default behavior is to `Fail` the operation to avoid overwriting the existing file.
If you do not want to overwrite the file but still want to upload the file, you can select the `Rename` option from the drop-down. This option will rename the file in the destination, usually by appending a number to the filename.
The last option is to overwrite the file. To overwrite the file, select the `Replace` option from the drop-down.
* **Location:** The second is the location of the file. This can be anything from the provided options. Such as in the root directory of a site drive, or relative to an item in a site drive, such as a folder. Select appropriate value based on your situation.
* **File:** The third input is the file itself. The input value for this field is mostly a jsonpath for the file from the previous connector or helpers such as `File helpers`.
* **File path:** The last input is a file path. This path will be set relative to the location, so if you choose a site drive as the location, this file path will be relative to that.
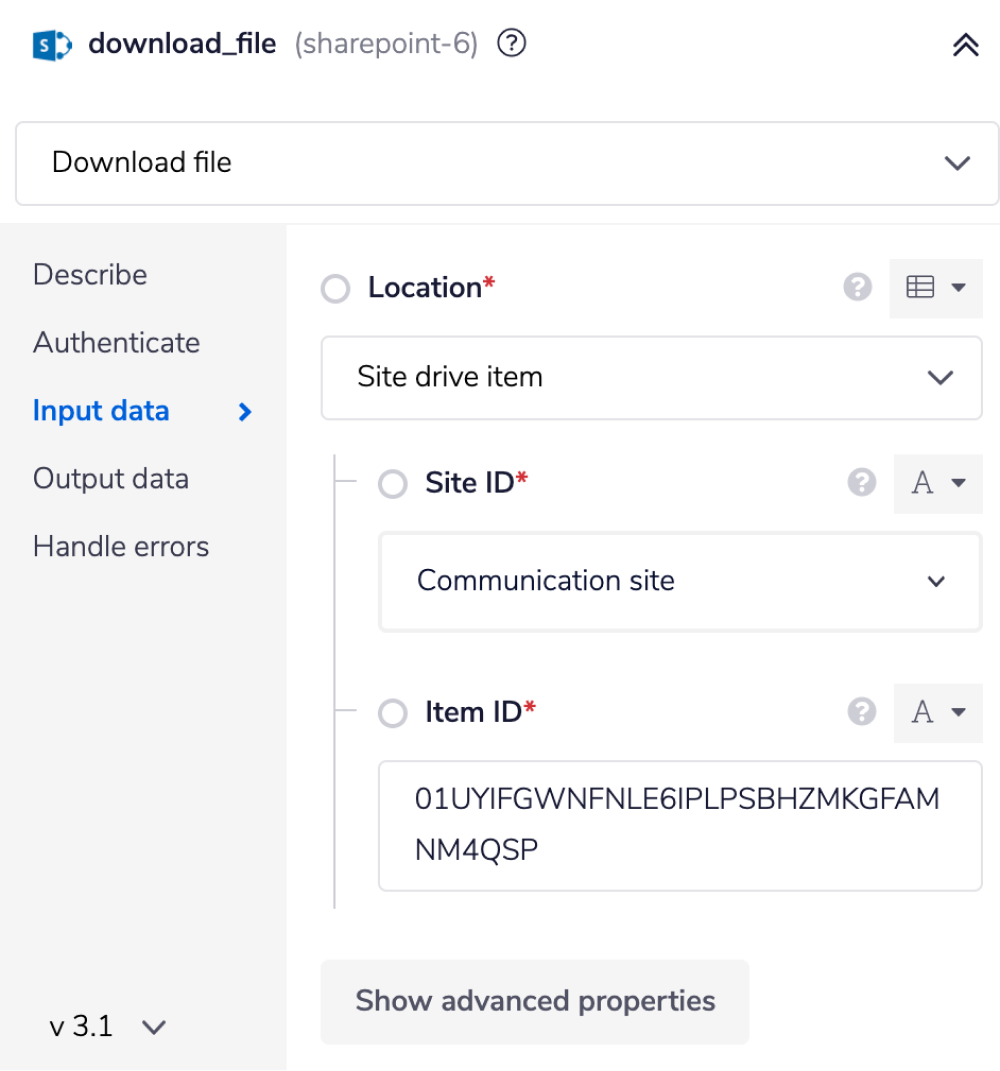
### Download file
The download file operation takes in the location of a drive item. This can be a file in either a OneDrive, or a Sharepoint site drive.
## Using the Raw HTTP Request ('Universal Operation')
As of **version 5.0**, the connector uses Microsoft Graph API v1.0. You can create custom operations for endpoints not covered by the standard operations.
To use this feature, research the endpoint in the [Microsoft Graph SharePoint API documentation](https://learn.microsoft.com/en-us/graph/api/resources/sharepoint?view=graph-rest-1.0) to find the exact format required.
Note that you only need to add the suffix to the endpoint, as the base URL is automatically set. The base URL for SharePoint version 5.0+ is: `https://graph.microsoft.com/v1.0/`
> **Warning:** **Version History**: Prior to version 5.0, the connector used SharePoint REST API v2.0 with base URL `https://[TENANT-NAME].sharepoint.com/_api`. Version 5.0 migrated to Microsoft Graph API v1.0.
For example, to use the Microsoft Graph Sites endpoint, you would reference the [Sites API documentation](https://learn.microsoft.com/en-us/graph/api/resources/site?view=graph-rest-1.0). To list sites, use a `GET` request with endpoint: `/sites`.
Method: `GET`
Endpoint: `/sites`
Query Parameter: Key: `search` Value: `Communication site`
This would result in: ** site**
## Migration Guide
### Breaking Changes in Version 5.0
Version 5.0 includes breaking changes that require immediate action for all existing workflows.
### What Changed
**Authentication**
* **Removed**: Tenant ID / Tenant Name parameter no longer required or accepted
* **Changed**: OAuth scopes changed from SharePoint API scopes to Microsoft Graph API Sites scopes
* **Changed**: Base URL changed from `https://[tenant].sharepoint.com/_api` to `https://graph.microsoft.com/v1.0/`
**API Migration**
* Migrated from SharePoint REST API v2.0 to Microsoft Graph API v1.0
* All operations now use Microsoft Graph API endpoints
### Migration Steps
Follow these steps to migrate your workflows from version 4.x or earlier to version 5.0:
1. **Create New Authentication**
* Navigate to the SharePoint connector in your workflow
* Create a new authentication using the [Version 5.0+ method](#version-5-0)
* Note: The Tenant ID field is no longer present in the authentication form
* Configure Microsoft Graph API Sites scopes as documented above
2. **Update All Workflows**
* Replace the old authentication with the new authentication in all workflows using the SharePoint connector
* Each workflow must be updated individually
3. **Test Workflows**
* Run a test execution of each updated workflow
* Verify that operations complete successfully
* Confirm data is retrieved as expected
4. **Timeline**
* Microsoft has deprecated SharePoint REST API v2.0
* No hard cutoff date has been announced, but migration is strongly recommended
* Old authentication methods will stop working when Microsoft fully deprecates the SharePoint REST API
### Getting Help
If you encounter issues during migration, contact Tray.io support with:
* Your workflow name
* The specific operation causing issues
* Any error messages received