# Tray Documentation — Developer bundle
> All developer documentation pages concatenated in navigation order. Each page is preceded by a horizontal rule, its title as an H1, and a Source URL. Per-page markdown is also individually fetchable at the Source URLs.
---
# Introduction
Source: https://tray.ai/documentation/developer/getting-started/introduction.md
Tray's APIs give you direct programmatic access to the power of Tray's connectors and auth creation / storage tools.
The following APIs are available:
* **Auths API** for creating, retrieving and deleting **authentications** for particular services
* **Connectors API** for calling **individual operations** for particular service connectors
* **Users API (GraphQL)** for managing the **end users** of your Tray powered integrations
Some use cases include:
* **Using connectors and their operations** to power your integrations
* **Building your own workflow engine** similar to the Tray builder
* **Storing authentications** which can be re-used in **multiple Tray integrations**, negating the need to request auths from End Users more than once
* **Calling authentications** to be used in external (i.e. non-Tray) integrations
* **Simple transfer of existing authentications** into Tray, to facilate transfer of your integrations
This documentation will take you through the end-to-end processes of managing your End Users and integrations - from creating users and authentications, to presenting connector operations and making validated calls to the services involved in your integrations.
## Building integrations
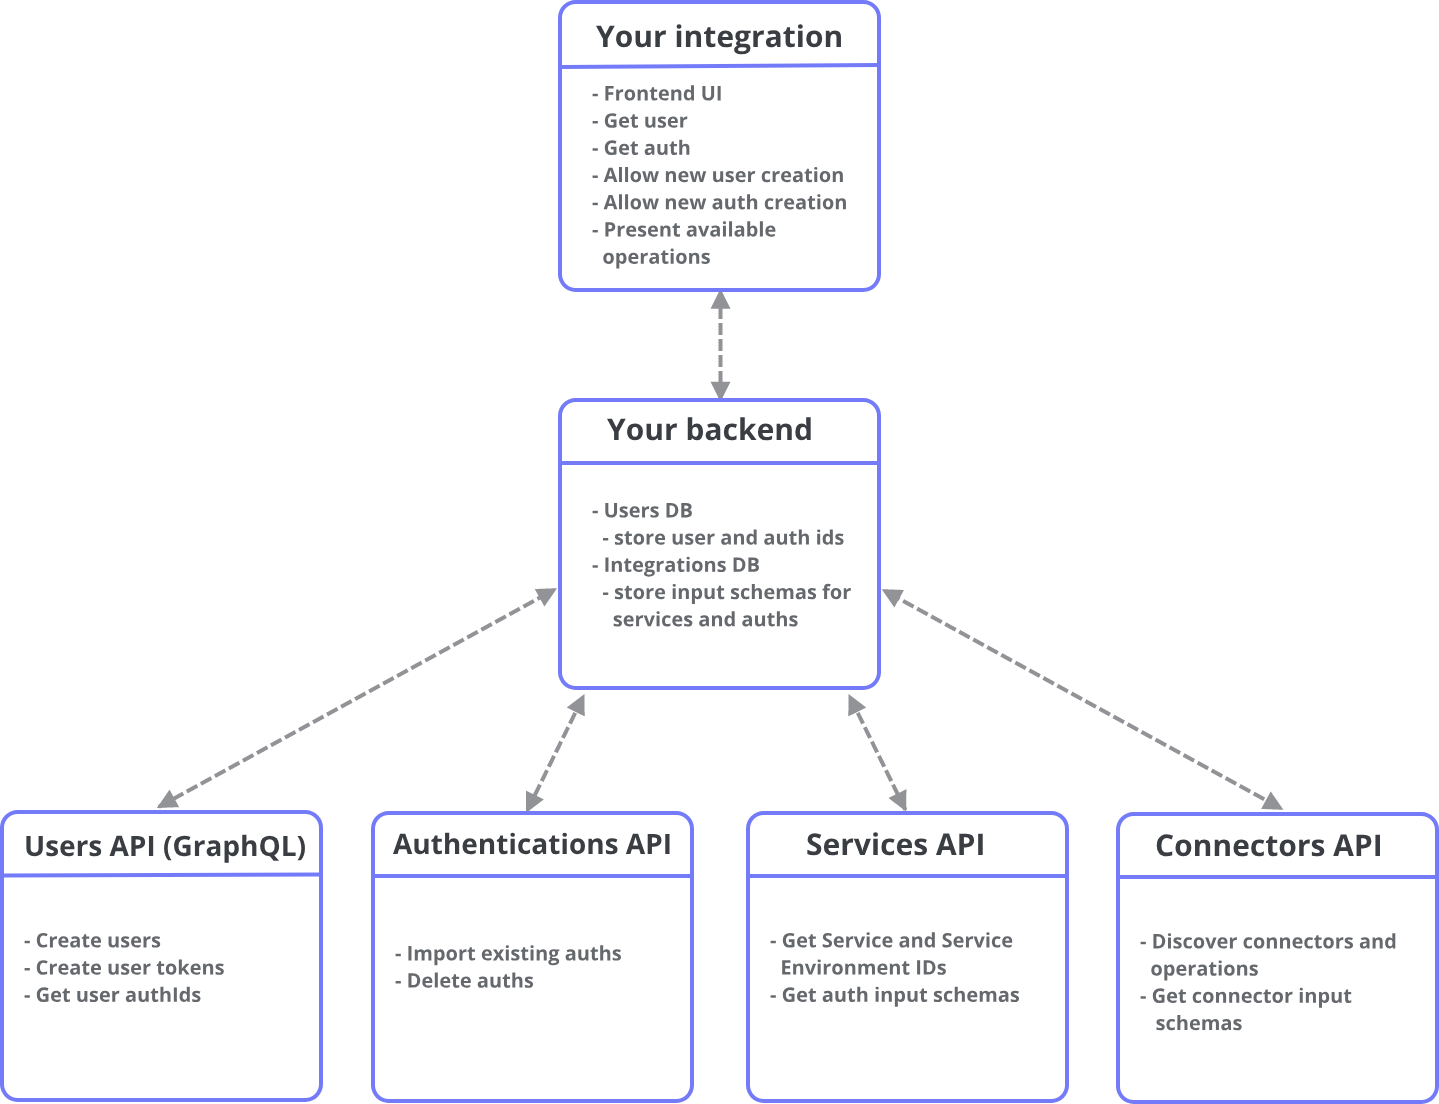
The following diagram is a simple overview of how you can use our APIs to build a backend which can serve your integrations.
For more details, please see our ['Building integrations' guidance on storing users and integrations](https://tray.ai/documentation/developer/getting-started/building-integrations/storing-users-and-integrations/):
## Calling connectors
Ultimately, building an integration is about calling connectors.
The following diagram illustrates the basic process:

## Quick start
To get you started as quickly as possible, we recommend you make use of our [Form Builder demo app](https://tray.ai/documentation/developer/developer-tools/connector-tester)
This will allow you to connect to your Embedded account, create some auths and start playing with the connectors and operations you have access to.
It gives you insight into how 3rd party calls are made and what responses to expect.
Our [Building a UI form tutorial](https://tray.ai/documentation/developer/getting-started/tutorials/building-a-ui-form/) then gives a breakdown of how this app was built, and will help you get started on building your own integration!
---
# Master and user tokens
Source: https://tray.ai/documentation/developer/getting-started/prerequisites/master-and-user-tokens.md
> **All endpoints require either a master token or a user token passed as a bearer.** When using a Master token, **you are the one taking actions** (getting connectors, getting operation schemas etc.).When using a user token, **your end users are performing the actions** (creating an auth, calling a connector etc.)
User tokens are generated using the [Create User token mutation](https://tray.ai/documentation/developer/embedded-apis/users#graphql-create-user-token)
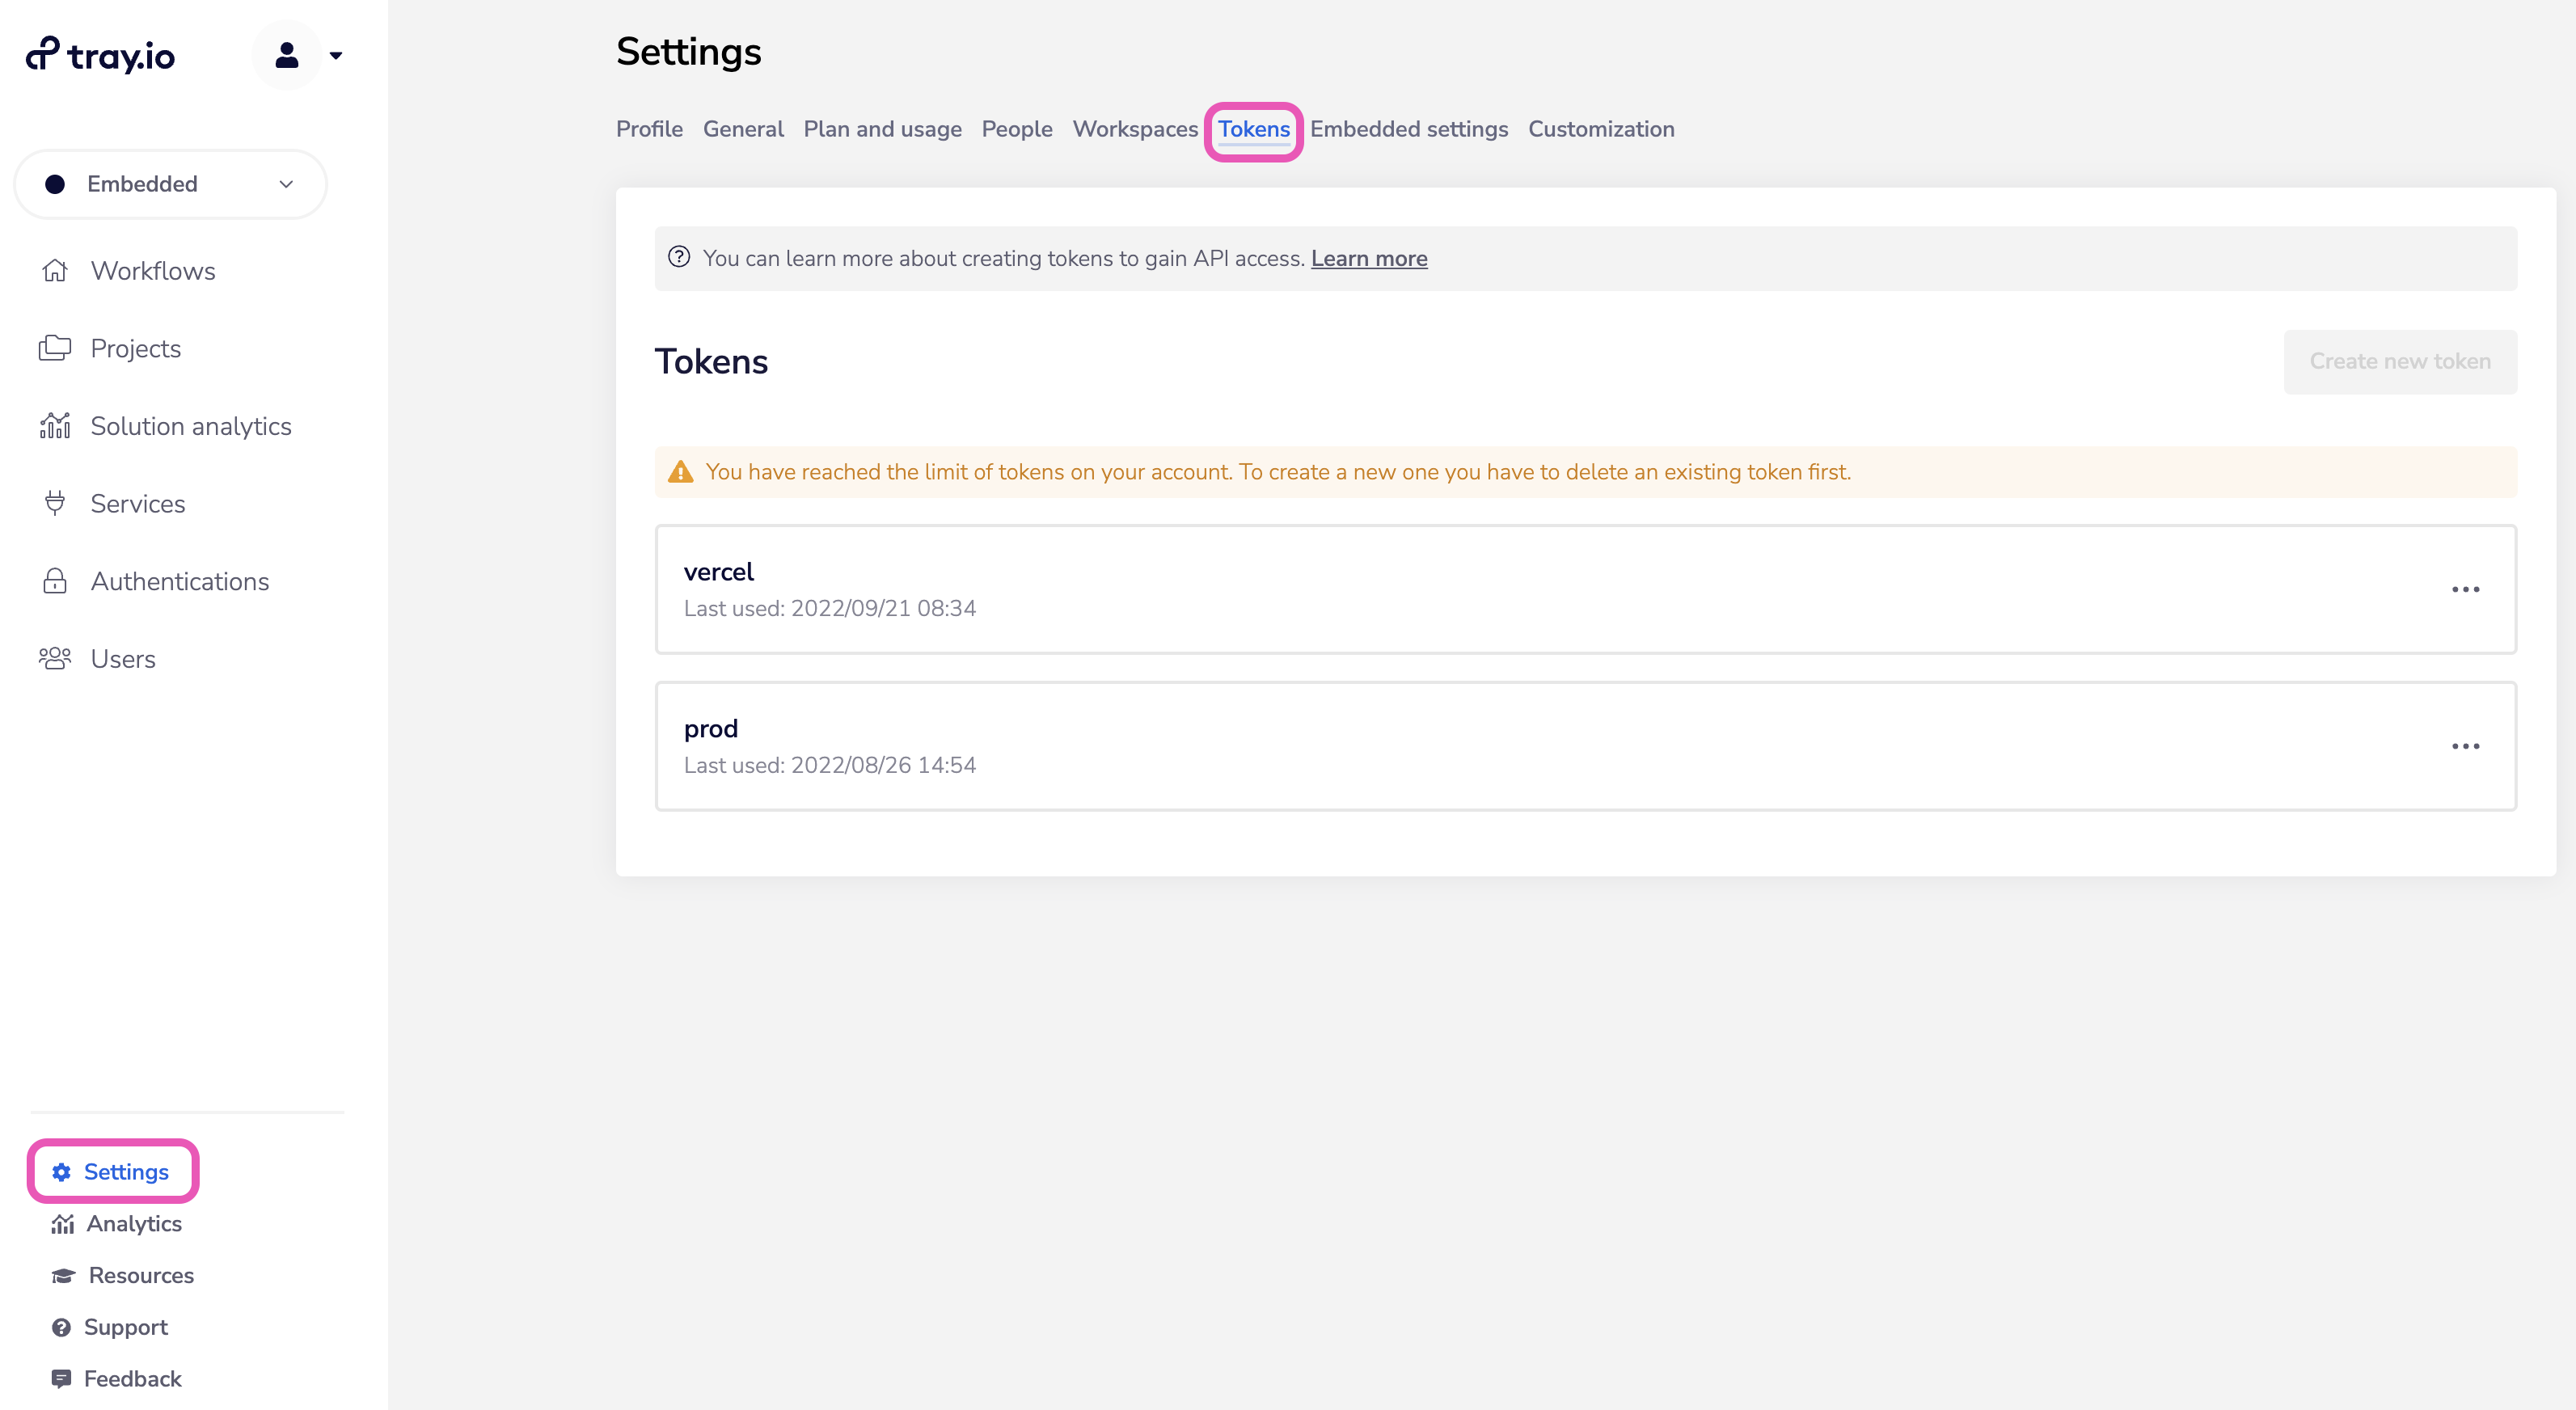
Your master token is generated in the Tokens section under Settings in your dashboard (requires Tray Embededd admin/owner access):
The following table gives a breakdown of what tokens are used for the various API endpoints:
| S.No. | In-App Operation | Trigger (When is the API operation called) | Token |
| ----- | ---------------------------- | ---------------------------------------------- | ------------ |
| 1 | GET existing end-users | App user lands on the page | master-token |
| 2 | Create new end-user | User fills the form to create new user | master-token |
| 3 | Create end-user token | User selects an end user | master-token |
| 4 | GET end user authentications | User selects an end user | user-token |
| 5 | GET connectors | User lands up on the page | master-token |
| 6 | GET connector operations | User selects the connector and version | user-token |
| 7 | Create new auth | User clicks on the button to ‘create new auth’ | master-token |
| 8 | Call connector | User hits the form submit | user-token |
---
# Whitelabelling with Custom OAuth apps
Source: https://tray.ai/documentation/developer/getting-started/prerequisites/custom-oauth-apps.md
When building integrations with Tray's API, you will need to authenticate your End Users with the service connectors involved.
This can be done by:
* **Importing existing authentications** (using the [Create User authentication (user token)](https://tray.ai/documentation/developer/platform-apis/authentications#endpoint-create-user-authentication) endpoint)
* **Prompting End Users to create new authentications** with the auth-only dialog
By default the **auth-only dialog URL** will begin with:
* `https://embedded.tray.io` (US region)
* `https://embedded.eu1.tray.io` (EU region)
With our whitelabelling option you can use a wildcarded domain:
* `*.integration-authentication.com` (US region)
* `*.eu1.integration-authentication.com` (EU region)
## Creating Custom OAuth apps
In order to create a Custom OAuth app you will have to:
1. Create it in the **3rd-party UI** (Salesforce, Mailchimp, Zendesk etc.)
2. Log in to the **Tray builder** at to set up your app as a 'Service Environment' for the service connector in question
A detailed breakdown of the steps involved in creating a Custom OAuth app is:
### 1 - Create an OAuth app in the 3rd party UI
Create the OAuth app (in e.g. Salesforce, Mailchimp, Zendesk etc.):
* Give it a name
* Include your company logo
* Set the main redirect / callback url to the default - `https://auth.tray.io/oauth2/token` (US) or `https://auth.eu1.tray.io/oauth2/token` (EU)
* Set a second redirect / callback url as e.g. `https://acme.integration-authentication.com/oauth2/token` (US) `https://acme.eu1.integration-authentication.com/oauth2/token` (EU) (if the service supports entering multiple urls)
* Retrieve Client ID, Client Secret etc. to use in step 2
> **Some services do not allow adding two redirect urls.** Please see our for info on how to deal with this.
### 2 - Create an OAuth app in Tray
You will then need to create a Tray workflow and add a connector step for the service in question.
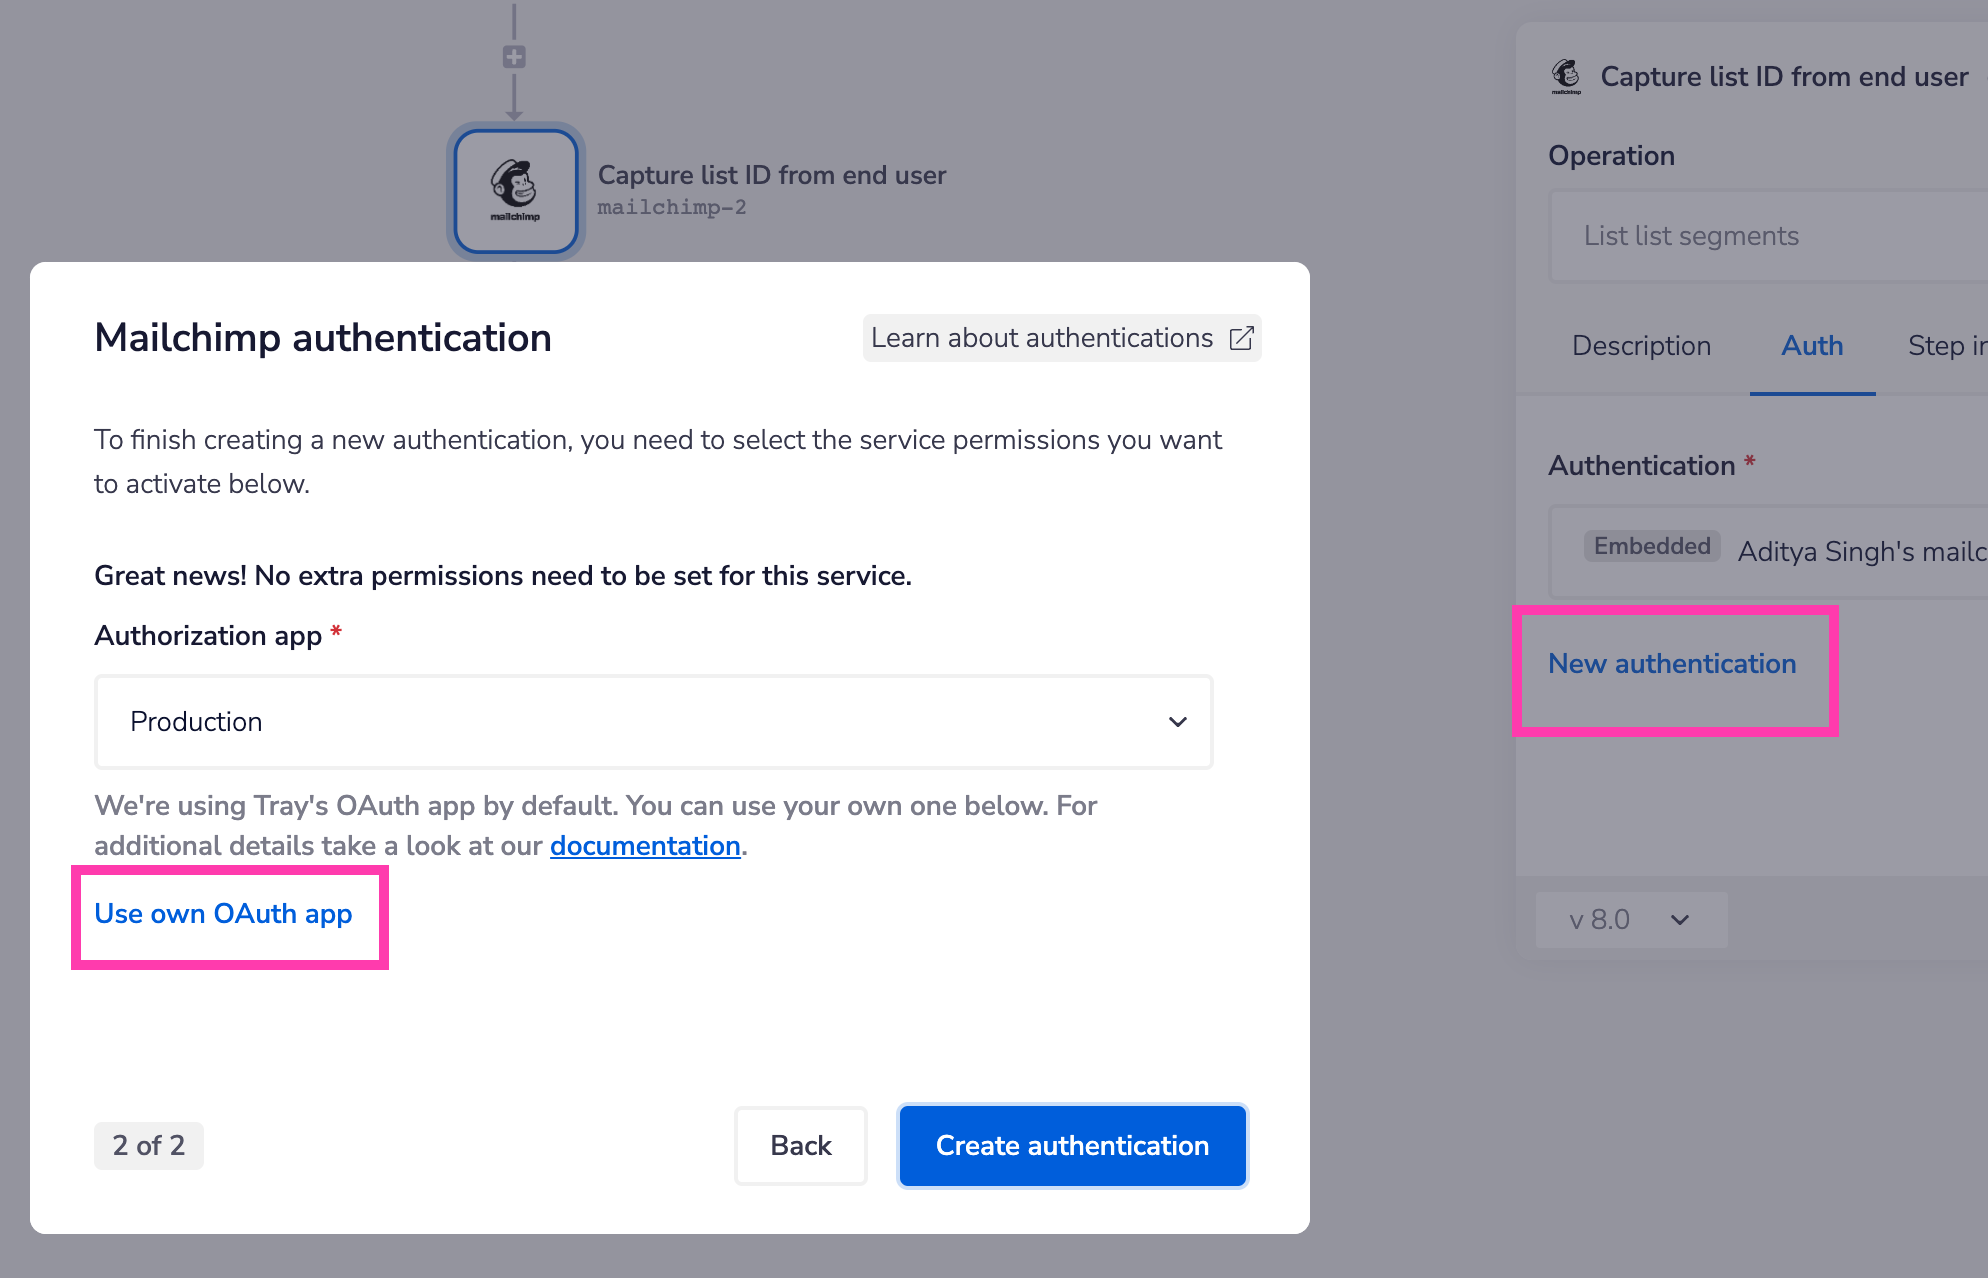
Then create a new authentication for it and, in the auth dialog, click 'Use own OAuth app' and enter your app details (typically you will have to enter the Client ID and Client Secret retrieved from step 1 here):
> **The scopes that you select when creating this auth will be the scopes that are available for your End Users to choose from.**
### 3 - Get Service Environment
Any custom auth apps you create will then have a **serviceId** which can be retrieved using the [Get service environments endpoint](https://tray.ai/documentation/developer/platform-apis/authentications#endpoint-get-service-environments)
```json
{
"elements": [
{
"id": "474a0059-xxxx-xxxx-xxxx-06f090088d70",
"title": "Production",
"authenticationType": "oauth2",
"userDataSchema": {...},
"credentialsSchema": {...},
"scopes": [...]
},
{
"id": "634dadf7-xxxx-xxxx-xxxx-446233ac09e9",
"title": "Acme mailchimp custom OAuth app",
"authenticationType": "oauth2",
"userDataSchema": {...},
"credentialsSchema": {...},
"scopes": [...]
}
]
}
```
> **Attention:** Please also see individual service connector pages for specific notes and guidance on creating auth apps for those services.
---
# Storing users and integrations
Source: https://tray.ai/documentation/developer/getting-started/building-integrations/storing-users-and-integrations.md
For your integrations you will need to manage:
* **Users and their authentications**
* **The connectors, operations, input schema and service environments** involved in each integration
Exactly how you manage these will of course be up to you, and there will be specific approaches you will take depending on your use case.
However we **generally recommend that you create databases on your own infrastructure** to manage your users and integrations, for the following reasons:
* Tray’s **connectors and operations are regularly updated** as and when the underlying third-party API changes.
* Storing the **input schema for the individual operations your integration makes use of** gives you complete control over the UI form presented to your End Users
* A **user model** is needed to store the Tray user IDs and details of integrations configured by an End User in order to show them their list of configured integrations when they log in to your service
* Your UI **would be much slower if you were to make an API call for every End User interaction**.
* For scalable solutions, **relying only on APIs could cause latency issues**. A caching system can go a long way toward improving UX.
## User database
The following simple visual gives an overview of how you might store users and their auths:
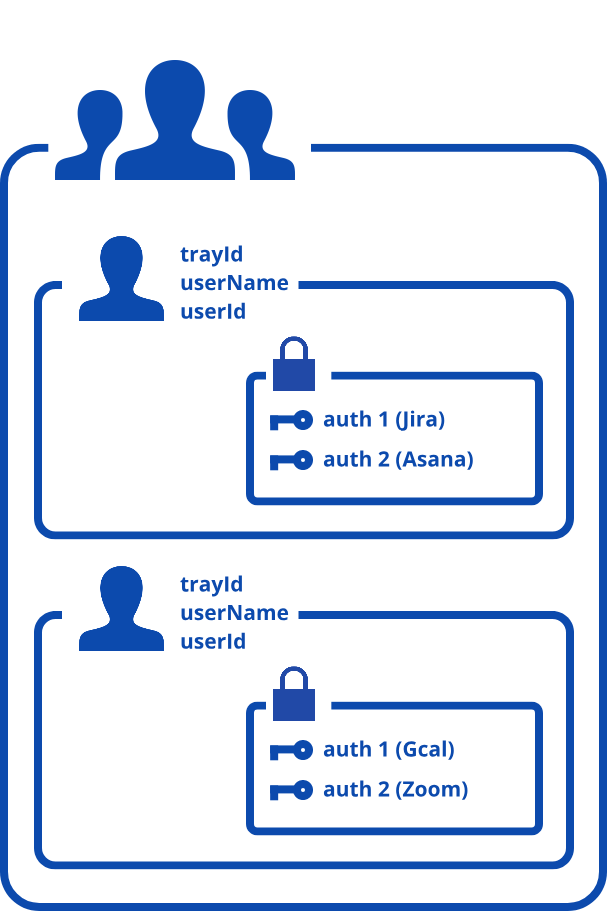
For each user you could store the following details:
* Tray `userId` (returned by Create User mutation)
* `externalUserId` (pass as an input in Create User mutation to link user to your external db)
* Tray user `name`
And for each of their auths:
* `name`
* `authId`
* Service Environment `title` (e.g. Zoom Custom OAuth app)
* `serviceEnvironmentId`
So, in json format, a sample users database might look like this:
> **This is an example of what you might store in your own infrastructure, therefore the exact names of fields (e.g. \`trayID\` or \`userName\`) is up to you!**
> **Info:** Remember that, when creating users in Tray with [Create new user](https://tray.ai/documentation/developer/embedded-apis/users#graphql-create-user) (Embedded GraphQL mutation), you will need to specify an `externalId` which links the user to their entry in your own db. In the below example this is represented by `userId` (this could be anything you wish - UUID, email address etc.)
```json
{
"users": [
{
"trayId": "d869ec65-XXXX-XXXX-XXXX-ac5c1a3958b6",
"userId": "23r8h29f",
"userName": "Elmer Fudd",
"authentications": [
{
"serviceEnvironmentId": "e6bc22a4-xxxx-xxxx-xxxx-828d6627aeea",
"serviceEnvironmentTitle": "Acme Jira Custom OAuth app",
"name": "Elmer Fudd Jira auth",
"authId": "5eae2edb-xxxx-xxxx-xxxx-8dd913036b7a"
},
{
"serviceEnvironmentId": "23f83f3e-xxxx-xxxx-xxxx-3498g384g43g",
"serviceEnvironmentTitle": "Acme Asana Custom OAuth app",
"name": "Elmer Fudd Asana auth",
"authId": "27wdf-xxxx-xxxx-xxxx-f9384hf34f8as5"
}
]
},
{
"trayId": "d83325-XXXX-XXXX-XXXX-ac3f23f2r8b6",
"userId": "23f923ff",
"userName": "Bugs Bunny",
"authentications": [
{
"serviceEnvironmentId": "e6bc22a4-xxxx-xxxx-xxxx-828d6627aeea",
"serviceEnvironmentTitle": "Acme Jira Custom OAuth app",
"name": "Bugs Bunny Jira auth",
"authId": "5e23e23e-xxxx-xxxx-xxxx-ef9393hef6b7a"
},
{
"serviceEnvironmentId": "23f83f3e-xxxx-xxxx-xxxx-3498g384g43g",
"serviceEnvironmentTitle": "Acme Asana Custom OAuth app",
"name": "Bugs Bunny Asana auth",
"authId": "23r23r3-xxxx-xxxx-xxxx-f9384hf34f8as5"
}
]
}
]
}
```
## Integrations database
The following simple visual gives an overview of how you might store your integrations:
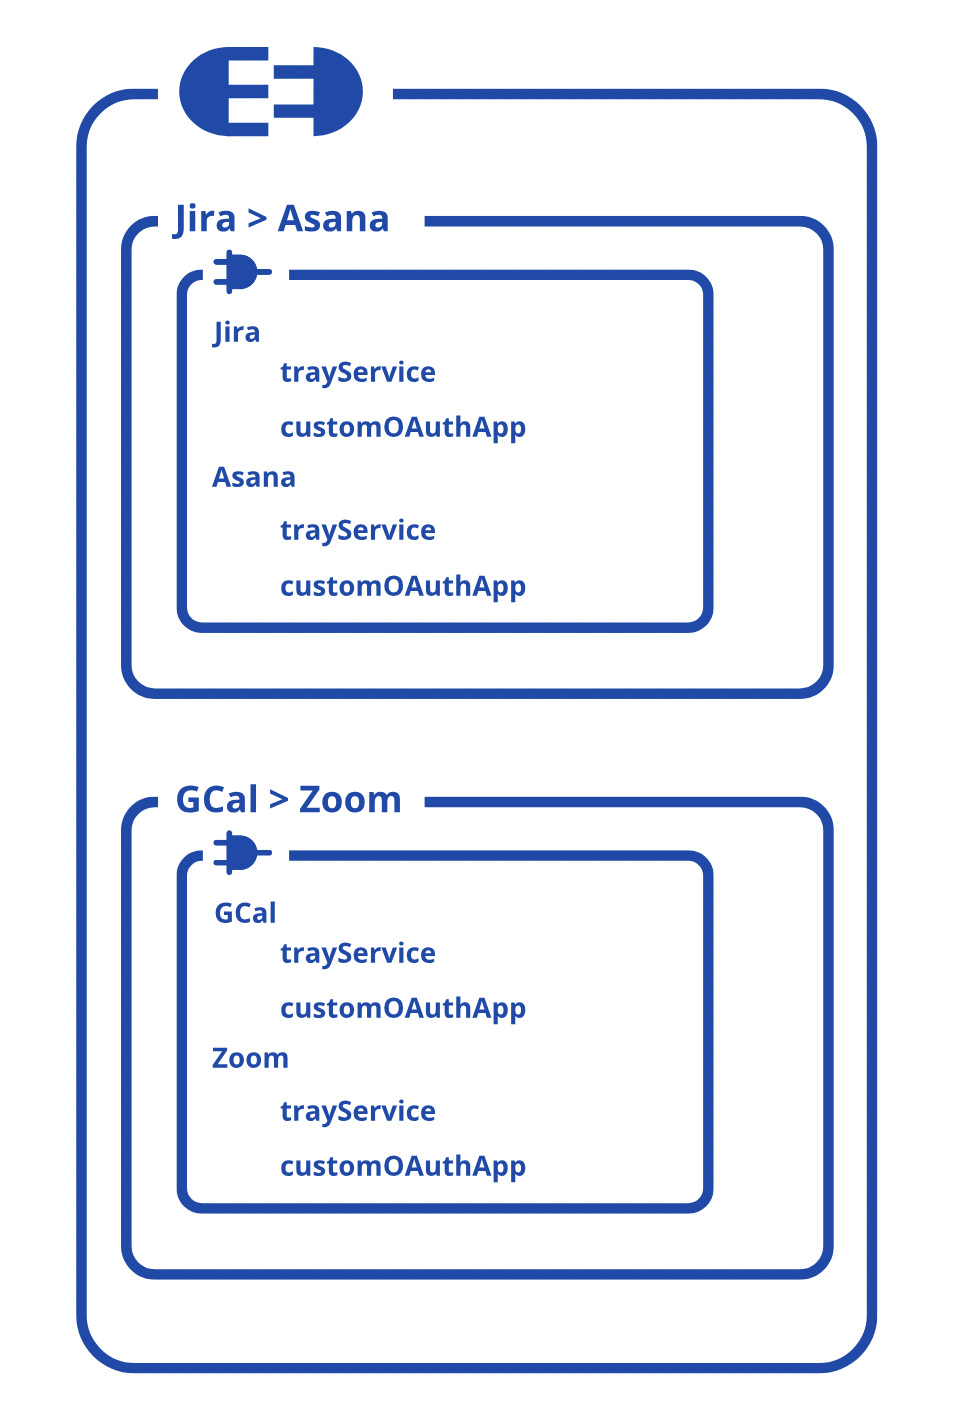
For each connector in your integration, you might want to store:
* Details of the Tray Service
* The auth input schemas of your [Custom OAuth app](https://tray.ai/documentation/developer/getting-started/prerequisites/custom-oauth-apps/)
Both of the above are obtained using the [Get service environments endpoint](https://tray.ai/documentation/developer/platform-apis/authentications#endpoint-get-service-environments)
So, in json format, a sample integrations database might look like this:
> **This is an example of what you might store in your own infrastructure, therefore the exact names of fields (e.g. \`trayService\` or \`customOAuthApp\`) is up to you!**
```json
{
"integrations": [
{
"name": "Jira tasks to Asana",
"connectors": [
{
"name": "jira-cloud",
"version": "2.0",
"trayService": {
"id": "6c9a3924-xxxx-xxxx-xxxx-9765d1b635d9",
"name": "jira-cloud",
"version": 1
},
"customOAuthApp": {
"id": "634dadf7-xxxx-xxxx-xxxx-446233ac09e9",
"title": "Acme Jira Custom OAuth app",
"userDataSchema": {...},
"credentialsSchema": {...},
"scopes": [...]
},
"operations": ['list_project_issues', 'get_issue']
},
{
"name": "asana",
"version": "4.11",
"trayService": {
"id": "238r923r-xxxx-xxxx-xxxx-23r238935215",
"name": "asana",
"version": 1
},
"customOAuthApp": {
"id": "92323r32-xxxx-xxxx-xxxx-329fj23f093j",
"title": "Acme Asana Custom OAuth app",
"userDataSchema": {...},
"credentialsSchema": {...},
"scopes": [...]
},
"operations": ['update_task']
}
],
"formInputSchema": {
...
}
},
{
"name": "Gcal and Zoom",
"connectors": [
{
"name": "calendar",
"version": "4.0",
"trayService": {
"id": "fcf2d82f-xxxx-xxxx-xxxx-11c01cf1f28c",
"name": "google-calendar",
"version": 2
},
"customOAuthApp": {
"id": "928efh2f-xxxx-xxxx-xxxx-23f823f23",
"title": "Acme GCal Custom OAuth app",
"userDataSchema": {...},
"credentialsSchema": {...},
"scopes": [...]
},
"operations": ['update_event', 'list_events']
},
{
"name": "zoom",
"version": "2.1",
"trayService": {
"id": "44d802b4-xxxx-xxxx-xxxx-80c53f6799eb",
"name": "zoom",
"version": 2
},
"customOAuthApp": {
"id": "839fh2f-xxxx-xxxx-xxxx-09238h33",
"title": "Acme Zoom Custom OAuth app",
"userDataSchema": {...},
"credentialsSchema": {...},
"scopes": [...]
},
"operations": ['create_meeting']
}
],
"formInputSchema": {
...
}
}
]
}
```
---
# The user journey
Source: https://tray.ai/documentation/developer/getting-started/building-integrations/the-user-journey.md
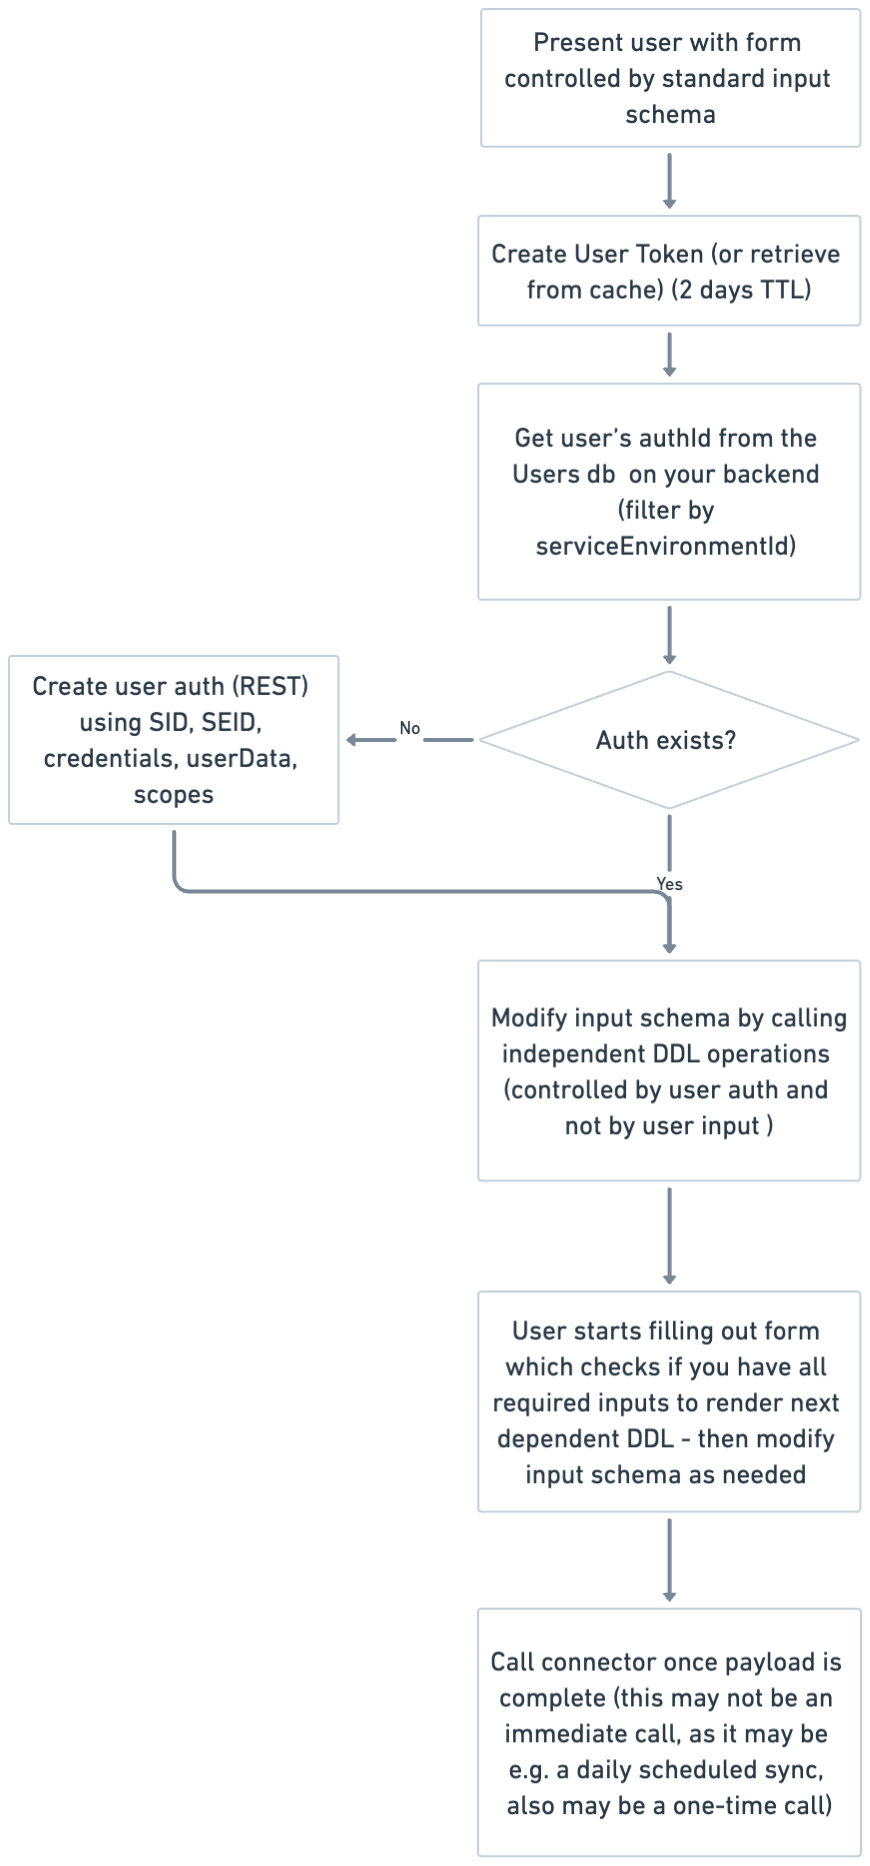
This page will be a detailed breakdown of the following process flow.
It will also link to the [Form builder tutorial](https://tray.ai/documentation/developer/getting-started/tutorials/building-a-ui-form/) which will be deep dive code tutorial on how to build an app which follows this process:
---
# Create users and tokens
Source: https://tray.ai/documentation/developer/getting-started/creating-end-user-auths/create-users-and-tokens.md
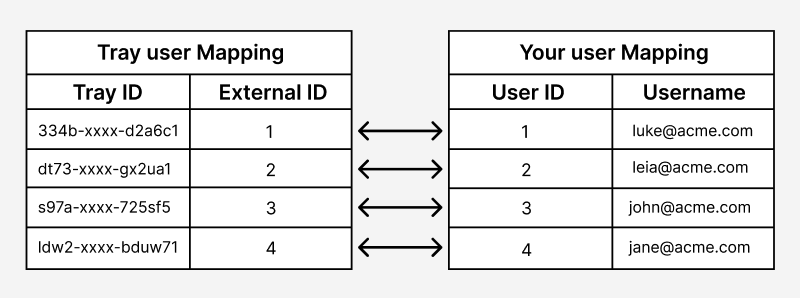
The users of your integrations (end users) need to have corresponding Tray user records so you can attach auths to them and run integrations (call connectors) on their behalf.
This page shows how you can create a user and then their access token (to be used for attaching auths, and calling connectors)
## Creating a user
To create an end user in your Tray org, you have to use the from Users API (GraphQL)
This endpoint accepts an external identifier so you can link the created Tray user with an identifier in your system.
The endpoint returns a userId that will be used to identify the user when using Tray APIs:
```graphql mutation
mutation {
createExternalUser(
input: { name: "Billy Bluehat", externalUserId: "96xxxxxxd7" }
) {
userId
}
}
```
```graphql response
{
"data": {
"createExternalUser": {
"userId": "fbb96559-xxxx-xxxx-xxxx-5552c2d2fca4"
}
}}
```
### User Model
Here's a diagram of how the one-to-one mapping would look between your users and their corresponding Tray user object.
## Create a User access token
Once a user has been created, the from Users API (GraphQL) can be used to generate an access token for the created user.
A master token and the `userId` for the user created in the previous step are used in the request below to obtain the access token.
The access token obtained here will be **valid for 2 days**:
```grahpql mutation
mutation {
authorize(input: {userId: "fbb96559-xxxx-xxxx-xxxx-5552c2d2fca4"}) {
accessToken
}}
```
```response
{
"data": {
"authorize": {
"accessToken": "0c8c8e16e39e4xxxxxxxxxxxxxxxxxxxxxx49545b584e307063710d1ee"
}
}}
```
---
# Create new auths
Source: https://tray.ai/documentation/developer/getting-started/creating-end-user-auths/create-new-auths.md
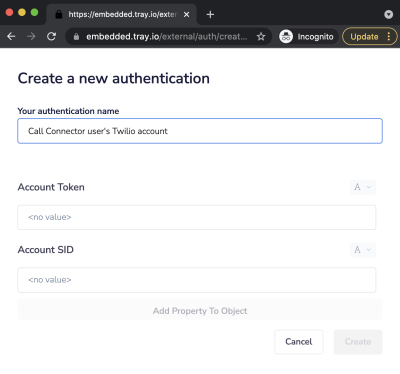
If you need to prompt your End Users to create new auths from scratch, you can make use of Tray's auth-only dialog:
## 1 - Generate an auth code for the End User
In order to open the auth collection dialogue so that the user can provide their authentication details, an authorization code needs to be obtained using the endpoint.
This endpoint requires a master token and the userId created above. The code returned by this endpoint is single-use and expires after 5 minutes:
```graphql mutation
mutation {
generateAuthorizationCode(
input: { userId: "fbb96559-xxxx-xxxx-xxxx-5552c2d2fca4" }
) {
authorizationCode
clientMutationId
}
}
```
```response
{
"data": {
"generateAuthorizationCode": {
"authorizationCode": "b8aab26cxxxxxxxxxxxxxxxxxxxx776c7bba7977",
"clientMutationId": null
}
}}
```
## 2a - Assemble the auth-only dialog URL
You can now assemble the URL that will be passed to your user to collect authentication details for a particular connector:
`https://embedded.tray.io/external/auth/create/{partnerName}?code={authorizationCode}&serviceId={serviceId}&serviceEnvironmentId={serviceEnvironmentId}&scopes[]={scopes}`
> **The 'embedded.tray.io' domain can be white-labeled:** Please see our [page on Custom OAuth apps](https://tray.ai/documentation/developer/getting-started/prerequisites/custom-oauth-apps/) for more info
You will direct your user to a popup window with this URL.
* `partnerName` is the 'Embedded ID' that can be set/viewed in the embedded settings page (seen here)
* `authorizationCode` is the single-use authorization code generated in the previous step
* `serviceId` was retrieved in the 'Get service version and serviceId' step above
* `serviceEnvironmentId` was retrieved in the 'Get serviceEnvironmentId' step above
* `scopes` are the OAuth scopes required to ensure that the necessary permissions are set once the OAuth flow is completed:
* Each scope needs to be passed as an individual parameter, so it should look something like this: `&scopes[]=channels:read&scopes[]=channels:write`
Available scopes can be identified using the [Get service environments endpoint](https://tray.ai/documentation/developer/platform-apis/authentications#endpoint-get-service-environments)
(Note that this only returns the available scopes and doesn't indicate what scopes are actually required for any particular connector operation. Also note that this may not be a complete list of all available scopes. Please consult 3rd party docs for more information)
```json Slack example (truncated scopes list)
{
"elements": [
{
"id": "35cf89a9-5d49-44b3-ba10-7c78324da260",
"title": "Production",
"authenticationType": "oauth2",
"userDataSchema": {...},
"credentialsSchema": {...},
"scopes": [
{
"scope": "chat:write:bot",
"description": "Send messages as tray.ai"
},
{
"scope": "chat:write:user",
"description": "Send messages as user"
},
{
"...": "...",
"...": "..."
}
]
}
]
}
```
```json Salesforce example (truncated scopes list)
{
"elements": [
{
"id": "d403c9c6-282b-4b8c-ad02-1655ebccb166",
"title": "Production",
"authenticationType": "oauth2",
"userDataSchema": {...},
"credentialsSchema": {...},
"scopes": [
{
"scope": "full",
"children": [
"id"
],
"description": "Allows access to all data accessible by the logged-in user, and encompasses all other scopes (except refresh token)."
},
{
"scope": "refresh_token",
"children": [
"id"
],
"description": "Allows a refresh token to be returned, allowing for offline access."
},
{
"scope": "api",
"children": [
"chatter_api"
],
"description": "Allows access to the current, logged-in user's account using APIs, such as REST API and Bulk API. This value also includes chatter_api, which allows access to Chatter REST API resources."
},
{
"...": "...",
"...": "...",
"...": "..."
}
]
}
]
}
```
## 2b - Example auth-only dialog URL
A valid auth collection URL would look like this:
`https://embedded.tray.io/external/auth/create/traydemoaccount?code=5fb286bbxxxxxxxxxxxxxxxx3484c63201f&serviceId=55d1154c-4fd8-4c2c-ba22-041deabfcbfd&serviceEnvironmentId=973b1afa-aa13-42c7-86c3-3964f44c53dd`
The service ID and service environment ID correspond to the Twilio connector.
No scopes are required because the Twilio connector uses token-based authentication.
The URL will take your user to a dialogue where they can provide their Twilio credentials:

## 3 - Retrieving the authId
The auth dialogue to the window that opened it. You can listen to these events and take action accordingly.
Check out the page on .
Here's a snapshot of the success event logged onto the console. You can directly grab the authId from this event and use it in the next steps of the user journey.

The other way to get the fresh auths for the user after auth dialouge is finished is to perform the endpoint from Users API (GraphQL).
```graphql Request
query {
viewer {
authentications {
edges {
node {
id
name
customFields
service {
id
name
icon
title
version
}
serviceEnvironment {
id
title
}
}
}
pageInfo {
hasNextPage
hasPreviousPage
}
}
}
}
```
```json Response
{
"data": {
"viewer": {
"authentications": {
"edges": [
{
"node": {
"id": "569xxxxxx-xxxxx-xxxx-7e829d2c56d",
"name": "Roger Ramjet's Slack Account",
"service": {
"id": "227312c4-3e5f-4b0d-22a0-5b9630ece00e",
"name": "slack",
"icon": "https://s3.amazonaws.com/images.tray.io/artisan/icons/slack.png",
"title": "Slack",
"version": "1"
}
}
},
{
"node": {
"id": "0b07xxxxxx-xxxxx-xxxx-b8d4121471c3",
"name": "Roger Ramjet's Trello Account",
"service": {
"id": "72cef4e9-229f-4d7c-97e3-b6cd4d92146f",
"name": "trello",
"icon": "https://s3.amazonaws.com/images.tray.io/artisan/icons/trello.png",
"title": "Trello",
"version": "1"
}
}
},
{
"node": {
"id": "a29dxxxxxx-xxxxx-xxxx-99901f41c698",
"name": "Roger Ramjet's Slack Account 2",
"service": {
"id": "227312c4-3e5f-4b0d-22a0-5b9630ece00e",
"name": "slack",
"icon": "https://s3.amazonaws.com/images.tray.io/artisan/icons/slack.png",
"title": "Slack",
"version": "1"
}
}
}
]
}
}
}
}
```
---
# Import existing auths
Source: https://tray.ai/documentation/developer/getting-started/creating-end-user-auths/import-existing-auths.md
This page illustrates the steps involved in importing existing authentications from your infrastructure to Tray.
The primary use case for this process is that **your End Users have already created authentications and you do not want them to have to make them again**.
## Prerequisites
You will need a corresponding Tray user for each End User you wish to create an auth for. Once you have created a user, you will generate their access token, which is sent as an `Authorization` header for creating auth.
To create a user and their token, refer [Create users and tokens](https://tray.ai/documentation/developer/getting-started/creating-end-user-auths/create-users-and-tokens/) page.
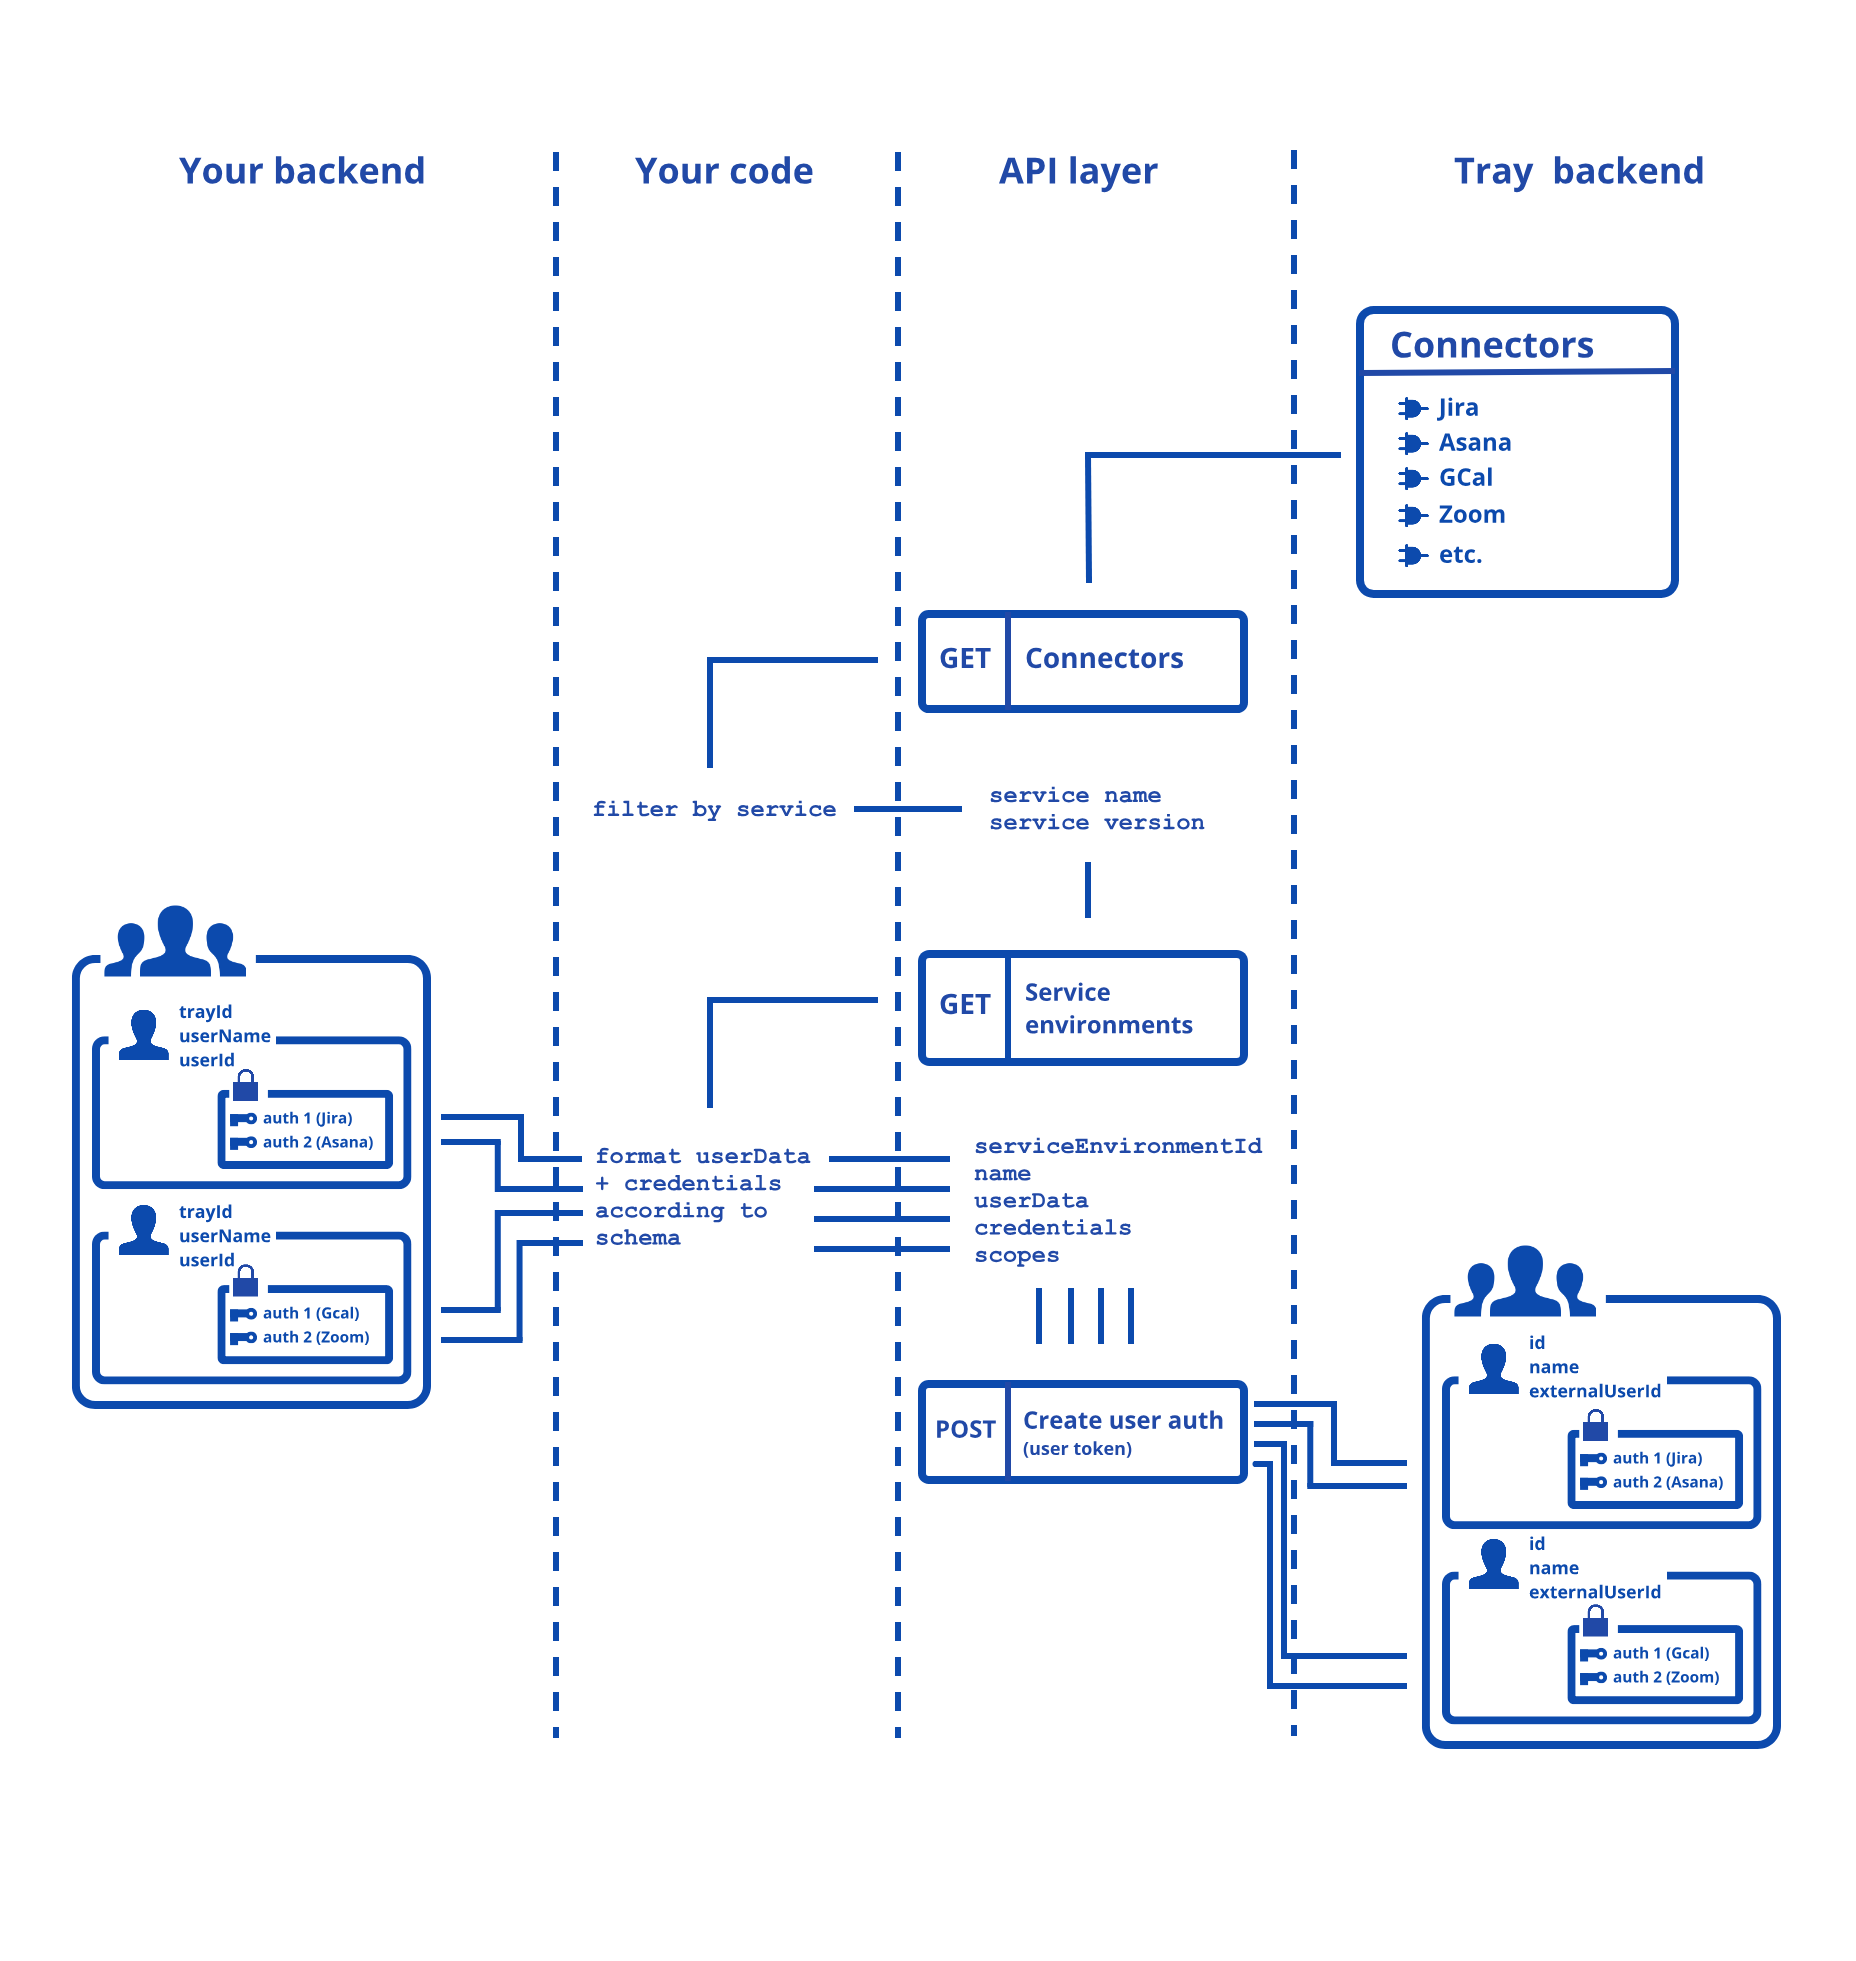
## The import process
To import, you will make use of the following endpoints.
* [Get connectors (master token)](https://tray.ai/documentation/developer/platform-apis/connectors#endpoint-get-connectors)
* [Get service environments (master token)](https://tray.ai/documentation/developer/platform-apis/authentications#endpoint-get-service-environments)
* [Create User authentication (user token)](https://tray.ai/documentation/developer/platform-apis/authentications#endpoint-create-user-authentication)
Importing with a user token means that each auth will be associated with the correct user:
## Step-by-step guide
### 1. Get service details
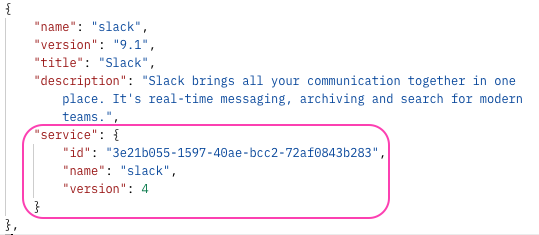
You need to find the relevant 3rd party service connector for the service whose auth you want to import. You can do this through [GET connectors](https://tray.ai/documentation/developer/platform-apis/connectors#endpoint-get-connectors) call.
Let's say you want to import a `Slack` auth. You can filter the Connectors array for the service and grab the `serviceId`, `serviceName`, `serviceVersion`.
### 2. Get service environment details
> **If the service you are trying to import an auth for is an OAuth service, you will first have to Create the service environment.** A service environment is automatically created when you create an auth using inside the Tray builder. Currently this is the only way to create a service environment for an OAuth service.
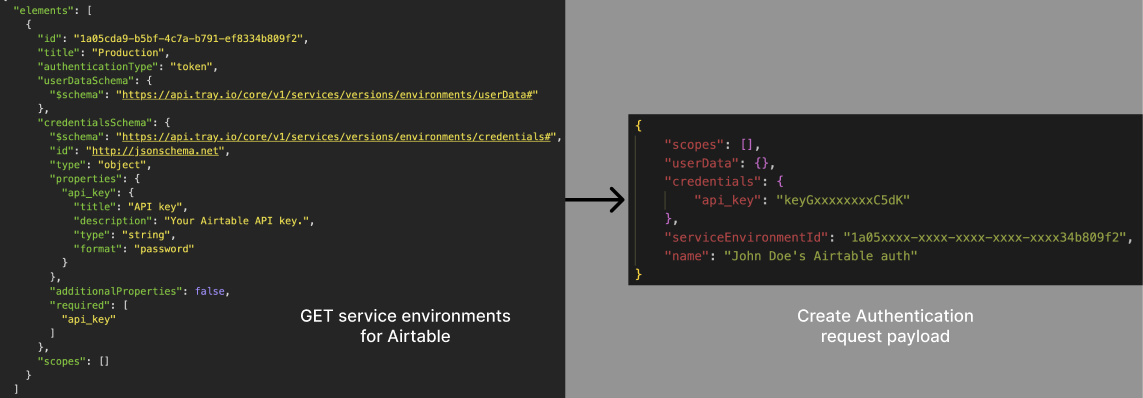
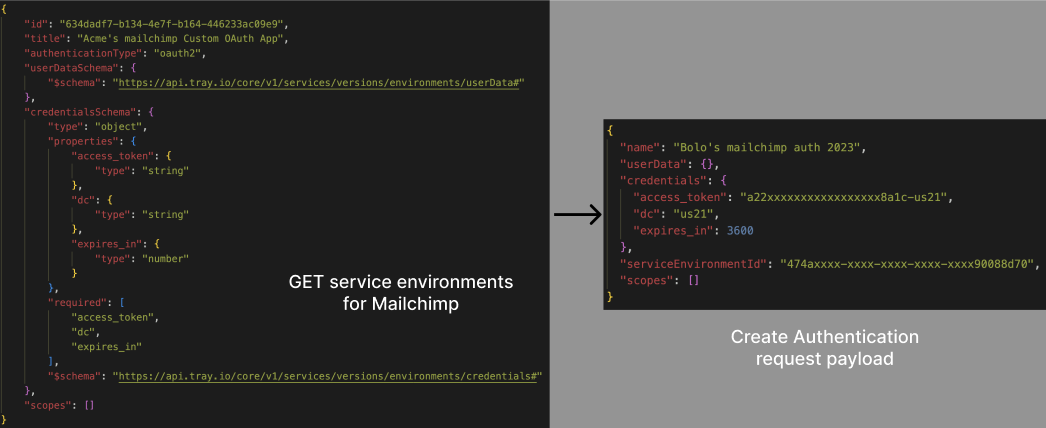
Next step is to get the details of the service environment, including `serviceEnviromentId` and the schemas for `credentials` and `userData`, which are crucial to perform the create authentication call later.
#### Example 1: Airtable
Here's how Airtable's `serviceEnviromentId`, `credentials`, and `userData` schema translate to the payload for Create Authentication:
#### Example 2: Mailchimp
Here's how Mailchimp's `serviceEnviromentId`, `credentials`, and `userData` schema translate to the payload for Create Authentication:
### 3. Create authentication
The final step is to use the after preparing the body of the request as given by response of step 2.
Here's how the request payload would look for a Mailchimp auth import:
```json Request
{
"name": "Bolo's mailchimp auth 2023",
"userData": {},
"credentials": {
"access_token": "a22xxxxxxxxxxxxxxxxx8a1c-us21",
"dc": "us21",
"expires_in": 3600
},
"serviceEnvironmentId": "474axxxx-xxxx-xxxx-xxxx-xxxx90088d70",
"scopes": []
}
```
```json 200 Response
{
"id": "0490xxxx-xxxx-xxxx-xxxx-xxxxf21243cf"
}
```
---
# Auth dialog Events
Source: https://tray.ai/documentation/developer/getting-started/creating-end-user-auths/auth-dialog-events.md
Auth dialog is used to capture new auths from your end users. The dialog window to the global window object that can be captures to take further actions.
You can attach a to the window where user's click on create auth button.
`window.addEventListener("message", onmessage);`
By doing this, you will be able to capture the messages sent by the auth popup window.
The three events you would want to capture from the window are:
* `tray.authPopup.error` This event is fired when the auth dialog runs into unexpected errors (ex. mismatched service environment ID and service ID)
* `tray.authpopup.close` This event is fired when the auth dialog is closed by the user abruptly
* `tray.authpopup.finish` This event is fired when the user provides the auth details and the popup window closes by itself. This event would contain the authId of the newly created auth. Here's how this event's data would look:
```json
{
"type": "tray.authpopup.finish",
"authType": "oauth",
"authId": "1209xxxx-xxxx-xxxx-xxxx-xxxxxx8d3779"
}
```
Here is a sample code on how you could structure your authWindow function:
```javascript
export const openAuthWindow = (url) => {
// Must open window from user interaction code otherwise it is likely
// to be blocked by a popup blocker:
const authWindow = window.open(
undefined,
"_blank",
"width=500,height=500,scrollbars=no"
);
const onmessage = (e) => {
console.log("message", e.data.type, e.data);
if (e.data.type === "tray.authPopup.error") {
// Handle popup error message
alert(`Error: ${e.data.error}`);
authWindow.close();
}
if (
e.data.type === "tray.authpopup.close" ||
e.data.type === "tray.authpopup.finish"
) {
authWindow.close();
}
};
window.addEventListener("message", onmessage);
// Check if popup window has been closed
const CHECK_TIMEOUT = 1000;
const checkClosedWindow = () => {
if (authWindow.closed) {
window.removeEventListener("message", onmessage);
} else {
setTimeout(checkClosedWindow, CHECK_TIMEOUT);
}
};
checkClosedWindow();
authWindow.location = url;
};
const authDialogURL = `https://${AUTH_DIALOG_URL}/external/auth/create/${PARTNER_NAME}?code=${json.data?.generateAuthorizationCode?.authorizationCode}&serviceId=${serviceId.current}&serviceEnvironmentId=${selectedServiceEnvironment.id}&scopes[]=${scopes}`;
openAuthWindow(authDialogURL);
```
You can also check the code of the to see how it's implemented there.
---
# Using connectors and operations
Source: https://tray.ai/documentation/developer/getting-started/calling-connectors/using-connectors-and-operations.md
> **This page will take you through what endpoints are involved in discovering and using connectors and their operations.** Please be sure to check out our [Building a UI form tutorial](https://tray.ai/documentation/developer/getting-started/tutorials/building-a-ui-form/) for guidance on putting it all into practice!
## Discovering connectors
The [Get connectors endpoint](https://tray.ai/documentation/developer/platform-apis/connectors#endpoint-get-connectors) will return all of the connectors that you have access to:
The response includes:
* connector name
* connector version
These can then be used with the [Get connector operations endpoint](https://tray.ai/documentation/developer/platform-apis/connectors#endpoint-get-connector-operations) to list the available operations within a particular connector.
So if your organization has access to Outreach and Twilio you would see the following:
```json
{
"elements": [
{
"name": "outreach",
"version": "3.2",
"title": "Outreach",
"description": ""
},
{
"name": "twilio-output",
"version": "2.1",
"title": "Twilio",
"description": "Cloud communication platform for developers"
}
]
}
```
## Discovering operations
The operations available within a connector can be identified using the [Get connector operations endpoint](https://tray.ai/documentation/developer/platform-apis/connectors#endpoint-get-connector-operations).
So for Twilio the URL would be:
In the following sample response for Twilio, we have shown only the input schema for the 'Send SMS' operation.
You can use our [Ops Explorer dev tool](https://tray.ai/documentation/developer/developer-tools/operations-explorer) to get complete examples of operation lists and input and output schema:
```json
{
"elements": [
{
"name": "send_sms",
"title": "Send SMS",
"description": "Send SMS.",
"inputSchema": {
"$schema": "https://api.tray.io/core/v1/connectors/operations/input-schema#",
"advanced": [],
"additionalProperties": false,
"type": "object",
"properties": {
"body": {
"type": "string",
"description": "The body of the SMS to send.",
"title": "Body"
},
"media_url": {
"type": "string",
"title": "Media URL",
"description": "This parameter specifies the URL of the media you want to include with your message, for sending an MMS message."
},
"to": {
"type": "string",
"description": "The phone number (including international code) to send the sms to.",
"title": "To"
},
"from": {
"type": "string",
"description": "The valid Twilio number (or authorised number) from which the sms message will appear.",
"title": "From"
},
"status_callback": {
"type": "string",
"title": "Status callback URL",
"description": "By including a StatusCallback URL in your API call, you can tell Twilio where to POST information about your message."
}
},
"required": ["to", "from", "body"]
},
"hasDynamicOutput": false,
"authScopes": []
}
]
}
```
## Using operations
When making a call to a particular connector operation using the [Call connector endpoint](https://tray.ai/documentation/developer/platform-apis/connectors#endpoint-call-connector), the body needs to contain:
* The `operation` that is being called
* The unique `authId` which identifies the End User and their auth credentials
* The required `input` as dictated by Tray's input schema for the connector being called
## Using the Ops Explorer
Our in-browser [Ops Explorer dev tool](https://tray.ai/documentation/developer/developer-tools/operations-explorer) can help you quickly identify all of the above for any connector operation.
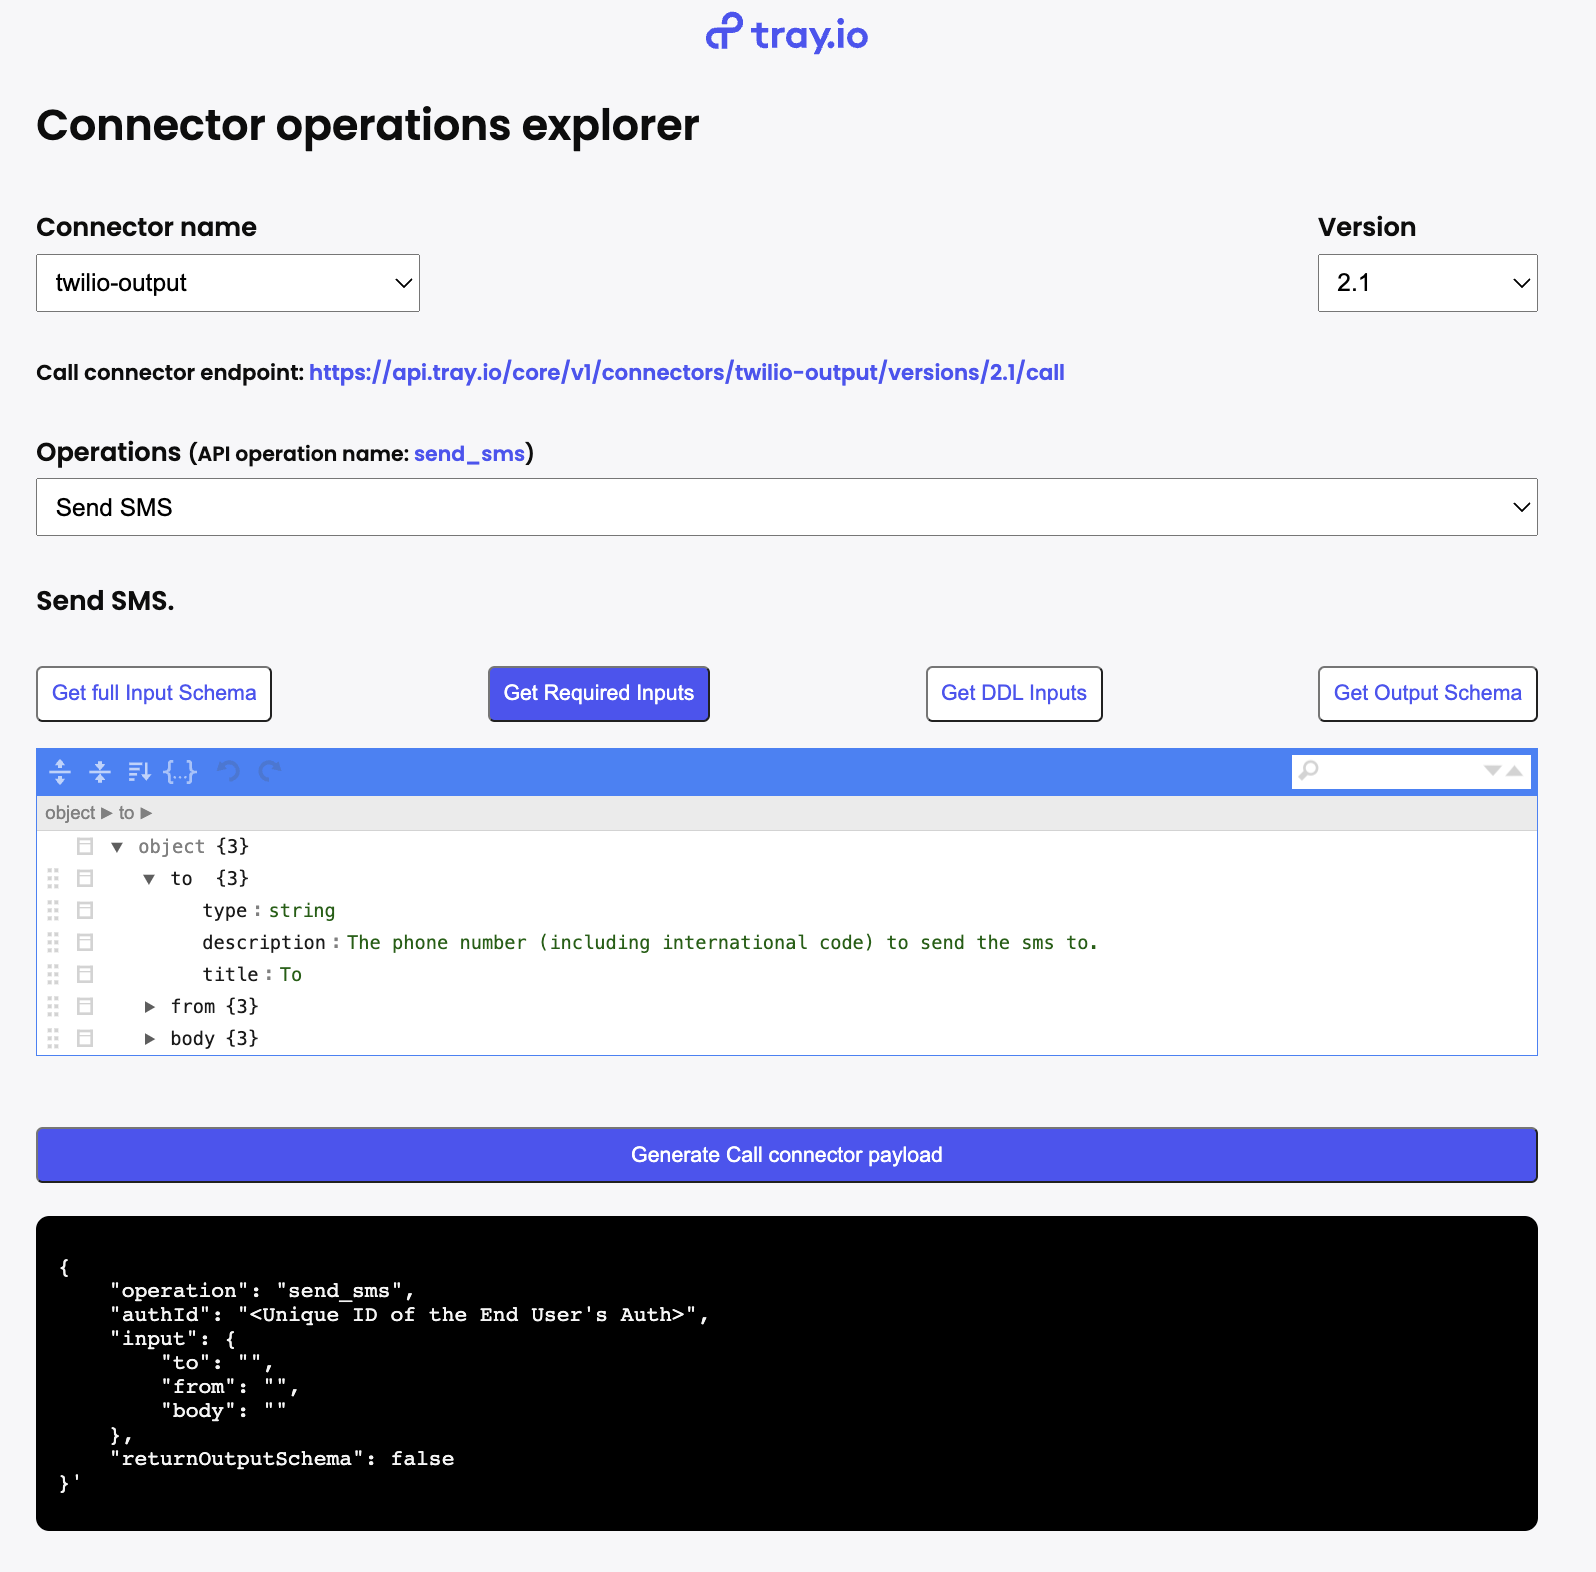
The following screenshot shows using it to obtain the required inputs for the Twilio 'Send SMS' operation:
## Testing operations with the form builder demo
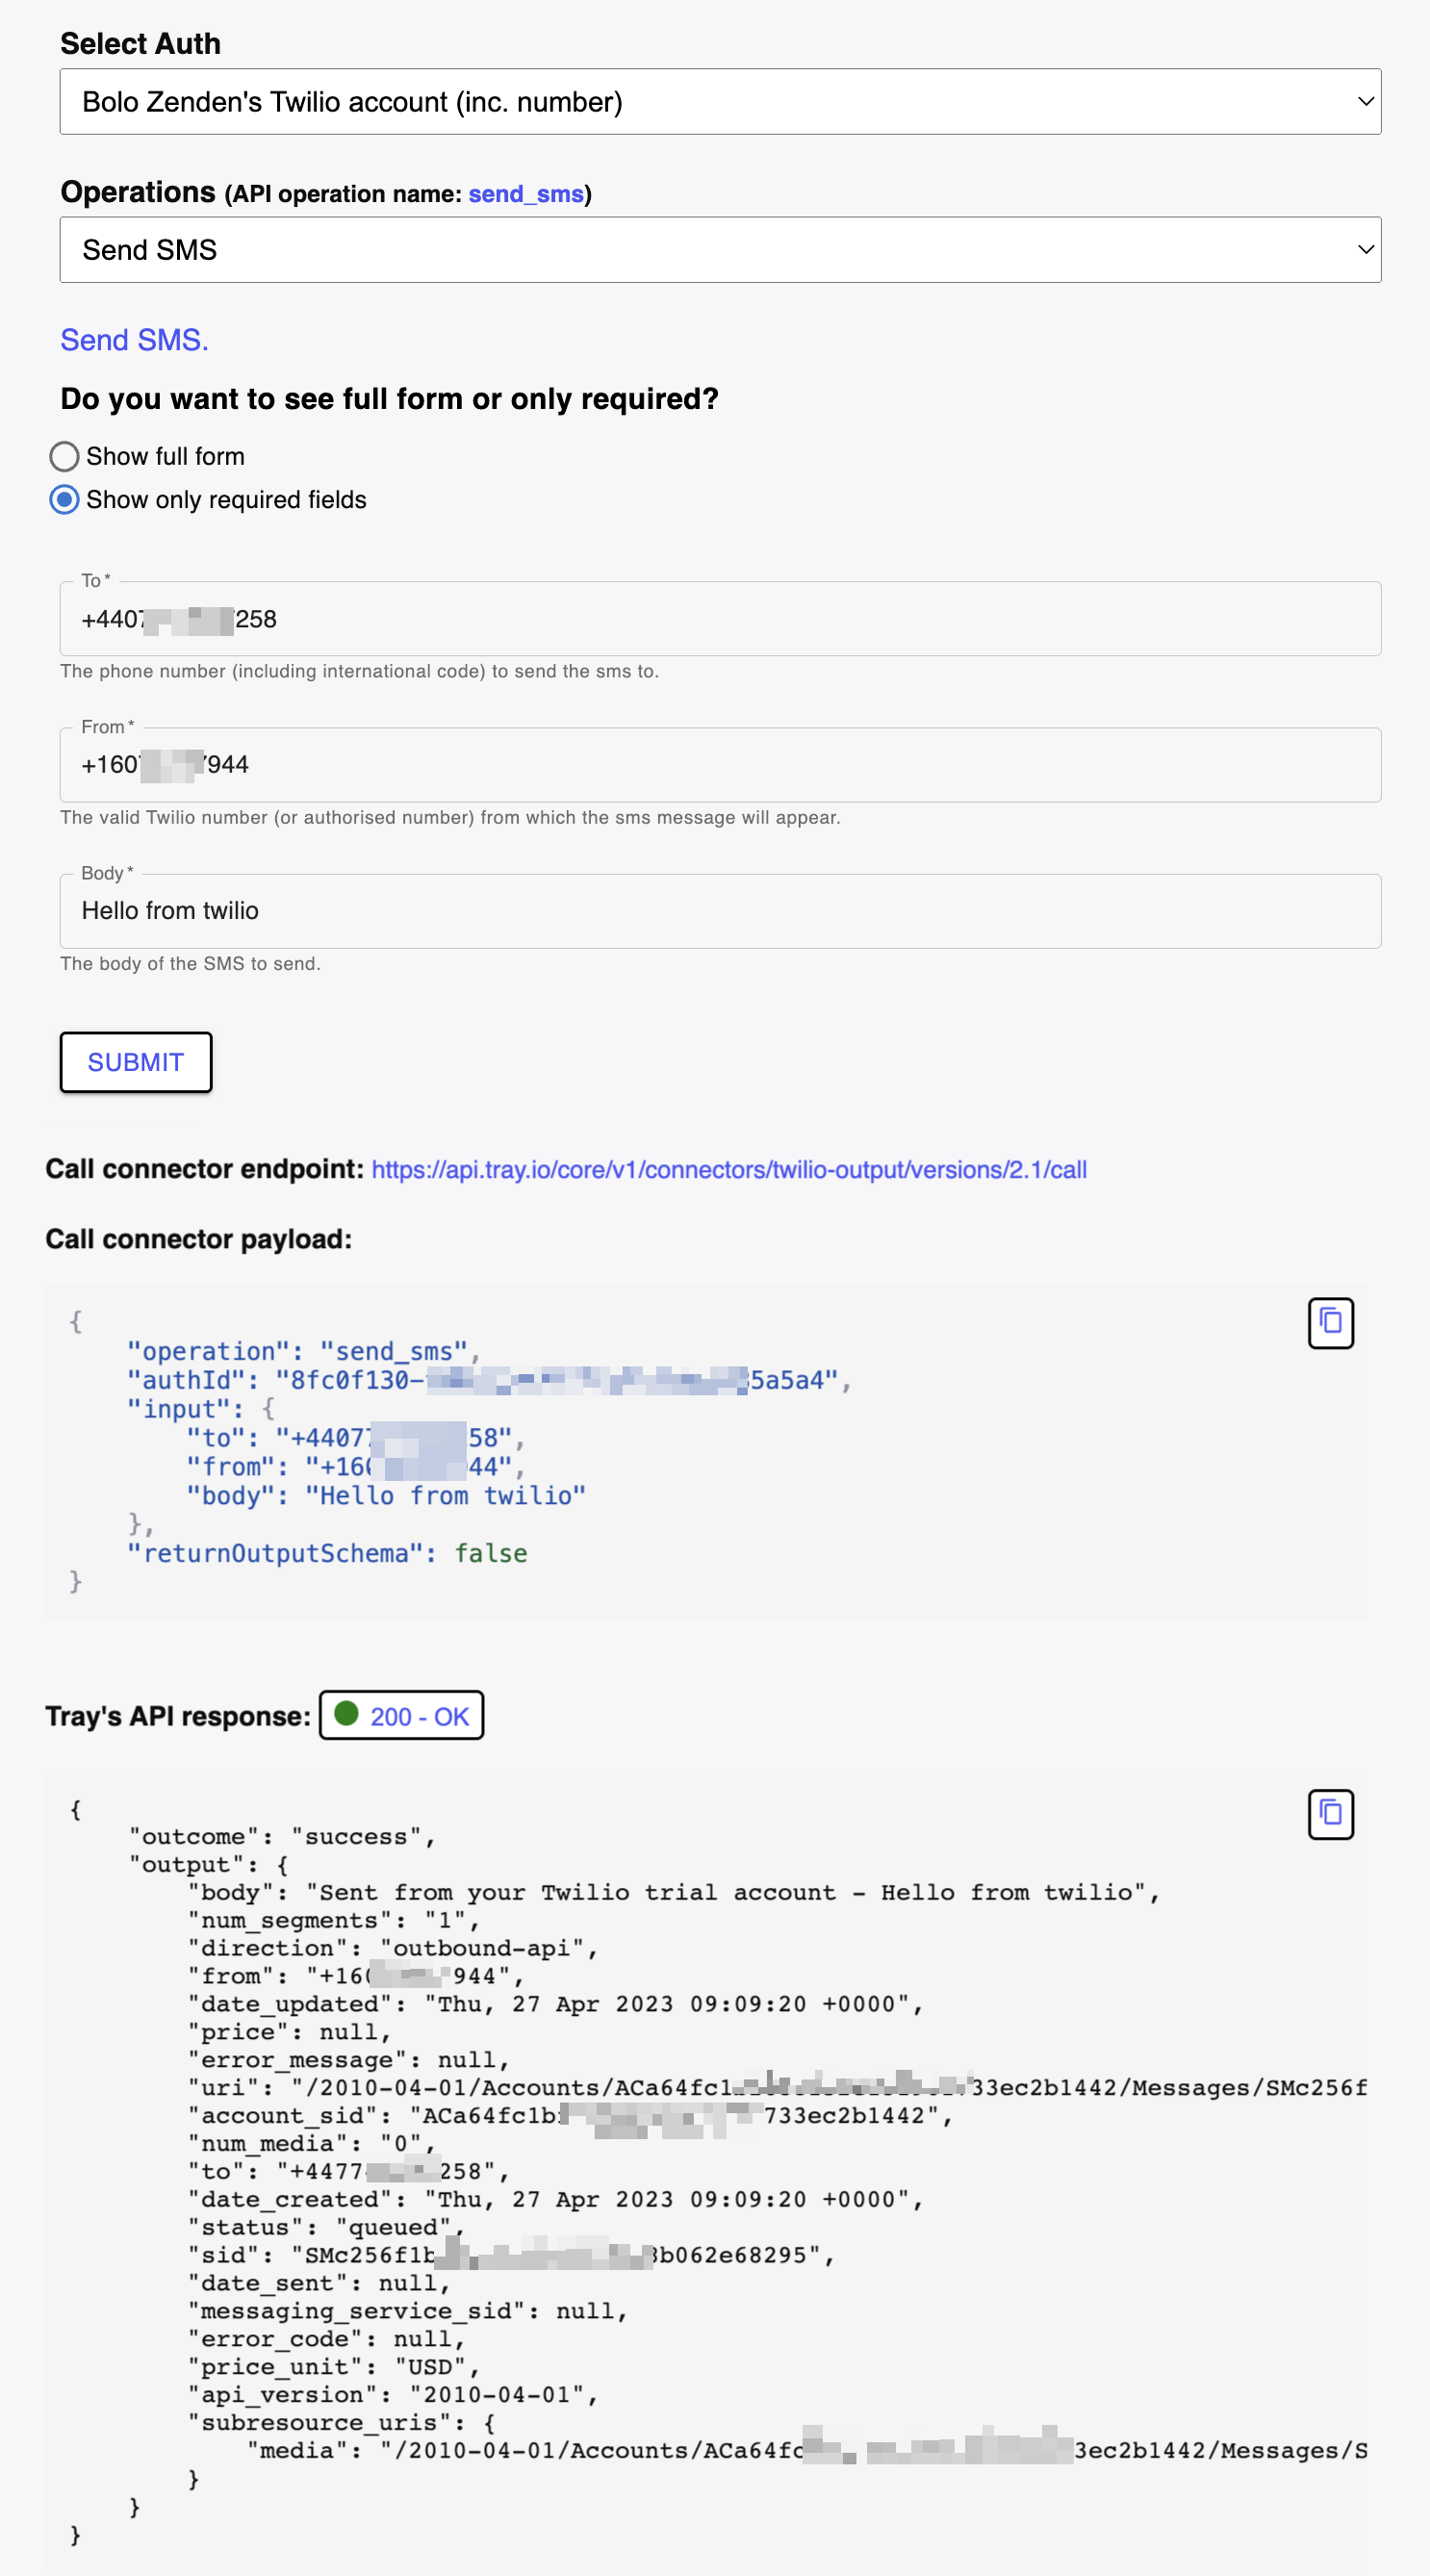
You can also download and run our [Form Builder demo app](https://tray.ai/documentation/developer/developer-tools/connector-tester) to connect to your Tray Embedded account and **run live tests** of any operations you wish to use.
This will show you the input payload being built, and also the response coming from Tray and the 3rd party once you hit 'submit'
We also highly recommend you follow our [Building a UI form tutorial](https://tray.ai/documentation/developer/getting-started/tutorials/building-a-ui-form/) which explains how this was built and will give you a great headstart in building your own integrations:
---
# DDL operations
Source: https://tray.ai/documentation/developer/getting-started/calling-connectors/ddl-operations.md
> **Info:** Please also see our [Building a UI form tutorial](https://tray.ai/documentation/developer/getting-started/tutorials/building-a-ui-form/) for guidance on rendering DDLs in your integration.
Certain Tray connector operations have to dynamically respond to other information that may be determined by an End User.
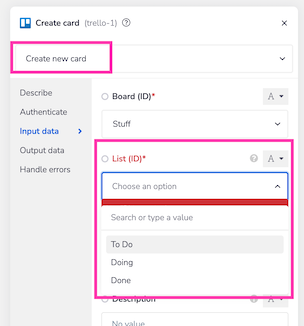
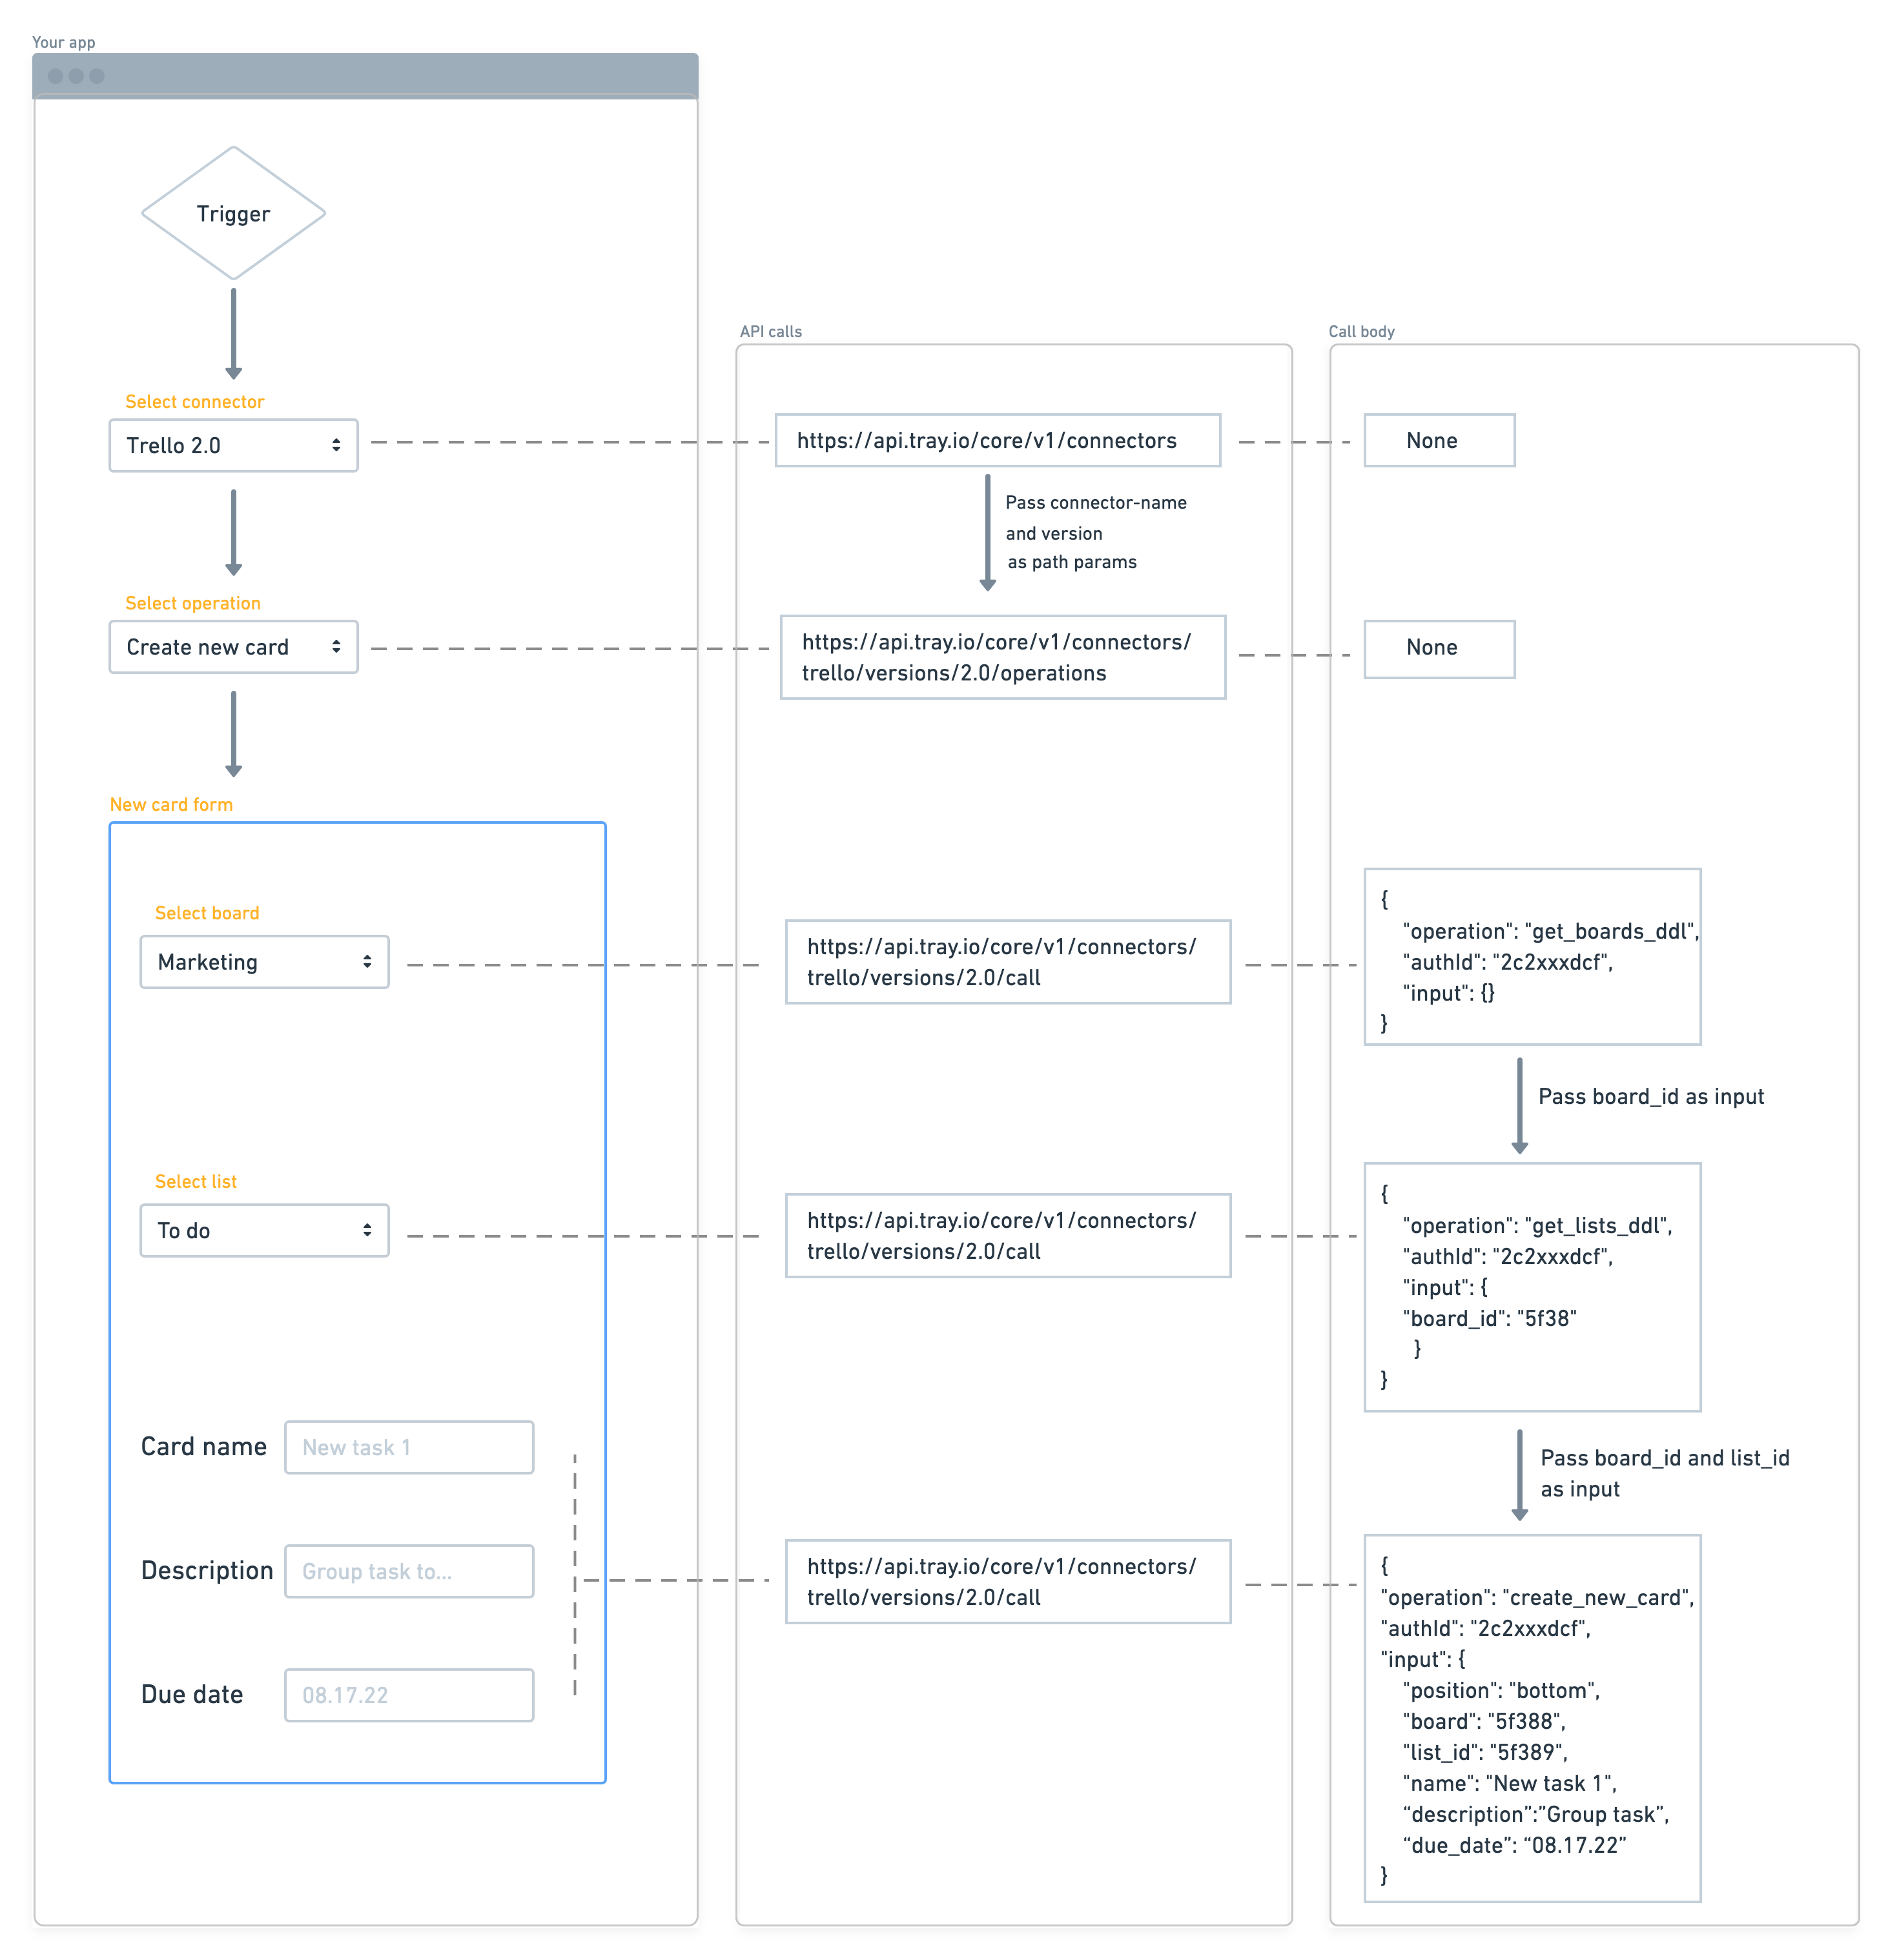
For example when using the Trello 'Create new Card' operation in the Tray builder, you must use drop-down lists to select both the Board and List that the new card will be created in:
From the input schema retrieved using the [Get connector operations endpoint](https://tray.ai/documentation/developer/platform-apis/connectors#endpoint-get-connector-operations), we know that the `list_id`, `board` and `position` are all required inputs.
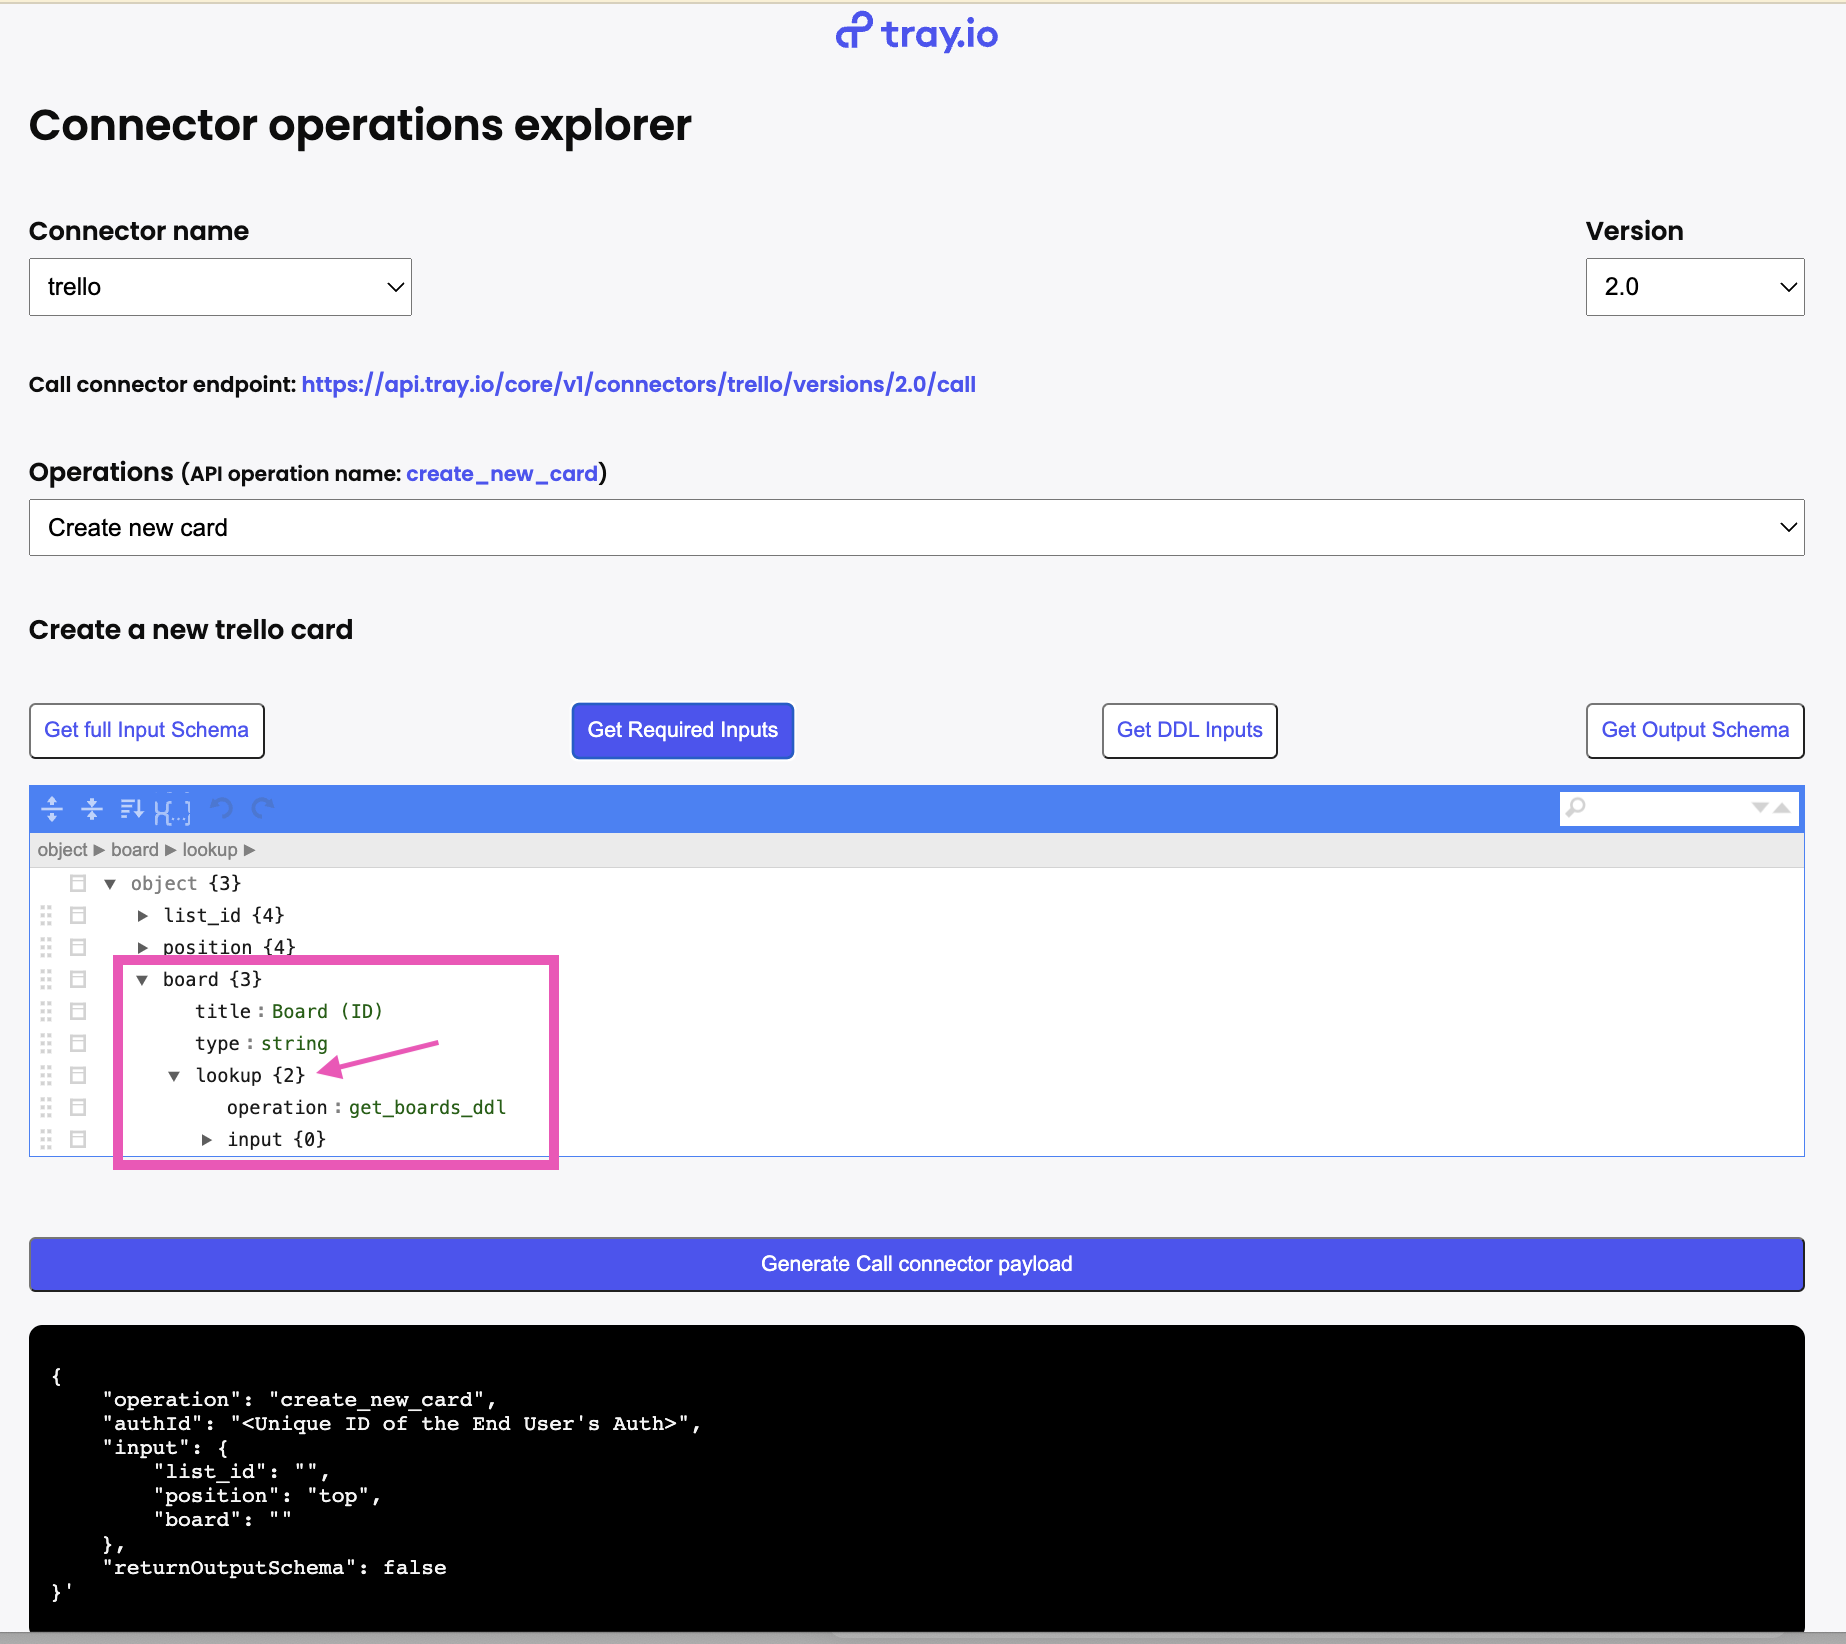
The [Ops Explorer dev tool](https://tray.ai/documentation/developer/developer-tools/operations-explorer) can get us a quick view on what these inputs are.
You can **identify any dynamic operations by the presence of a `lookup` field**.
In this case we can see that **the `lookup` for the `board` property is `get_boards_ddl`**
To test this operation you can hardcode these id values, which will result in a successful call.
However the 'Create new card' operation must work in a dynamic fashion, in that an end user must be able to specify the board and list.
## Testing DDLs
`get_boards_ddl` is a standalone operation that you can use to list the available boards and allow your end users to select from.
A successful run of the operation will list the available boards:
```json query
{
"operation": "get_boards_ddl",
"authId": "2c21aae5-xxx-xxx-xxx-xxx3e478f1dcf",
"input": {}
}
```
```json response
{
"outcome": "success",
"output": {
"result": [
{
"text": "Customer Success",
"value": "6294cd45bb83f36eae2db4b0"
},
{
"text": "HR",
"value": "6294cd2e0604a64feb7c326f"
},
{
"text": "Marketing",
"value": "5f36aedb0ec0e166c75bff88"
},
{
"text": "Sales",
"value": "6294cd2218fc875335ca186d"
}
]
}
}
```
## Putting it all together
The following diagram illustrates how you would make use of these calls in an application which allows an end user to:
1. Choose the service (Trello)
2. Choose the operation (Create New Card)
3. Choose the board (Marketing)
4. Choose the list (To do)
5. Add the new card details
---
# Dynamic outputs
Source: https://tray.ai/documentation/developer/getting-started/calling-connectors/dynamic-outputs.md
***
One of the properties included with each operation is the boolean `hasDynamicOutput`.
A `true` value indicates that the output schema can change depending on the input to the Call Connector operation.
In this case when making a call to the call connector endpoint, you just need to set the `returnOutputSchema` to `true` to get the output schema for that particular request:
```json
{
"operation": "get_location",
"authId": "3a56fxx-xxx-xxx-xxx76fda19",
"input": {
"location_id": "61098065993"
},
"returnOutputSchema":true
}
```
The following example is from the Get Location operation within the Shopify connector:
When the above payload is used in a call connector request then the output schema is returned and can be used accordingly:
```json
{
"outcome": "success",
"output": {
"output_schema": {
"$schema": "http://json-schema.org/draft-04/schema#",
"type": "object",
"properties": {
"location": {
"type": "object",
"properties": {
"id": {
"type": "number"
},
"name": {
"type": "string"
},
"address1": {
"type": "string"
},
"address2": {
"type": "string"
},
"city": {
"type": "string"
},
"zip": {
"type": "string"
},
"province": {
"type": "string"
},
"country": {
"type": "string"
},
"phone": {
"type": "string"
},
"created_at": {
"type": "string"
},
"updated_at": {
"type": "string"
},
"country_code": {
"type": "string"
},
"country_name": {
"type": "string"
},
"province_code": {
"type": "string"
},
"legacy": {
"type": "boolean"
},
"active": {
"type": "boolean"
},
"admin_graphql_api_id": {
"type": "string"
}
}
}
}
}
}
}
```
If the property is set to `false` or not included at all then the call to this endpoint will return the response from the call itself:
```json
{
"outcome": "success",
"output": {
"location": {
"id": 61098065993,
"name": "Test location",
"address1": "Lynchgate Road",
"address2": "22 Cannon Park Centre",
"city": "Coventry",
"zip": "CV4 7EH",
"province": "England",
"country": "GB",
"phone": "+4412345123456",
"created_at": "2021-12-03T18:52:24+00:00",
"updated_at": "2021-12-03T18:52:25+00:00",
"country_code": "GB",
"country_name": "United Kingdom",
"province_code": "ENG",
"legacy": false,
"active": true,
"admin_graphql_api_id": "gid://shopify/Location/61098065993"
}
}
}
```
---
# Enums
Source: https://tray.ai/documentation/developer/getting-started/calling-connectors/enums.md
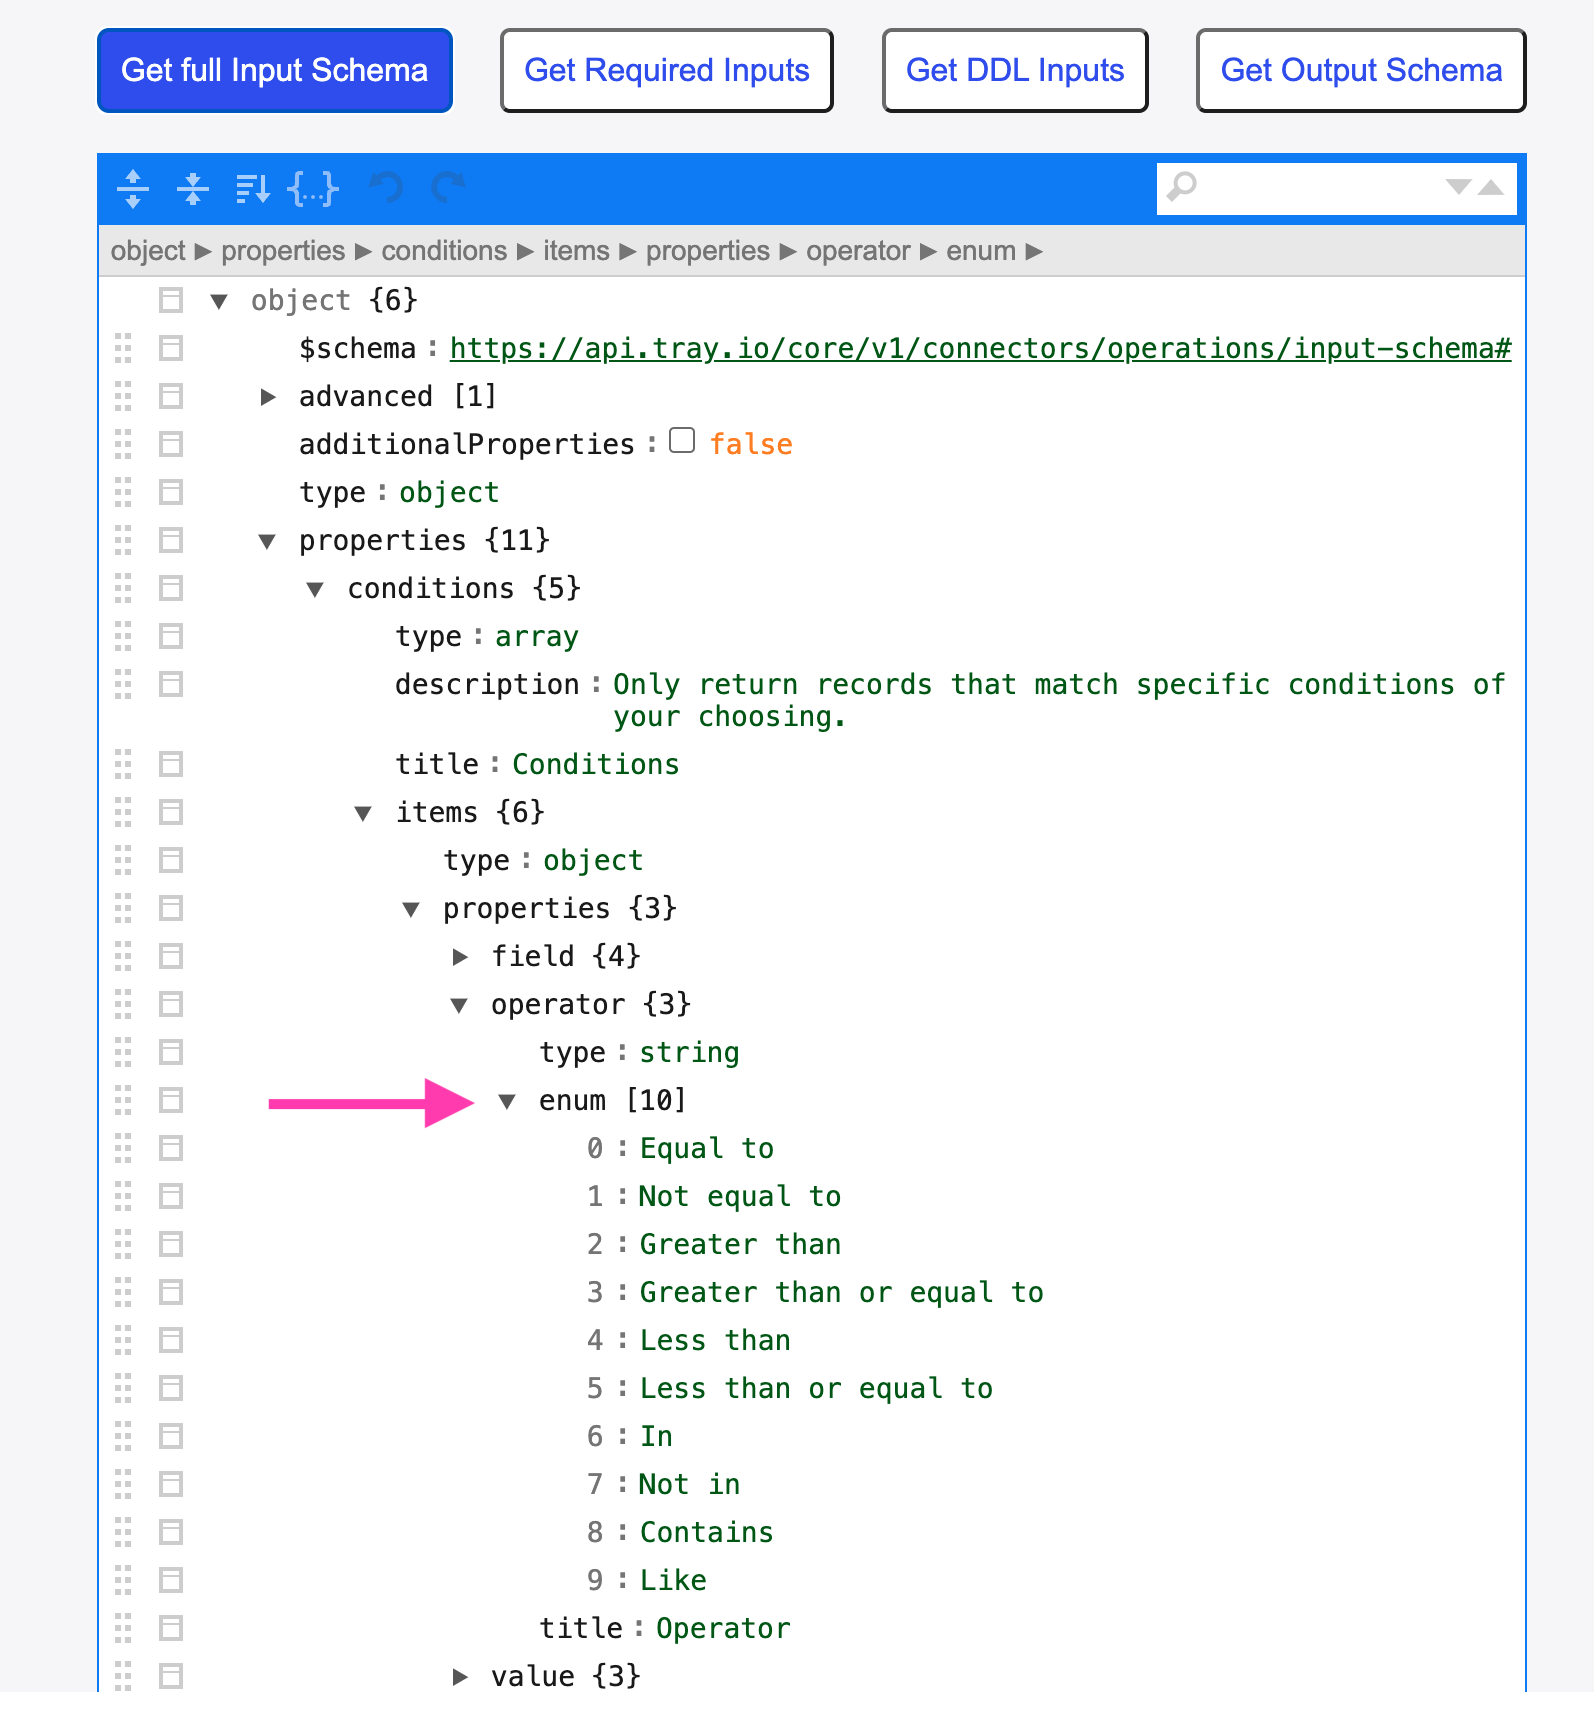
Some fields in connector operations are enum lists that can be rendered as set lists for your End Users to choose from:
You can use our [Ops Explorer dev tool](https://tray.ai/documentation/developer/developer-tools/operations-explorer) to get a very quick view of these.
Please also see our [Building a UI form tutorial](https://tray.ai/documentation/developer/getting-started/tutorials/building-a-ui-form/) for guidance on rendering these.
For example the Salesforce 'Find records' operation has enum list for the filter conditions:
---
# Example use case
Source: https://tray.ai/documentation/developer/getting-started/calling-connectors/example-use-case.md
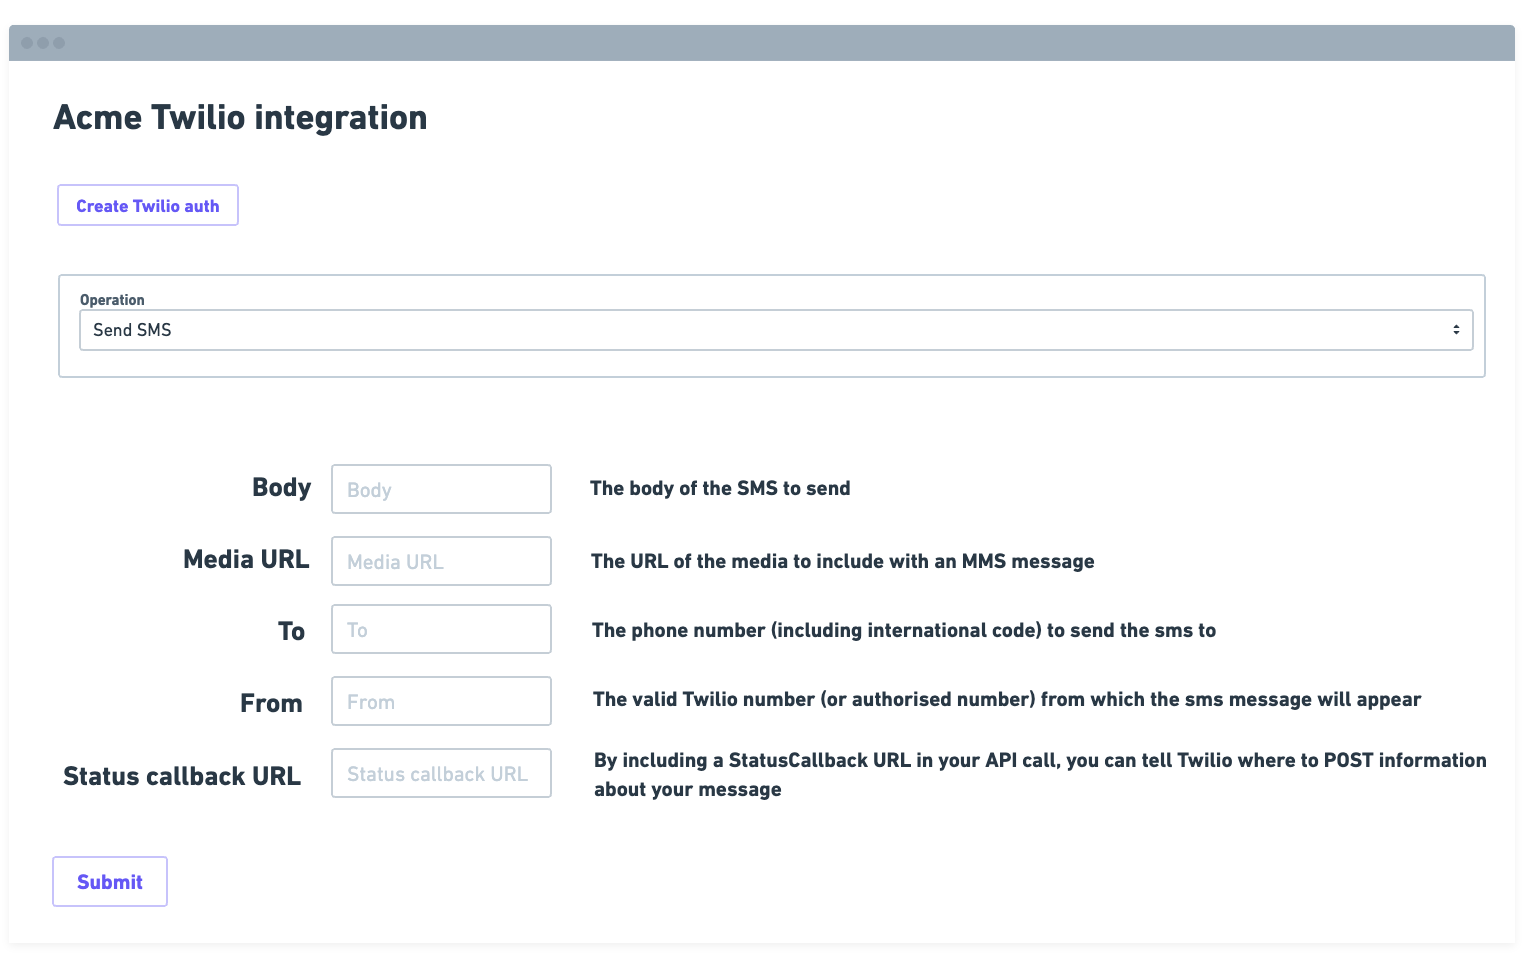
The screenshot above shows a mockup of an interface you might create to make use of the Twilio connector.
This would allow your users to:
1. Create an auth for the service in the integration using the [auth-only dialog](https://tray.ai/documentation/developer/getting-started/creating-end-user-auths/create-new-auths/) (or retrieve a pre-existing auth if they have already registered)
2. Select the operation they wish to make use of
3. Add any necessary inputs for the operation
4. Submit the call to Twilio
In order to serve this form to your End Users, your backend setup should have:
* **A 'users' database** which stores user and auth ids (as generated by our [Users API](https://tray.ai/documentation/developer/embedded-apis/users), [Authentications API](https://tray.ai/documentation/developer/platform-apis/authentications) and [auth-only dialog](https://tray.ai/documentation/developer/getting-started/creating-end-user-auths/create-new-auths/))
* **An 'integrations' database** which stores the service details for each of your integrations, including the auth and operation input schemas for the connectors being used (as retrieved from our [Connectors API](https://tray.ai/documentation/developer/platform-apis/connectors) and [Authentications API](https://tray.ai/documentation/developer/platform-apis/authentications))
This setup will help maximize the consistency and efficiency of your application.
For more details, please see our ['Building integrations' guidance on storing users and integrations](https://tray.ai/documentation/developer/getting-started/building-integrations/storing-users-and-integrations/)
Please also see our [Building a UI form tutorial](https://tray.ai/documentation/developer/getting-started/tutorials/building-a-ui-form/) for quickstart guide to rendering a form as a UI.
The form fields would make use of the available inputs according to the Twilio input schema
Having retrieved the form details from the user, the final call to the connector would be a POST request to with the body of the message being something like:
```json
{
"operation": "send_sms",
"authId": "9944xxx-xxxx-xxxx-xxxx-xxxx456fd0",
"input": {
"from": "+18577633299",
"to": "+447587123456",
"body": "Call connector is great!",
"media_url": "https://acmecorp-images.s3.eu-west-2.amazonaws.com/message.png",
"status_callback": "https://status.acmecorp.com"
}
}
```
---
# Using triggers
Source: https://tray.ai/documentation/developer/getting-started/using-triggers/discovering-triggers-and-operations.md
> **This page will take you through what endpoints are involved in discovering and using triggers and their operations.**
## Discovering triggers
The [Get triggers endpoint](https://tray.ai/documentation/developer/platform-apis/triggers#endpoint-get-triggers) will return all of the triggers that you have access to:
The response includes:
* trigger name
* trigger version
These can then be used with the [Get trigger operations endpoint](https://tray.ai/documentation/developer/platform-apis/triggers#endpoint-get-trigger-operations) to list the available operations within a particular trigger.
So if your organization has access to Calendly and Typeform you would see the following:
```json
{
"elements": [
{
"name": "calendly-trigger",
"version": "3.0",
"title": "Calendly",
"description": "Calendly helps you schedule meetings without the back-and-forth emails.",
"service": {
"id": "8e1e2aa9-877b-4710-9acb-5c8ff9dd8059",
"name": "calendly",
"version": 2
}
},
{
"name": "typeform-trigger",
"version": "4.1",
"title": "Typeform",
"description": "Typeform is an online software as a service company that specializes in online form building and online surveys.",
"service": {
"id": "668f2ac5-2b44-41c5-a751-4a9773982c3e",
"name": "typeform",
"version": 3
}
}
]
}
```
## Discovering operations
The operations available within a trigger can be identified using the [Get trigger operations endpoint](https://tray.ai/documentation/developer/platform-apis/triggers#endpoint-get-trigger-operations).
So for `Calendly` the URL would be:
In the following sample response for `Calendly`, we have shown only the input schema for the `webhook` operation.
```json
{
"elements": [
{
"name": "webhook",
"title": "Webhook",
"description": "Receive Calendly appointment data in real-time. (Invitee Created Event & Invitee Canceled Events)",
"inputSchema": {
"type": "object",
"properties": {
"events": {
"type": "array",
"description": "List of user events to subscribe to.",
"title": "Events",
"items": {
"type": "string",
"enum": [
{
"text": "Invitee Created Events",
"value": "invitee.created"
},
{
"text": "Invitee Canceled Events",
"value": "invitee.canceled"
}
],
"description": "Event to subscribe to.",
"title": "Item"
},
"additionalItems": true
},
"scope": {
"type": "string",
"enum": [
{
"text": "Organization",
"value": "organization"
},
{
"text": "User",
"value": "user"
}
],
"default": "organization",
"description": "Indicates if the webhook subscription scope will be 'Organization' or 'User'.",
"title": "Scope"
},
"organization_uri": {
"type": "string",
"title": "Organization URI",
"description": "The unique reference to the organization that the webhook will be tied to."
},
"user_uri": {
"type": "string",
"title": "User URI",
"description": "The unique reference to the user that the webhook will be tied to. Required if 'Scope' is set to 'User'."
},
"public_url": {
"type": "string",
"default_jsonpath": "$.env.public_url",
"title": "Public URL"
}
},
"required": [
"events",
"scope",
"organization_uri",
"public_url"
],
"advanced": [
"public_url"
],
"$schema": "http://json-schema.org/draft-04/schema#",
"additionalProperties": false
},
"authScopes": []
}
]
}
```
The Trigger details (name and version) and operation deatils (name, inputSchema) are essential in forming the request payload for [Create Subscription](https://tray.ai/documentation/developer/platform-apis/triggers#endpoint-create-subscription) call.
---
# Creating subscriptions
Source: https://tray.ai/documentation/developer/getting-started/using-triggers/creating-subscriptions.md
For subscribing to a service using Tray, you need to make a call to [Create Subscription](https://tray.ai/documentation/developer/platform-apis/triggers#endpoint-create-subscription).
It needs the following in the request body:
* `name`: Name of the subscription, you can present this in the UI
* `externalId`: UniqueId of the subscription that will be stored in your DB and can be used to query subscriptions once created
* trigger `name` and `version`: The trigger for which you are creating a subscription. This is obtained from [Get Triggers](https://tray.ai/documentation/developer/platform-apis/triggers#endpoint-get-triggers)
* `authenticationId`: The authentication id returned from [Create Authentication](https://tray.ai/documentation/developer/platform-apis/triggers#endpoint-create-subscription)
* `operation`: A trigger can have several operations. This is obtained from [Get Trigger Operations](https://tray.ai/documentation/developer/platform-apis/triggers#endpoint-get-trigger-operations)
* `input`: A JSON object that follows the input schema of the operation returned by [Get Trigger Operations](https://tray.ai/documentation/developer/platform-apis/triggers#endpoint-get-trigger-operations)
* `endpoint`: The URL where you want to receive payloads from Tray (Tray in turn receives payload from the third party service and will forward it to this URL after formatting it to match the Output Schema of the operation).
## Step by step walkthrough
***
For the purpose of this walkthrough, you will need a account.
> **To keep it simple, We will also make use of a Tray workflow to receive the payloads from the subscription.** Please note this is NOT how you should be using the Trigger API.Processing of events should happen outside Tray within your own infrastructure. If you wish to process events within Tray, you can just use Tray Embedded for it and it won't have added latency of delivering events outside Tray.
Once the subscription is set up, we will receive a payload at your target endpoint whenever the Typeform form is submitted.
> **Info:** You should fork our to quickly set up the API endpoints for testing.
## Prerequisites
\### Typeform account
Here are steps to set up your first form:
1. Signup/login to Typeform.
2. Create a new form. You can use their AI to rapidly create one trivia quiz form.
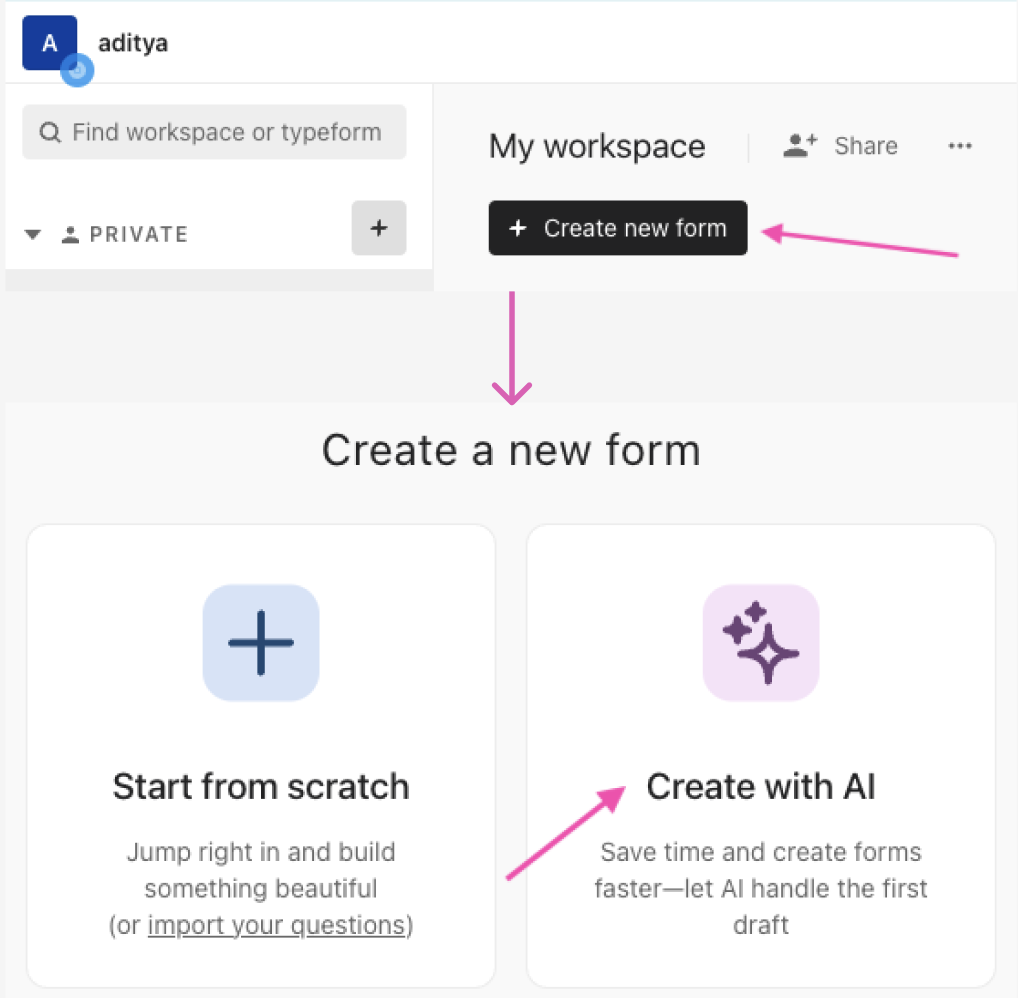
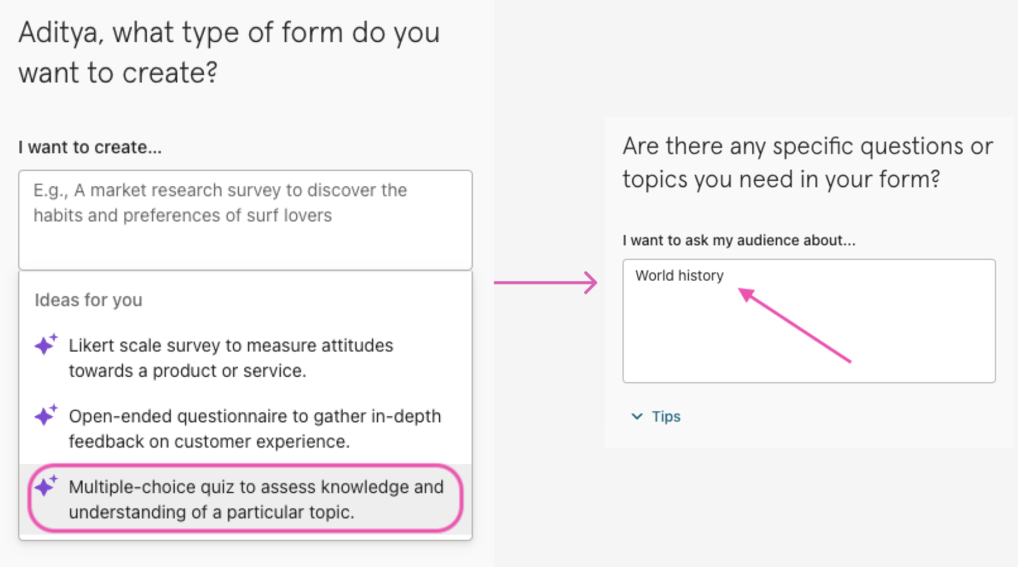
Copy the form ID from the URL of the newly generated form. This will be used to Create the subscription.
For example in the below URL:
`https://admin.typeform.com/form/D9B26k6g/create?typeform-source=admin.typeform.com&block=5903a939-ab99-432f-955f-69e0d2d89d68`
Form ID is `D9B26k6g`
### Create test user
You will first have to create a user for whom we are creating the subscription.
Make a call to
You will need a to make this call.
```curl cURL
curl --location 'https://tray.io/graphql' \
--header 'Authorization: Bearer master_token' \
--header 'Content-Type: application/json' \
--data '{"query":"mutation($externalUserId: String!, $name: String!) {\n createExternalUser(input: { \n name: $name, \n externalUserId: $externalUserId \n }) {\n userId\n }\n}","variables":{"name":"myCustomersName","externalUserId":"my-apps-internal-user-id"}}''
```
```js Javascript
var myHeaders = new Headers();
myHeaders.append("Authorization", "Bearer master_token");
myHeaders.append("Content-Type", "application/json");
var graphql = JSON.stringify({
query:
"mutation($externalUserId: String!, $name: String!) {\n createExternalUser(input: { \n name: $name, \n externalUserId: $externalUserId \n }) {\n userId\n }\n}",
variables: {
name: "myCustomersName",
externalUserId: "my-apps-internal-user-id",
},
});
var requestOptions = {
method: "POST",
headers: myHeaders,
body: graphql,
redirect: "follow",
};
fetch("https://tray.io/graphql", requestOptions)
.then((response) => response.text())
.then((result) => console.log(result))
.catch((error) => console.log("error", error));
```
### Create user token
Copy the userId from the response of last call and use it to make a call to .
You will need a to make this call.
Copy the token as this will be used in the follow up steps.
```curl cURL
curl 'https://tray.io/graphql' \
--header 'Authorization: Bearer master_token' \
--header 'Content-Type: application/json' \
--data '{"query":"mutation ($userId: ID!) {\n authorize(input: {\n userId: $userId\n }) {\n accessToken\n }\n}","variables":{"userId":"d869ec65-XXXX-XXXX-XXXX-ac5c1a3958b6"}}'
```
```js Javascript
var myHeaders = new Headers();
myHeaders.append("Authorization", "Bearer master_token");
myHeaders.append("Content-Type", "application/json");
var graphql = JSON.stringify({
query:
"mutation ($userId: ID!) {\n authorize(input: {\n userId: $userId\n }) {\n accessToken\n }\n}",
variables: { userId: "d869ec65-XXXX-XXXX-XXXX-ac5c1a3958b6" },
});
var requestOptions = {
method: "POST",
headers: myHeaders,
body: graphql,
redirect: "follow",
};
fetch("https://tray.io/graphql", requestOptions)
.then((response) => response.text())
.then((result) => console.log(result))
.catch((error) => console.log("error", error));
```
## Trigger API calls
You are now ready to use Trigger API calls to create a subscription for the end user.
You will need the `user_token` you obtained in the last step to perform all the subsequent calls.
### Get Triggers
Make an API call to using `user_token`.
> **This call can also be made using the \`master\_token\`.**
```curl cURL
curl --location 'https://api.tray.io/core/v1/triggers' \
--header 'Authorization: Bearer user_token'
```
```js Javascript
var myHeaders = new Headers();
myHeaders.append("Authorization", "Bearer user_token");
var requestOptions = {
method: "GET",
headers: myHeaders,
redirect: "follow",
};
fetch("https://api.tray.io/core/v1/triggers", requestOptions)
.then((response) => response.text())
.then((result) => console.log(result))
.catch((error) => console.log("error", error));
```
Now copy the `name` and `version` for typeform-trigger from the response.
These will be required to obtain trigger operations and creating subscription.
### Get Trigger operations
Use the `name` and `version` from response of previous request and make an API call to using `user_token`.
> **This call can also be made using the \`master\_token\`.**
```curl cURL
curl --location 'https://api.tray.io/core/v1/triggers/:trigger-name/versions/:trigger-version/operations' \
--header 'Authorization: Bearer user_token'
```
```js Javascript
var myHeaders = new Headers();
myHeaders.append("Authorization", "Bearer user_token");
var requestOptions = {
method: "GET",
headers: myHeaders,
redirect: "follow",
};
fetch(
"https://api.tray.io/core/v1/triggers/:trigger-name/versions/:trigger-version/operations",
requestOptions
)
.then((response) => response.text())
.then((result) => console.log(result))
.catch((error) => console.log("error", error));
```
The response will be an array of operations.
For Typeform, there's only one operation with name `webhook`.
Inspect the `inputSchema` for this operation. This will be used to create the `input` object for the next call.
### Create Subscription
For creating a subscription successfully, we would need to send the following payload to
```json Request body
{
"name": "test-typeform-subscription",
"trigger": {
"name": "typeform-trigger",
"version": "4.1"
},
"operation": "webhook",
"authenticationId": "",
"input": {
"form_id": ""
},
"endpoint": ""
}
```
To get `authenticationId`, you should create a Typeform authentication for your user in Tray by following the guide on [Creating new auths](https://tray.ai/documentation/developer/getting-started/creating-end-user-auths/create-new-auths/)
For endpoint, You could use a Tray webhook URL where you will receive events from Typeform.
For this simply create a new Tray workflow with a and copy the public URL.
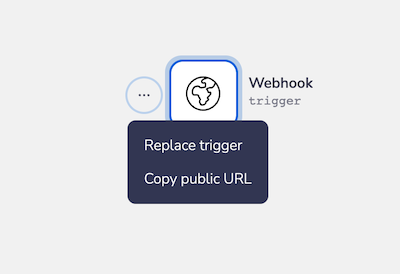
> **Info:** You can also set up a to a port on your machine and receive events on a local server for testing.
Here's a code sample with a test request:
```curl cURL
curl 'https://api.tray.io/core/v1/subscriptions' \
--header 'Content-Type: application/json' \
--header 'Authorization: Bearer user_token' \
--data '{
"name": "test-typeform-subscription",
"trigger": {
"name": "typeform-trigger",
"version": "4.1"
},
"operation": "webhook",
"authenticationId": "1a7f8a5b-xxxx-xxxx-xxxx-xxxx76d521ab",
"input": {
"form_id": "D9xxxx6g"
},
"endpoint": "https://9e2cf626-xxxx-xxxx-xxxx-xxxx33200b41.trayapp.io"
}'
```
```js Javascript
var myHeaders = new Headers();
myHeaders.append("Content-Type", "application/json");
myHeaders.append("Authorization", "Bearer user_token");
var raw = JSON.stringify({
name: "test-typeform-subscription",
trigger: {
name: "typeform-trigger",
version: "4.1",
},
operation: "webhook",
authenticationId: "1a7f8a5b-xxxx-xxxx-xxxx-xxxx76d521ab",
input: {
form_id: "D9xxxx6g",
},
endpoint: "https://9e2cf626-xxxx-xxxx-xxxx-xxxx33200b41.trayapp.io",
});
var requestOptions = {
method: "POST",
headers: myHeaders,
body: raw,
redirect: "follow",
};
fetch("https://api.tray.io/core/v1/subscriptions", requestOptions)
.then((response) => response.text())
.then((result) => console.log(result))
.catch((error) => console.log("error", error));
```
This will give you a response with the subscriptionId (`id` in the response):
```json
{
"id": "78f05417-xxxx-xxxx-xxxx-xxxx5762d390",
"name": "test-typeform-subscription",
"trigger": {
"name": "typeform-trigger",
"version": "4.1"
},
"operation": "webhook",
"authenticationId": "1a7f8a5b-xxxx-xxxx-xxxx-xxxx76d521ab",
"endpoint": "https://9e2cf626-xxxx-xxxx-xxxx-xxxx33200b41.trayapp.io",
"input": {
"form_id": {
"type": "string",
"value": "D9xxxx6g"
},
"public_url": {
"type": "string",
"value": "{$.env.public_url}"
}
},
"state": "active",
"signingKey": "jNEOJkfBNxCOGAHUUZZLqiEAbLbAd8SWr1kh0NHruJk9CIoy1+fv0+b89uGkEM7J52wMYObs/U1J59WFX3E2Kw=="
}
```
Copy the `id` from the response as this will be used for deleting the subscription after successful testing.
### Test subscription
You can fill the form using the public shareable URL of the Typeform you created at the start.
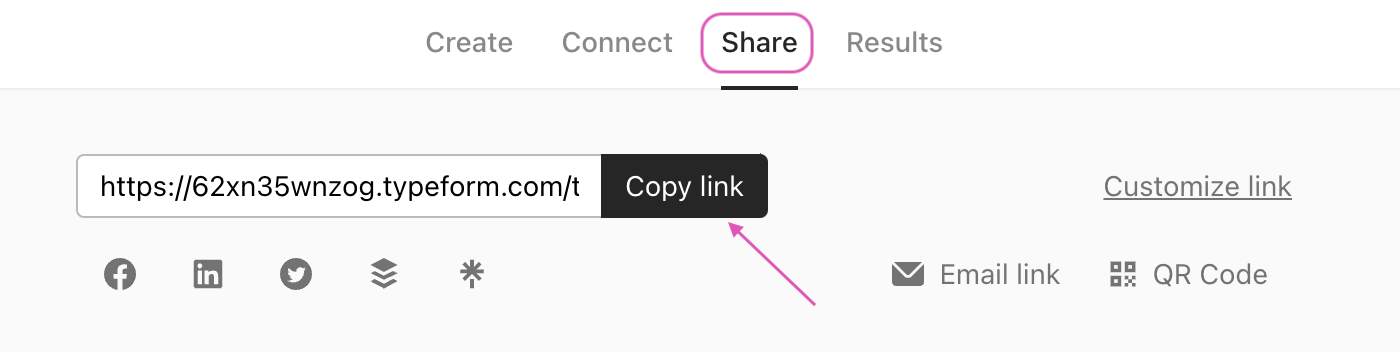
Once you submit the form, go back to the Tray workflow where added the webhook trigger.
You should see a successful workflow run.
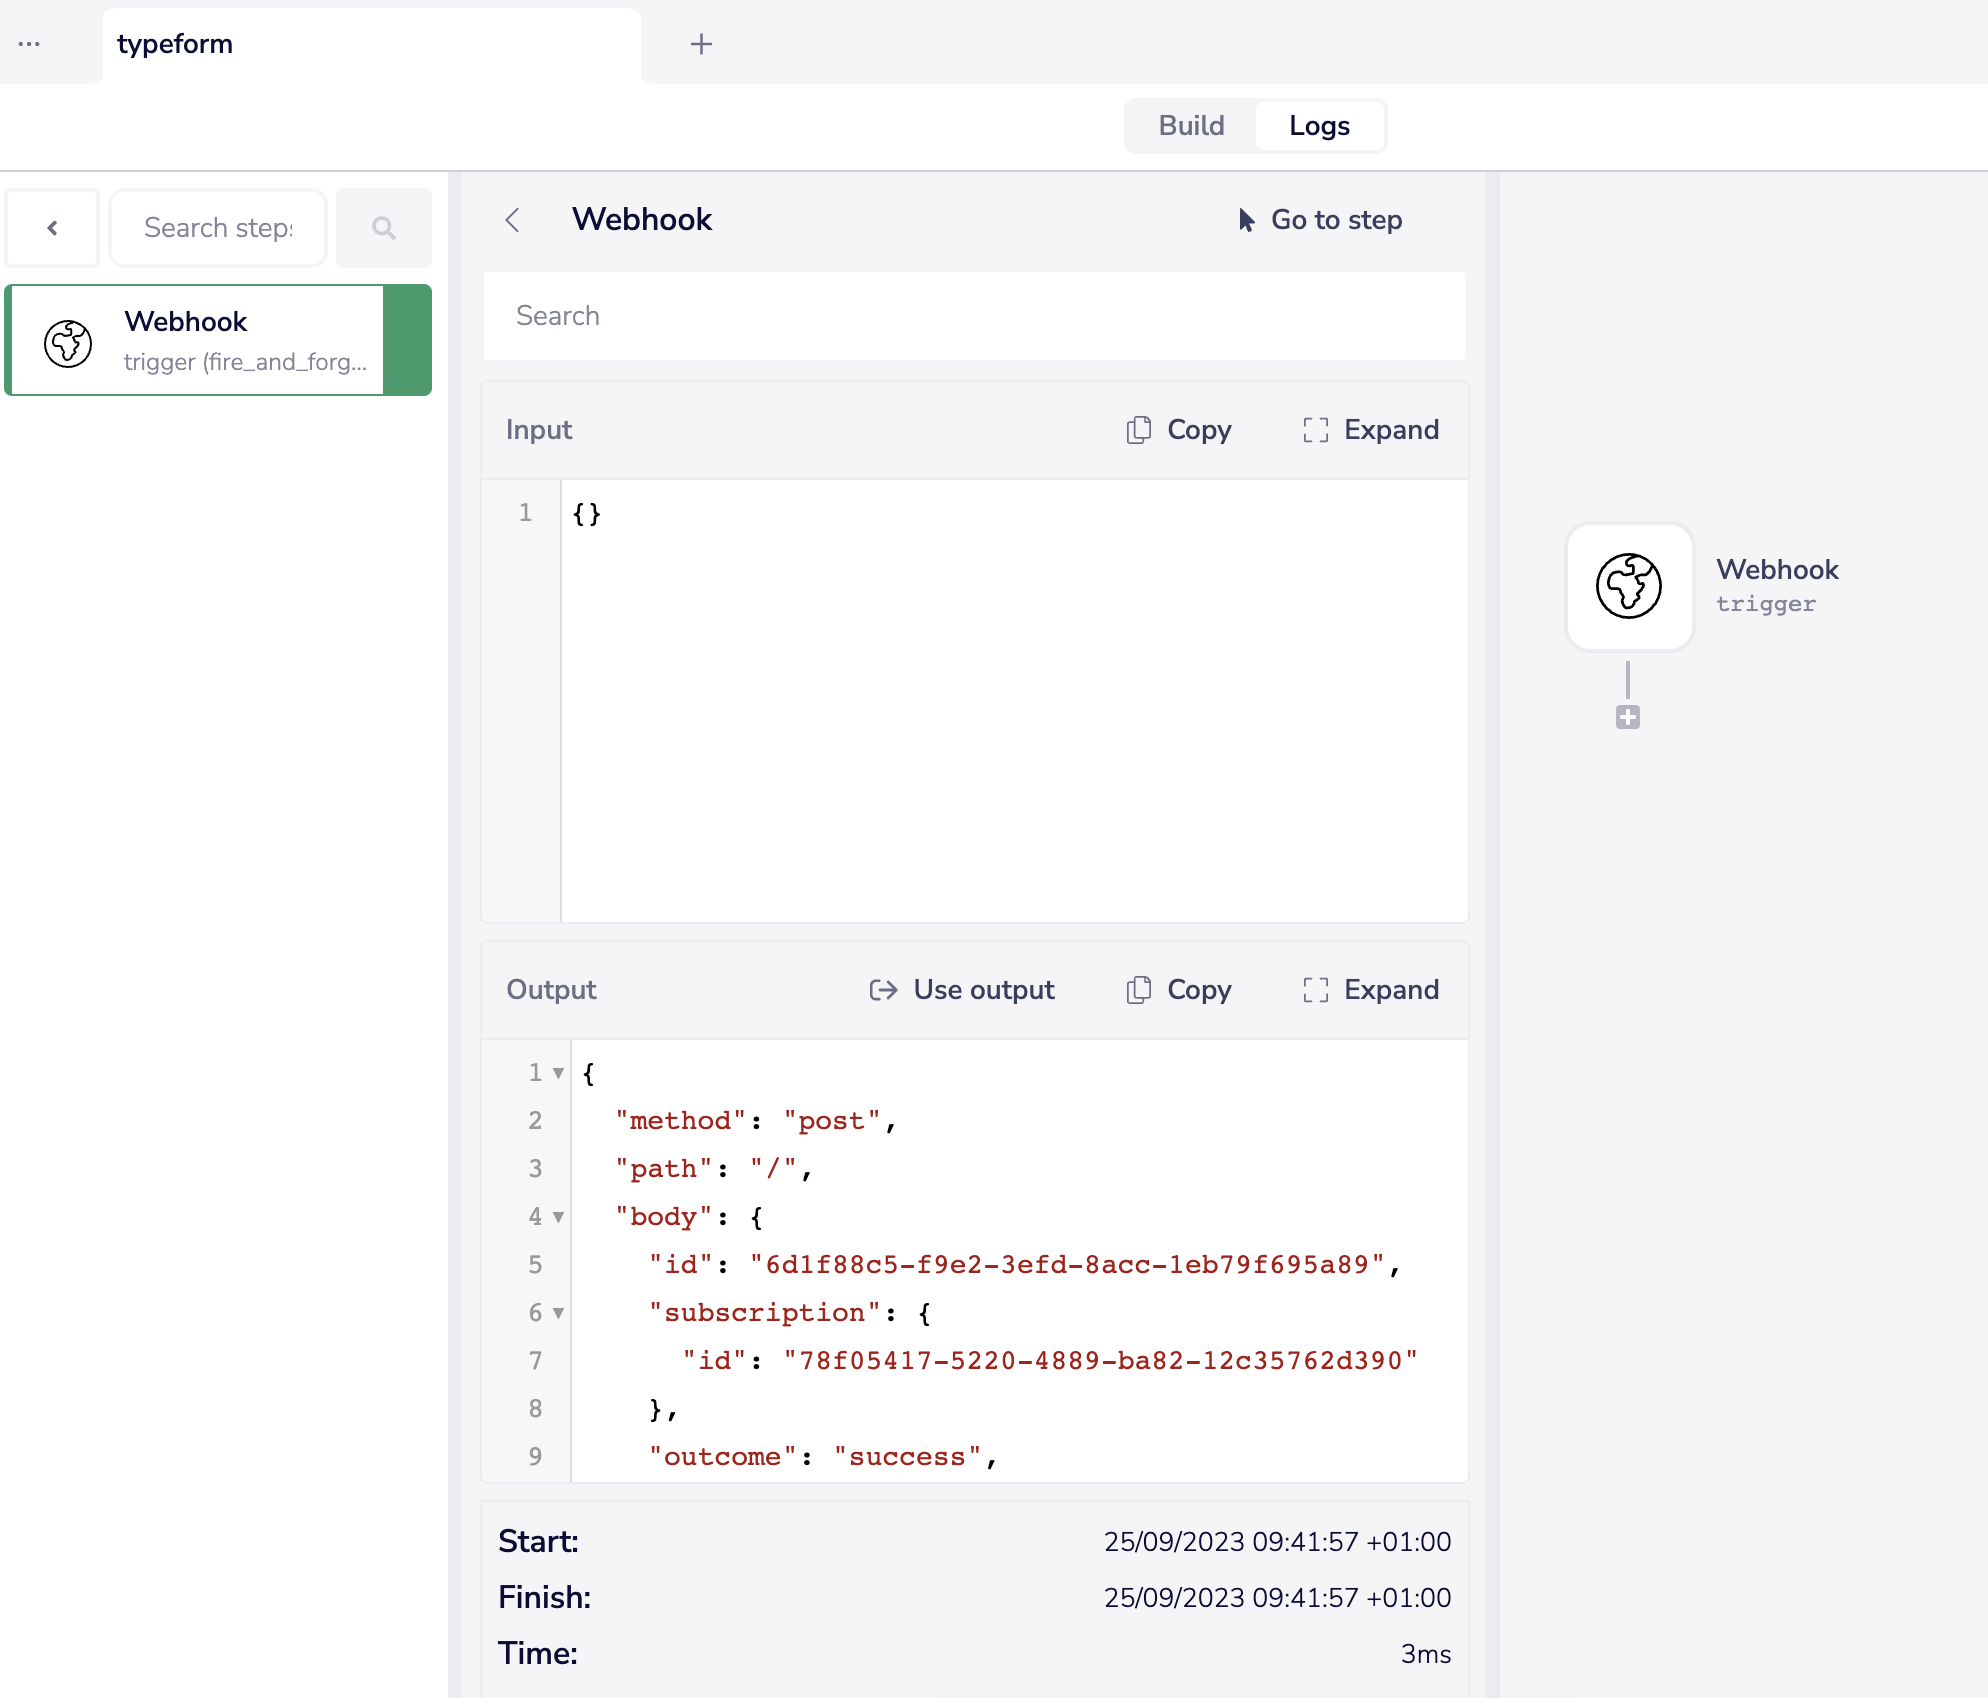
The payload from Typeform is the body of the `Webhook trigger` output. This payload will follow the `outputSchema` structure that was returned in [GET /trigger operations](#get-trigger-operations)
### Delete subscription
Since the subscription you created is still active, it will keep receiving payloads from Typeform at the webhook URL.
You can delete the subscription now by calling the endpoint.
```curl CURL
curl --request DELETE 'https://api.tray.io/core/v1/subscriptions/:subscriptionId' \
--header 'Authorization: Bearer user_token' \
--data ''
```
```js Javascript
curl --request DELETE 'https://api.tray.io/core/v1/subscriptions/:subscriptionId' \
--header 'Authorization: Bearer user_token' \
--data ''
```
The subscription should be deleted successfully with `204` no content.
---
# Verifying subscription payloads
Source: https://tray.ai/documentation/developer/getting-started/using-triggers/verifying-subcription-payloads.md
> **Verifying the payload is an optional step to ensure the authenticity of the payload.** This confirms the event payload originated from Tray and was not sent by a malicious third party.Hence, although this step is optional, it is recommended that you do this.
Once a subscription is created, you will receive a `signingKey` in the response.
The `signingKey` should be stored in your database against the subscription ID.
The `sigingKey` is used by Tray to generate a by signing the event payload.
This HMAC code will be sent as a header (`x-tray-signature`) along with the event payload to the `endpoint` you specified in [Create Subscription](https://tray.ai/documentation/developer/platform-apis/triggers#endpoint-create-subscription) request.
When you receive the event, you should verify the HMAC code before processing the payload.
Here is how you can do it in Node.js:
```js
const crypto = require("crypto");
const generateHMAC = (signingKey, requestBody) => {
const signingKeyBuffer = Buffer.from(signingKey, "base64");
return crypto
.createHmac("sha256", signingKeyBuffer)
.update(requestBody, "utf-8") //requestBody is your event payload in plain text
.digest("base64");
};
```
In the above code block, `signingKey` is what you get from upon creating subscription the first time.
`requestBody` will be the event payload (**in plain text**) that is sent to your `endpoint`.
The HMAC code generated using the function above should be equal to `x-tray-signature` header in the request.
> **The \`signingKey\` will only be sent the first time you create a subscription and never again.** The `signingKey` can NOT be obtained through [GET Subscriptions](https://tray.ai/documentation/developer/platform-apis/triggers#endpoint-get-subscriptions) or [GET Subscriptions by Id](https://tray.ai/documentation/developer/platform-apis/triggers#endpoint-get-subscription-by-id) calls.
---
# Pagination
Source: https://tray.ai/documentation/developer/getting-started/implementation-notes/pagination.md
When using the [Call connector endpoint](https://tray.ai/documentation/developer/platform-apis/connectors#endpoint-call-connector), certain 3rd party operations such as Salesforce 'List records' or Marketo 'List leads' may return long lists of data which will need to be paginated.
This can be dealt with using parameters such as `batch_size`, `next_page_token` etc.
**The exact pagination parameters will depend on the service**.
You can use our to check the input and output schema for each operation to look for any pagination parameters.
The following shows an example input for the Salesforce 'List Records' operation which passes a `batch_size` and `page_offset` token to obtain next page of records:
```json request
{
"operation": "find_records",
"authId": "a5f886xx-xxxx-xxx-xxx-xxf9459933",
"input": {
"object": "Account",
"batch_size": 200,
"page_offset": "0r84J1RcJ9gaMpWQKU-200",
"fields": ["Id", "Name"],
"conditions_type": "Match any conditions"
},
"returnOutputSchema": false
}
```
```json 200 response
{
"outcome": "success",
"output": {
"total": 31,
"next_page_offset": null,
"records": [
{
"Id": "0018d00000r3ynkAAA",
"Name": "Heaney, Lebsack and Brekke"
},
{
"Id": "0018d00000r3ynlAAA",
"Name": "Hegmann Inc"
},
...
...29 More Records
...
]
}
}
```
The **token for the next batch** and e.g. 'has more’ information will be **returned in the 200 response**.
---
# Working with webhooks
Source: https://tray.ai/documentation/developer/getting-started/implementation-notes/working-with-webhooks.md
If you are creating integrations that are dependent on 3rd-party webhooks, you may find that some policies are quite restrictive.
e.g. for **Jira Cloud**, the following constraints apply:
* For an **OAuth 2.0 app**, the limit is **5 webhooks per app** per user on a tenant
* A **single webhook url** can be registered per app
* Webhooks **expire every 30 days**
In such a case a solution you may need to implement is to set up **webhook proxies**.
This could be done natively in the Tray builder by:
1. **Creating a webhook-triggered workflow** to receive all webhooks from the 3rd party
2. **Building the necessary filtering logic into the workflow** (which you otherwise might have done with the 3rd party using e.g. Jira queries)
3. **Routing the payloads** to any required destinations
You would then need to **schedule a job**, after e.g. 29 days, to create a **new webhook with the 3rd party** (in the 3rd party admin UI or via API) with the same **destination URL of your Tray workflow**.
You could also build the above proxy system in your own external code outside of Tray.
---
# File storage
Source: https://tray.ai/documentation/developer/getting-started/implementation-notes/file-storage.md
When using the [Call connector endpoint](https://tray.ai/documentation/developer/platform-apis/connectors#endpoint-call-connector), certain operations require temporary file storage, when e.g. a generated file needs to be made available as an output that can be accessed downstream.
When using the Tray builder, Tray handles this for you by storing the file in an S3 location.
As an API customer, however, you will need to set up your own file storage system, using S3 or an appropriate equivalent.
---
# Building a UI form
Source: https://tray.ai/documentation/developer/getting-started/tutorials/building-a-ui-form.md
This page is a tutorial on how you can code a generic frontend form which works with all Tray connectors and operations.
It will give you a head start in building a UI form that you will ultimately present for your End Users.
The code used for this tutorial is what drives our [Connector Tester app](https://tray.ai/documentation/developer/getting-started/tutorials/building-a-ui-form)
You can clone the code from the .
It is highly recommended that you install and run the demo app in order to play with the services you plan to use in your application.
This will give you a good understanding of what is involved in terms of the options presented
## Tools used
### JSON Schema
We use JSON Schema to decribe the data formats for inputs and outputs of our connectors.
In a nutshell, **JSON Schema is a declarative language to annotate and validate a JSON document with standard definitions**.
If you are interested in reading more about JSON Schema, you can check out their step-by-step guide .
### React + MUI
To build the UI of the app.
### Express.js
To build a proxy server that powers UI.e
## High level diagram
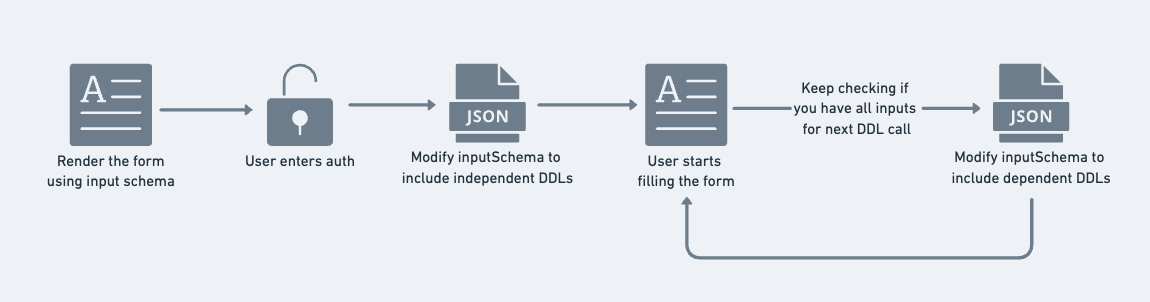
## Step by step guide:
### 1. Prepare the Input schema for form
As mentioned, every operation on a Tray connector has a predefined input format declared using JSON schema. You can use this input schema directly or modify it to only include the fields you would want to render.
To render the schema, the app uses a popular JSON Schema renderer library called
> **JSON schema is an industry standard and hence there are several other open source libraries worth exploring, you could also code your own JSON Schema renderer component.**
You can also merge schemas of two operations if you are building integrations between two services.
Click to see the input schema for an integration that pushes `contacts` from a Google Spreadsheet to Mailchimp:
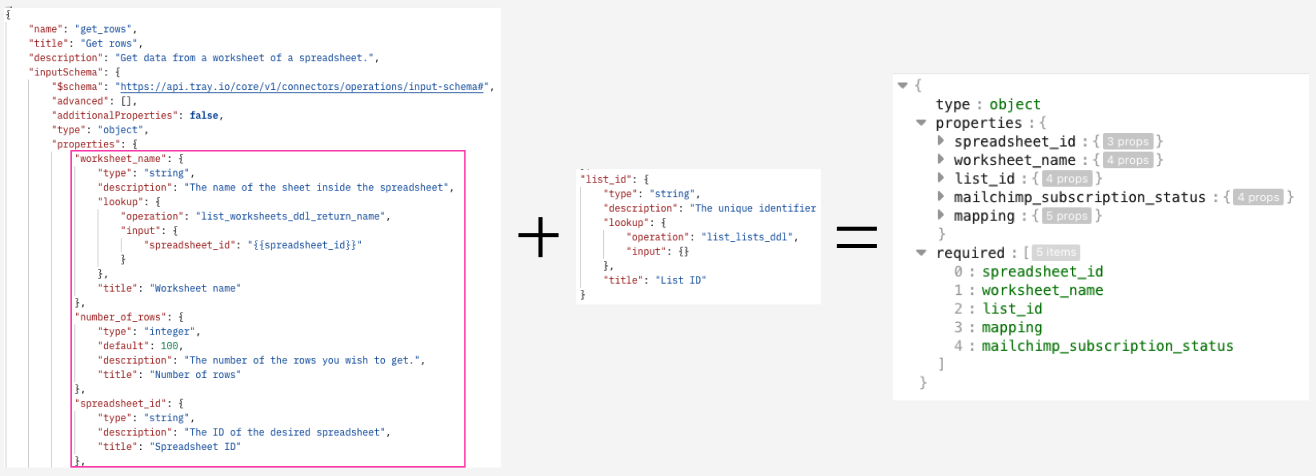
### 2. Render the Input schema
Here's a code sample for creating a `schemaRenderer` component using RJSF's theme. RJSF provides support for multiple CSS libraries including MUI, Bootstrap, Chakra and many more so you can choose the one that fits into your tech stack.
```js
import { useState } from "react";
import validator from "@rjsf/validator-ajv8";
import Form from "@rjsf/mui";
export const schemaRenderer = ({ inputSchema }) => {
const [inputPayload, setInputPayload] = useState({});
return (