This post is the 3rd in our series around how to build an inbound lead processing pipeline using the Tray latform. It dives in to take a closer look at the workflows that underpin the first half of the pipeline.
This post is the third in a series on the Lead Processing Pipeline, a framework for lead management that empowers your team to take full control of your lead flow using the Tray platform. If you haven’t read them already, check out the first two blogs below:
- Why low code is the future of lead management (and RevOps)
- Introduction to the Lead Processing Pipeline
Alright, I’m done selling you on the why of low code for RevOps (check out my first two posts above for more on this). I personally like getting my hands dirty and seeing EXACTLY how things work and that’s how we’re gonna roll from here on out.
In this post, we’re going open source. We’ll be diving into the nitty gritty details of the following RevOps “microservices”, aka callable workflows, that make up the first half of the lead processing pipeline:
- Intake: How we capture new leads from different channels.
- Validation: How we validate the emails associated with those leads.
- Lead/Contact Search: How we search for existing records to prevent duplicates.
- Enrichment: How we programmatically enrich leads with missing context.
- Creation: How we create leads in our CRM.
Here’s the entire Lead processing pipeline for reference. For each callable workflow, I’ve provided some commentary on what it’s doing, a simplified process diagram to show the important aspects of how it works, and a detailed video walk-through that unpacks how it’s built on the Tray platform. Without further ado, let’s get this party started.
Lead intake: Catch and release
Lead intake processes for the pipeline consist of a "package" of workflows. By package, we simply mean there are multiple workflows that comprise a given job in a process. Our intake processes rely on more than one workflow because leads can come from various sources (such as those shown in the diagram below). We classify each workflow in this package as an “orchestration” flow, as they're not writing data to any system but routing it through to another step in our process. Each workflow "catches" lead data, preps it for processing (using our mapping utility), and "releases" it into the pipeline.
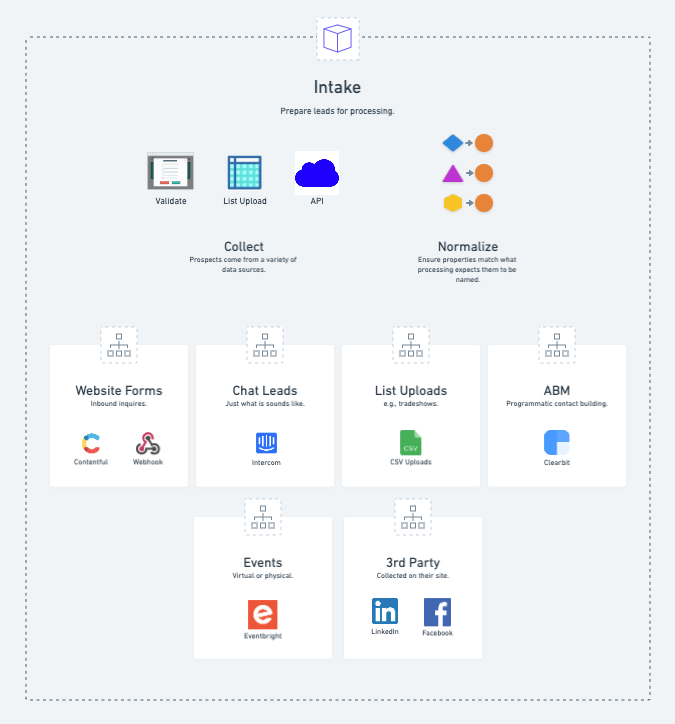
Our package of lead intake workflows
Reliable lead intake requires good form(s)
Our intake workflow for web form submissions is a great example of how you can use automation to break free of the shortcomings of out-of-the-box features, such as form libraries from marketing automation vendors. Depending on your native form provider, you might encounter challenges, including form load speed, reliability, and duplicate leads.
Web forms are a critical source of leads, so when forms are unreliable or slow, it's clearly a big problem for your lead funnel. Because we’ve decoupled our lead processing from our marketing automation platform, we can render our forms server-side and know they’ll work every time.
Our web forms post to an intake workflow, which uses a webhook trigger to catch the lead data on submission. The workflow is quite simple, with just a few checks to ensure we should send the lead through to our pipeline, run normalization to transform the form submission into our ops object structure, then send it to the pipeline using a call workflow helper.
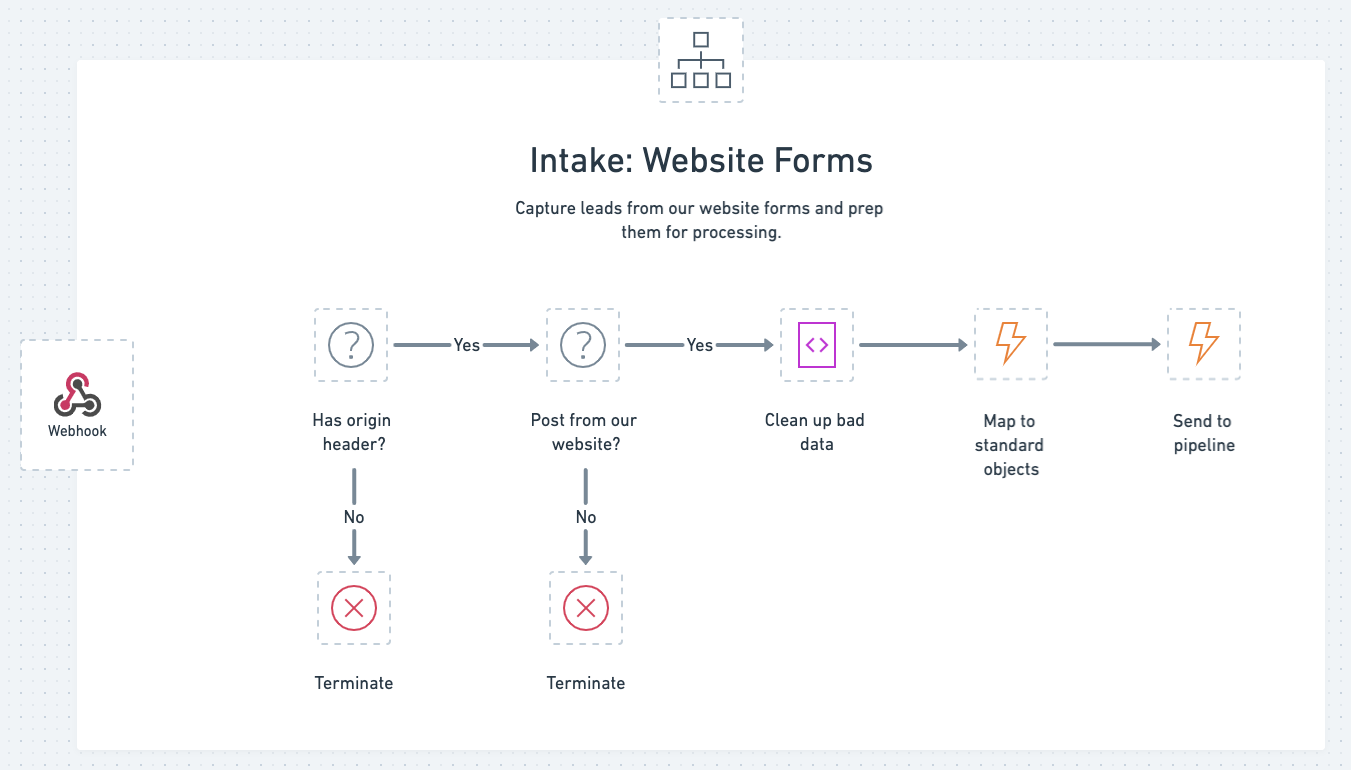
How we capture leads from our website
As your processes change over time, the conventions used for various form data often change as well. This may have to do with property names (e.g., first_name becomes FirstName) or property values (e.g., “Demo Offer” becomes “1:1 Demo”). It’s often hard to get all of this data cleaned up out there in the form universe. That’s why we created a little script in our form intake workflow that cleans this data up without the need to run down every four year old form out there on our website, it’s pretty handy.
The fundamentals I’ve shown you in this web form intake process apply to every lead source you might have (e.g., list uploads or 3rd party APIs). And, thanks to the ease of low-code technology, other trusted marketers can be taught this approach to set up their own lead sources. For example, our ABM Marketer built their own intake workflow to programmatically source contacts for reps to use in an outbound motion. They feel great because they got to learn some new technical skills, we feel great because that’s one less job we have to deal with.
Validation: Preventing bad data from entering the pipeline
Now that our intake workflows have given us a clean set of objects and lead properties flowing into the pipeline, our next step is to confirm we’ve received a valid email address to minimize bad data entering our systems.
The first "utility" workflow (send it data, it sends data back) we used in our pipeline is our validation workflow. It evaluates a person’s email and returns a variety of data points about it so we can make decisions in the calling workflow, such as:
- Is this a real email address?
- Is this from a free email provider?
- Is it from an employee here at Tray?
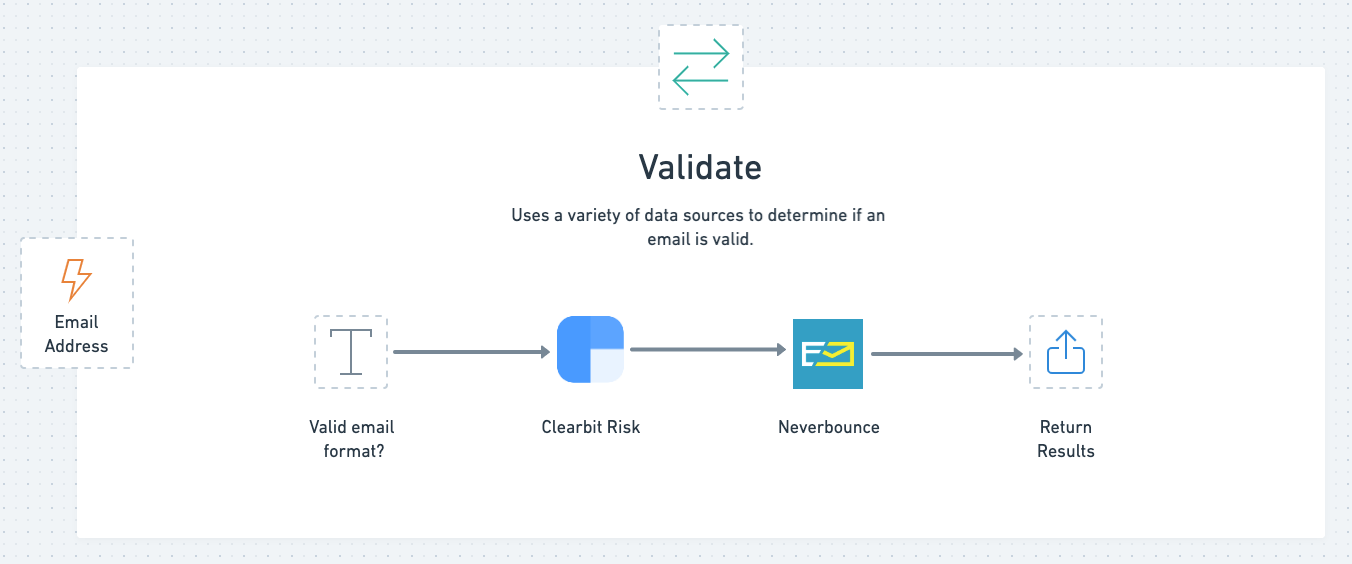
How we validate leads
The "Is Email?" text helper operation determines if the email is syntactically valid, while two vendor’s APIs, Clearbit Risk and Neverbounce, determine the rest of our validation attributes. If either source identifies a disposable address, we return isFreeProvider:true. Otherwise, we return that property as false.
When we first built this workflow, we used a static list of “bad words” and “freemail” providers to validate, but chose later to include both Neverbounce and Clearbit Risk to boost the accuracy of our validation efforts and prevent the need for upkeep of these static lists. The validation workflow is a great example of how a modularized approach helps you easily extend your processes’ functionality and reliability using low code.
De-duplication: Ensuring data hygiene
If there's one thing that sales ops teams hate most, it's duplicates. Our strategy to prevent duplicates is built off the workflow we’ll discuss next. All the workflow needs is an email address and it will return with any matching leads or contacts that already exist inside our CRM. Since the pipeline is the only way we create inbound or programmatically sourced leads, this workflow ensures that we won’t create any duplicate records.
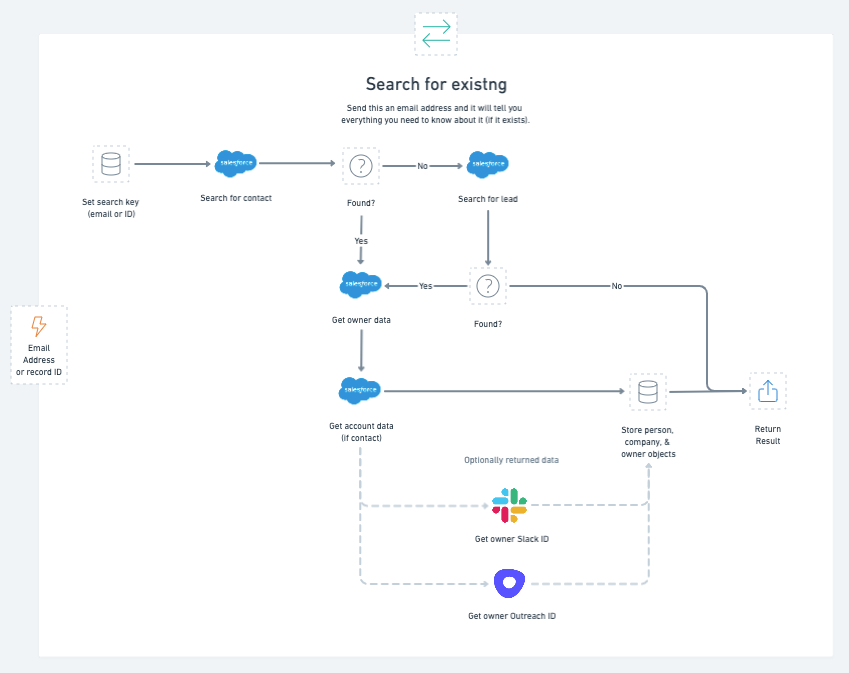
How we search for existing leads
While the workflow’s utility plays a considerable role in our pipeline, you can also use it for many other use cases where you need the latest and greatest data from a given lead or contact.
We've added additional functionality, including the ability to ask for data such as the owner's user ID from other important tools such as Slack and Outreach by specifying options on the trigger using the input schema feature (dear callable workflows, I love you).
Our lovely Academy Live team has a great training on using callables that you should definitely check out.
Enrichment: Filling in the missing pieces
We’re strong believers in using programmatic enrichment in lead processing. It allows us to create forms that convert better because less information is required, helps us score more accurately, improves lead-to-account matching, and routes leads to the right folks.
The pipeline runs programmatic enrichment for any leads that we know we’re going to create net new and are missing important information such as job title, phone number, company size and so on. We check for these properties in the person and company objects sent to the pipeline from intake using the “properties exist” operation for an object helper.
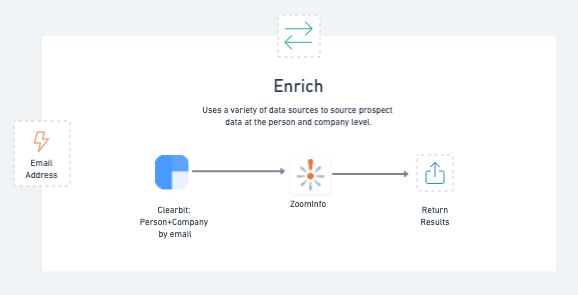
How we enrich leads
What we’re essentially doing here is calling multiple vendor APIs to get person and company data, mapping that data to our standardized object structure, and using a script to mash it all together. The script is pretty nifty, as it allows us to prioritize specific attributes from each vendor. For example, if we like job title data from Clearbit we can say use that first, then if Clearbit doesn’t have something, try to use Zoominfo next.
Creation: Let there be leads
The lead creation step is a bit of an exception in that this part is not a standalone workflow. Instead, lead creation happens directly in our CRM with all the properties they’ve provided or we’ve sourced via programmatic enrichment.
Just before we create the lead, we use our mapping utility to transform our person and company objects back into an “update” structure for our CRM (Salesforce). A cool feature of our mapping utility is that it’s able to set default values for fields we don't want blank. For example, if we don't have the person’s last name or a company’s name, it will replace null values with “[[Unknown]]” when we tell it we’re going to make an “update” call to Salesforce.
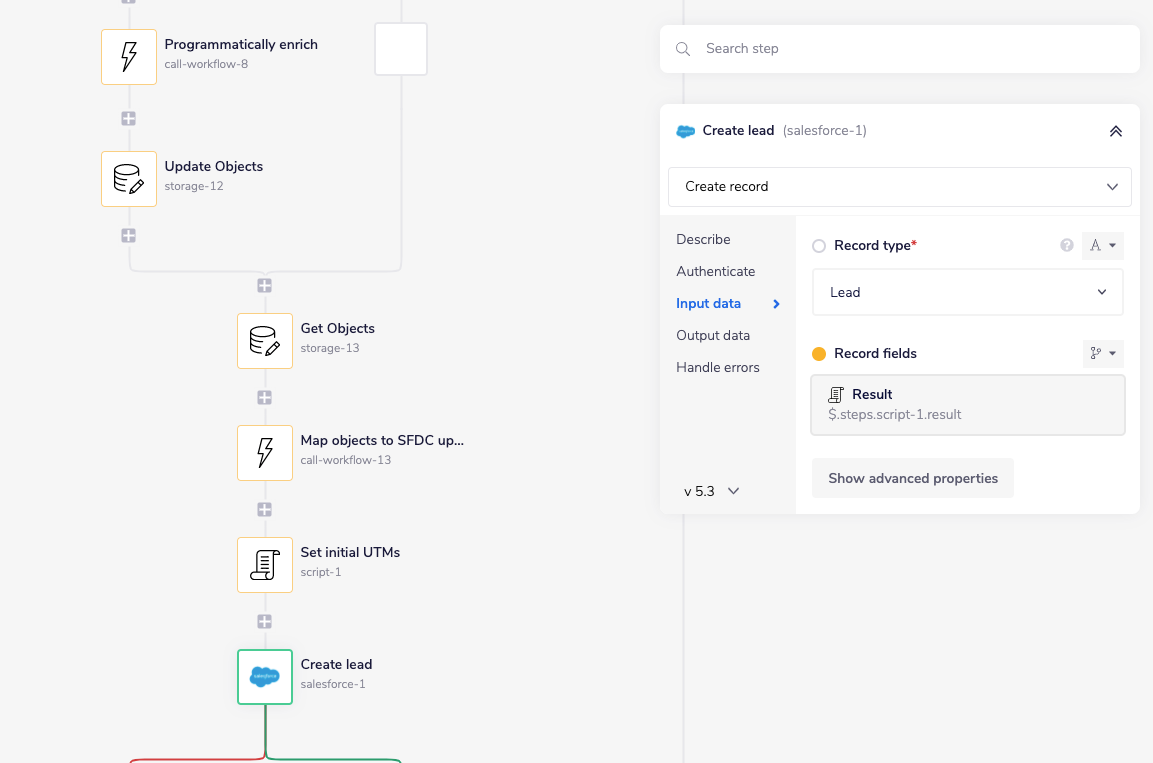
The script step you see above adds some unique fields we use for first touch attribution on the lead itself (e.g., “initial UTM campaign”) just before we create the lead.
Finishing the Lead processing pipeline: Attribution, scoring, routing, and more
Now, you’ve seen how to intake, validate, prevent duplicates, programmatically enrich, and create leads using the lead processing pipeline. With these processes in place, you’ll have greater control over the first half of your lead management funnel and won’t have to worry about frustrating manual data jobs that tax your team’s resources.
But what about lead-to-account matching, attribution, scoring, routing, and sequencing? Don’t worry - we’ll cover more critical jobs to be done in lead management in the last section of our guide to process-driven RevOps.
Stay tuned for more, and consider watching this quick demo to see the Tray platform in action.
