Notes on using Google Sheets
Sharing permissions
If you wish to share or give people access to your spreadsheet please note that permissions come under the remit of the Google Drive connector. Simply add a Google Drive connector and select the Create permission operation to specify the kind of access you wish to grant your user/s.
List Spreadsheets & Google Drive
IMPORTANT!: You now need to use the Google Drive connector in conjunction with the Google Sheets connector in order to list all available spreadsheets from within a user's account. This update effectively breaks all / any previous workflows that were dependent upon this ability within the Google Sheets connector.
Due to security updates from Google we have had to separate the ability to List Spreadsheets from the Google Sheets connector itself. This operation now resides in the Google Drive connector in its entirety. If you have a workflow which uses an old version of Google Sheets (one where the List spreadsheets operation is still available) we recommended revising your workflow in one of the following ways to avoid any potential downloading or security issues:
- Retrieve multiple sheets: Add a Google Drive connector to an earlier point within your current workflow.
- Select List spreadsheets from the operations list.
- Set it up in conjunction with your Google Sheets user.
- Retrieve a single sheet: Select via sheet ID
- Put the Google Sheet ID into the relevant operation field.
Finding the Spreadsheet ID
- Open the desired spreadhseet.
- Select the URL of the spreadhseet. It will be similar to:
https://docs.google.com/spreadsheets/d/1Ubfhc3e67Ivv6Wj5pJVPuQ6l7_3n_Bck397CC9-Z8Mw/edit#gid=0. - The Spreadhseet ID is the hash betwen the
d/and the/editsections. - In this example the Spreadhseet ID is
1Ubfhc3e67Ivv6Wj5pJVPuQ6l7_3n_Bck397CC9-Z8Mw.
Downloading Files
As the Google Drive connector holds most of the permissions available for downloading Google files (regardless of type) - it is recommended to try revising your workflow to include this connector, should you face any Google file downloading issues.
Setting up your Google Sheet to work with Tray.io
To use your Google Sheet with Tray.io, you'll need to set up your Sheet to work in a specific way:
- The first row must have column headers, for each of the columns you'd like to use with Tray.io
- There can be no completely blank rows in your spreadsheet (you'll need to delete any blank rows, as Google creates sheets with default 1,000 rows). Our operations are becoming more robust in handling this, however if something isn't acting as expected please check this first.
- The row values in your sheet should be in rows 2, 3, 4...etc - this is automatically handled if you use the sheets connector to create this for you from scratch.
- While it may not seem like a mandatory field, having a 'Column heading' is always necessary. Note that there is a 'Create column headers for sheet' operation that may make things simpler for you, should you wish to utilise it.
- In order to update your column headers, you may wish to utilise the 'Update row' operation. In order to do so you will need to set the property 'Row number' to
1. Please be aware that any data you already have in this row, will be over written as a result! - If you have forgotten to add a header to you sheet, but it still contains data, you will need to add the row you are overwriting to the end of the sheet using the 'Create Row' operation first; so you can then utilise the 'Update Row' operation in order to create said headers.
- When row values are added to a Google Sheet they are mapped based on the letter associated with the Column Heading selected. The technical assumption is that these column headings and associated column letters are set and will not change. If you change the order of the columns on the Google Sheet interface (thus changing the letter associated with the heading) the letter configured in the background of the Tray.io workflow will not update automatically. You will need to refresh the configuration in the Tray.io workflow manually. To do so, you will need to re-select the column heading from the column picker dropdown.
Create row VS Append Values Create row allows users to create a row in spreadsheet. It checks that there are headers in the sheets and will automatically add a row under the next available row, without users having to know the cell ranges. This operation is more useful when adding data one piece at a time Append values allows users to update a load of data into a sheet in one go. Note that it doesn't check if its overwriting anything. Think of it like a quick 'bulk insert' that runs no checks.
Get worksheet data
Please be aware that the number of Google sheet rows you can pull in using the 'Get worksheet data' operation is limited to 40,000.
Basic examples
This section provides simple, step-by-step instructions on how to work with specific operations of the Google Sheets connector.
Get rows
PLEASE NOTE: This is one of the most complex operations in the Google Sheets connector.
The 'Get rows' operation generally speaking, allows a user to retrieve any number of rows from a google spreadsheet. This operation will automatically gather all the row data available (including blanks) unless you apply 'Filter's to your request.
There are many variations and combinations possible when using the following filters available:
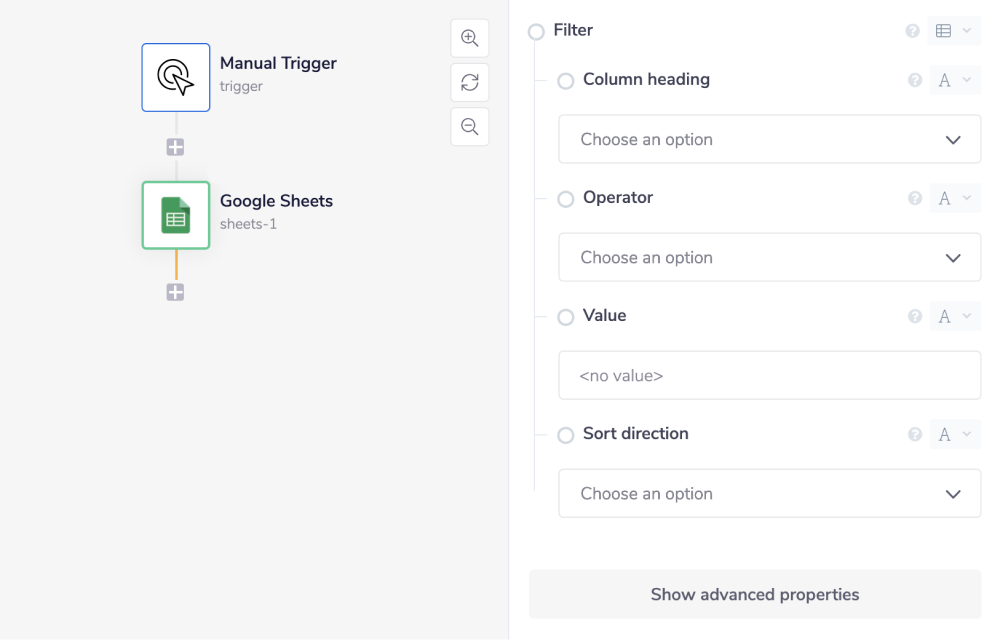
- Column Heading
- Operator
- Value
- Sort Direction
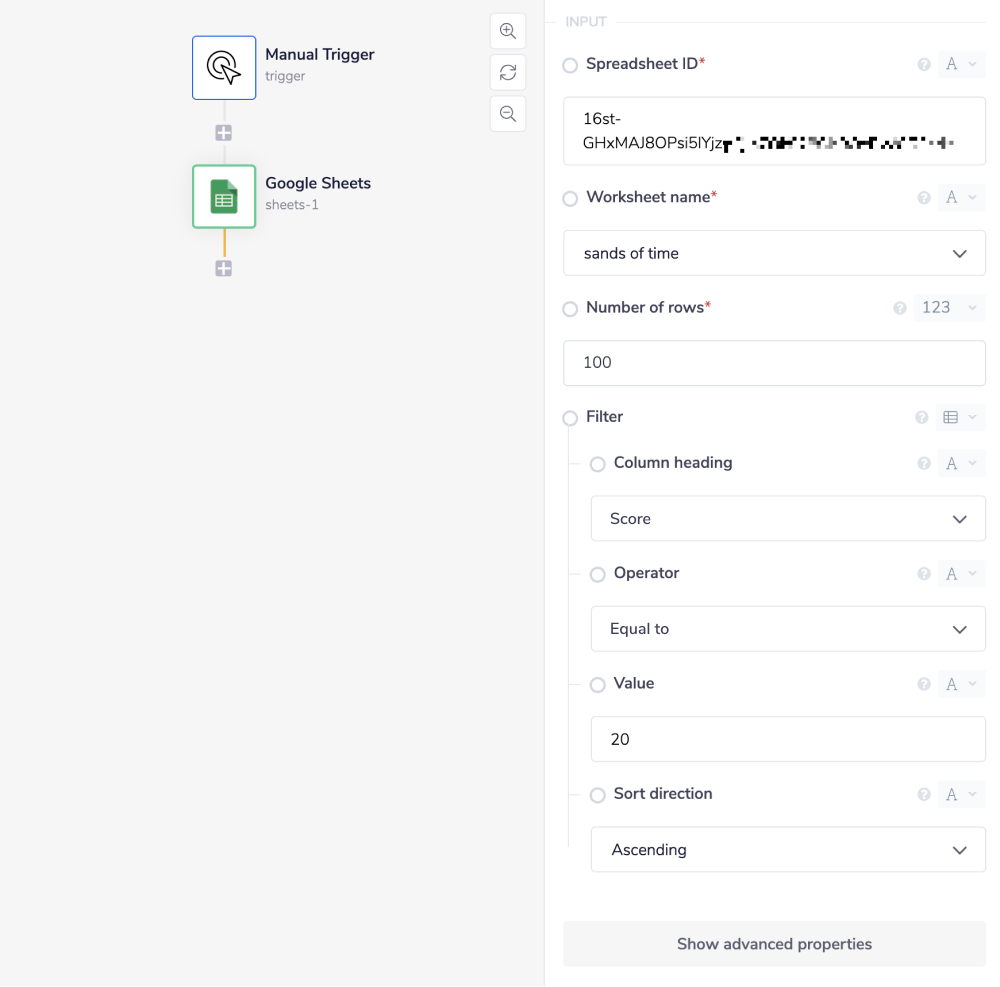
When using the 'Filter's available (as described in more detail below), your end result should be similar to this:
 Column Heading
Users are able to filter through columns, via selecting the relevant column heading. It is important that all columns have headers in order for this operation to work. See above notes on column headers within "Setting up your Google Sheet to work with Tray.io"
section for more details.
Do not use the letter of the column you wish to change - make sure to use its header instead. Tray.io uses the header to work out its letter for you.
Operator
This is a set of matcher functions that will match the cell value, to the value that you have supplied, depending on the comparison type you select.
Think of it as a more advanced boolean operation, where there are a few more options to choose from.
While most are self explanatory, please take case when selecting the 'Empty cells' Operator.
When filling in the 'Value' field (having selected the 'Empty cells' as your operator), please make sure to use the values
Column Heading
Users are able to filter through columns, via selecting the relevant column heading. It is important that all columns have headers in order for this operation to work. See above notes on column headers within "Setting up your Google Sheet to work with Tray.io"
section for more details.
Do not use the letter of the column you wish to change - make sure to use its header instead. Tray.io uses the header to work out its letter for you.
Operator
This is a set of matcher functions that will match the cell value, to the value that you have supplied, depending on the comparison type you select.
Think of it as a more advanced boolean operation, where there are a few more options to choose from.
While most are self explanatory, please take case when selecting the 'Empty cells' Operator.
When filling in the 'Value' field (having selected the 'Empty cells' as your operator), please make sure to use the values trueorfalse.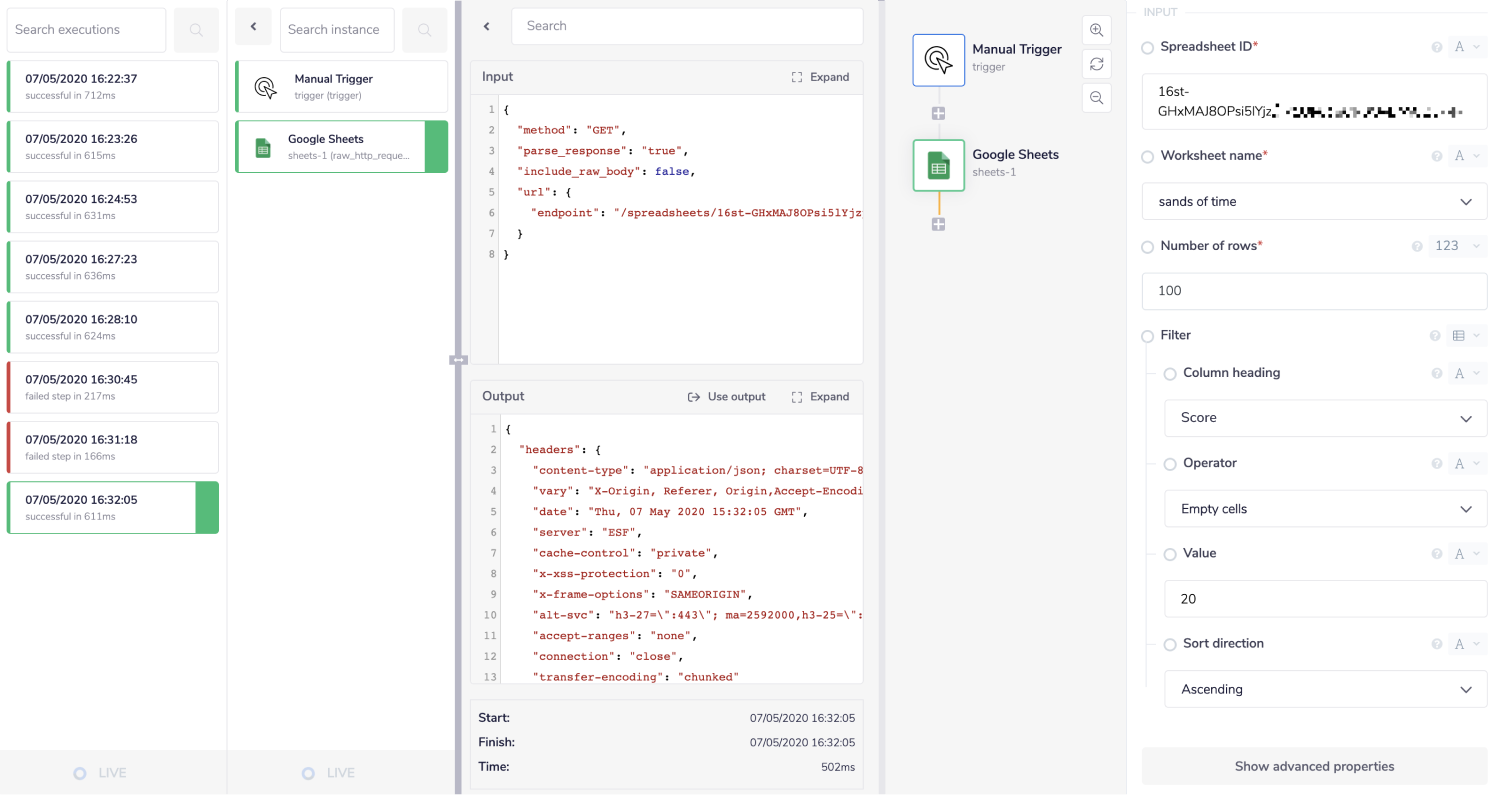 Value
Value
IMPORTANT!: Please be aware that all values returned from Fthe Google Sheets connector are basedin a string format.
The following 'Operator's deal with the following data types: Number based These 'Operator's convert the value given from the Tray.io 'Value' input field, and the actual specified Google Sheets cell value into numbers, before they then compare the two. Please be aware that they do not deal with floats only integers!.
- Greater than
- Less than
- Greater than or equal to
- Less than or equal to String based These 'Operator's compare strings only. These values look at comparing strings to each other.
- Text contains
- Text doesn't contain Number & String based: As mentioned previously, all values are originally returned in a string data format, from Google Sheets connector. Therefore to reduce complexity, these operators do not take into account the data type be they string or number. This means that an integer 2 would be the same as string '2'.
- Equal to
- Not equal to Boolean based
- Empty cells Sort Direction This filter is only used when the 'Value' input field parses to a number. You can use this operation to sort the returned output (from an earlier run) either as ascending or descending.
Update cell value
To update a cell value using the Google Sheets connector, you need to specify two parameters: a letter for the column and a number for the row in the Cell field of the properties panel, such as A1. Consider a workflow where you receive the following data through the Webhook trigger.
[
    {
        "id": "f6c52913-e27d-483f-9506-d376e3b98b4c",
        "name": "Add users to organization",
        "description": "<p>As a team owner or admin I want to add as many people as I want to my team</p>\n",
        "type": "subfeature",
        "status": \{
            "id": "1ddfa863-0549-4024-951f-5b25af108af7",
            "name": "In progress"
        \}
    }
]
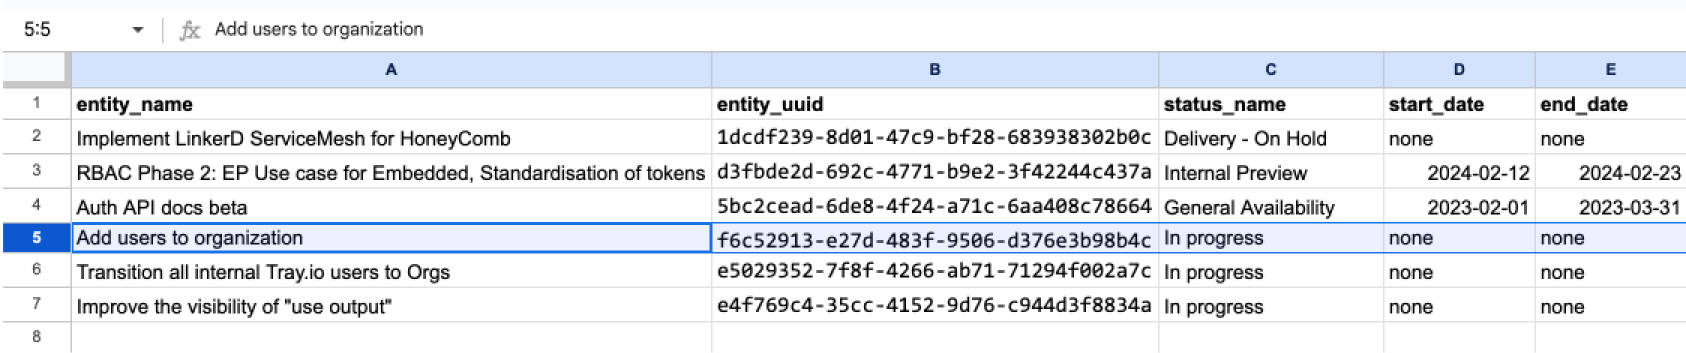
Upon receiving the data, the workflow would perform a check based on matching IDs and update the status in the Google Sheets below if it is not the same.
 To accomplish this, we utilize the Google Sheets Update Cell Value operation and hardcode the required column for the Cell parameter. In this case, it would be Column C.
Then, you must dynamically provide the value for the row number. In this example, we achieve this by using the JSON path
To accomplish this, we utilize the Google Sheets Update Cell Value operation and hardcode the required column for the Cell parameter. In this case, it would be Column C.
Then, you must dynamically provide the value for the row number. In this example, we achieve this by using the JSON path ($.steps.loop-1.value.row_number) from the Looping sheet data (loop-1) step.
Please disregard any warning signs.
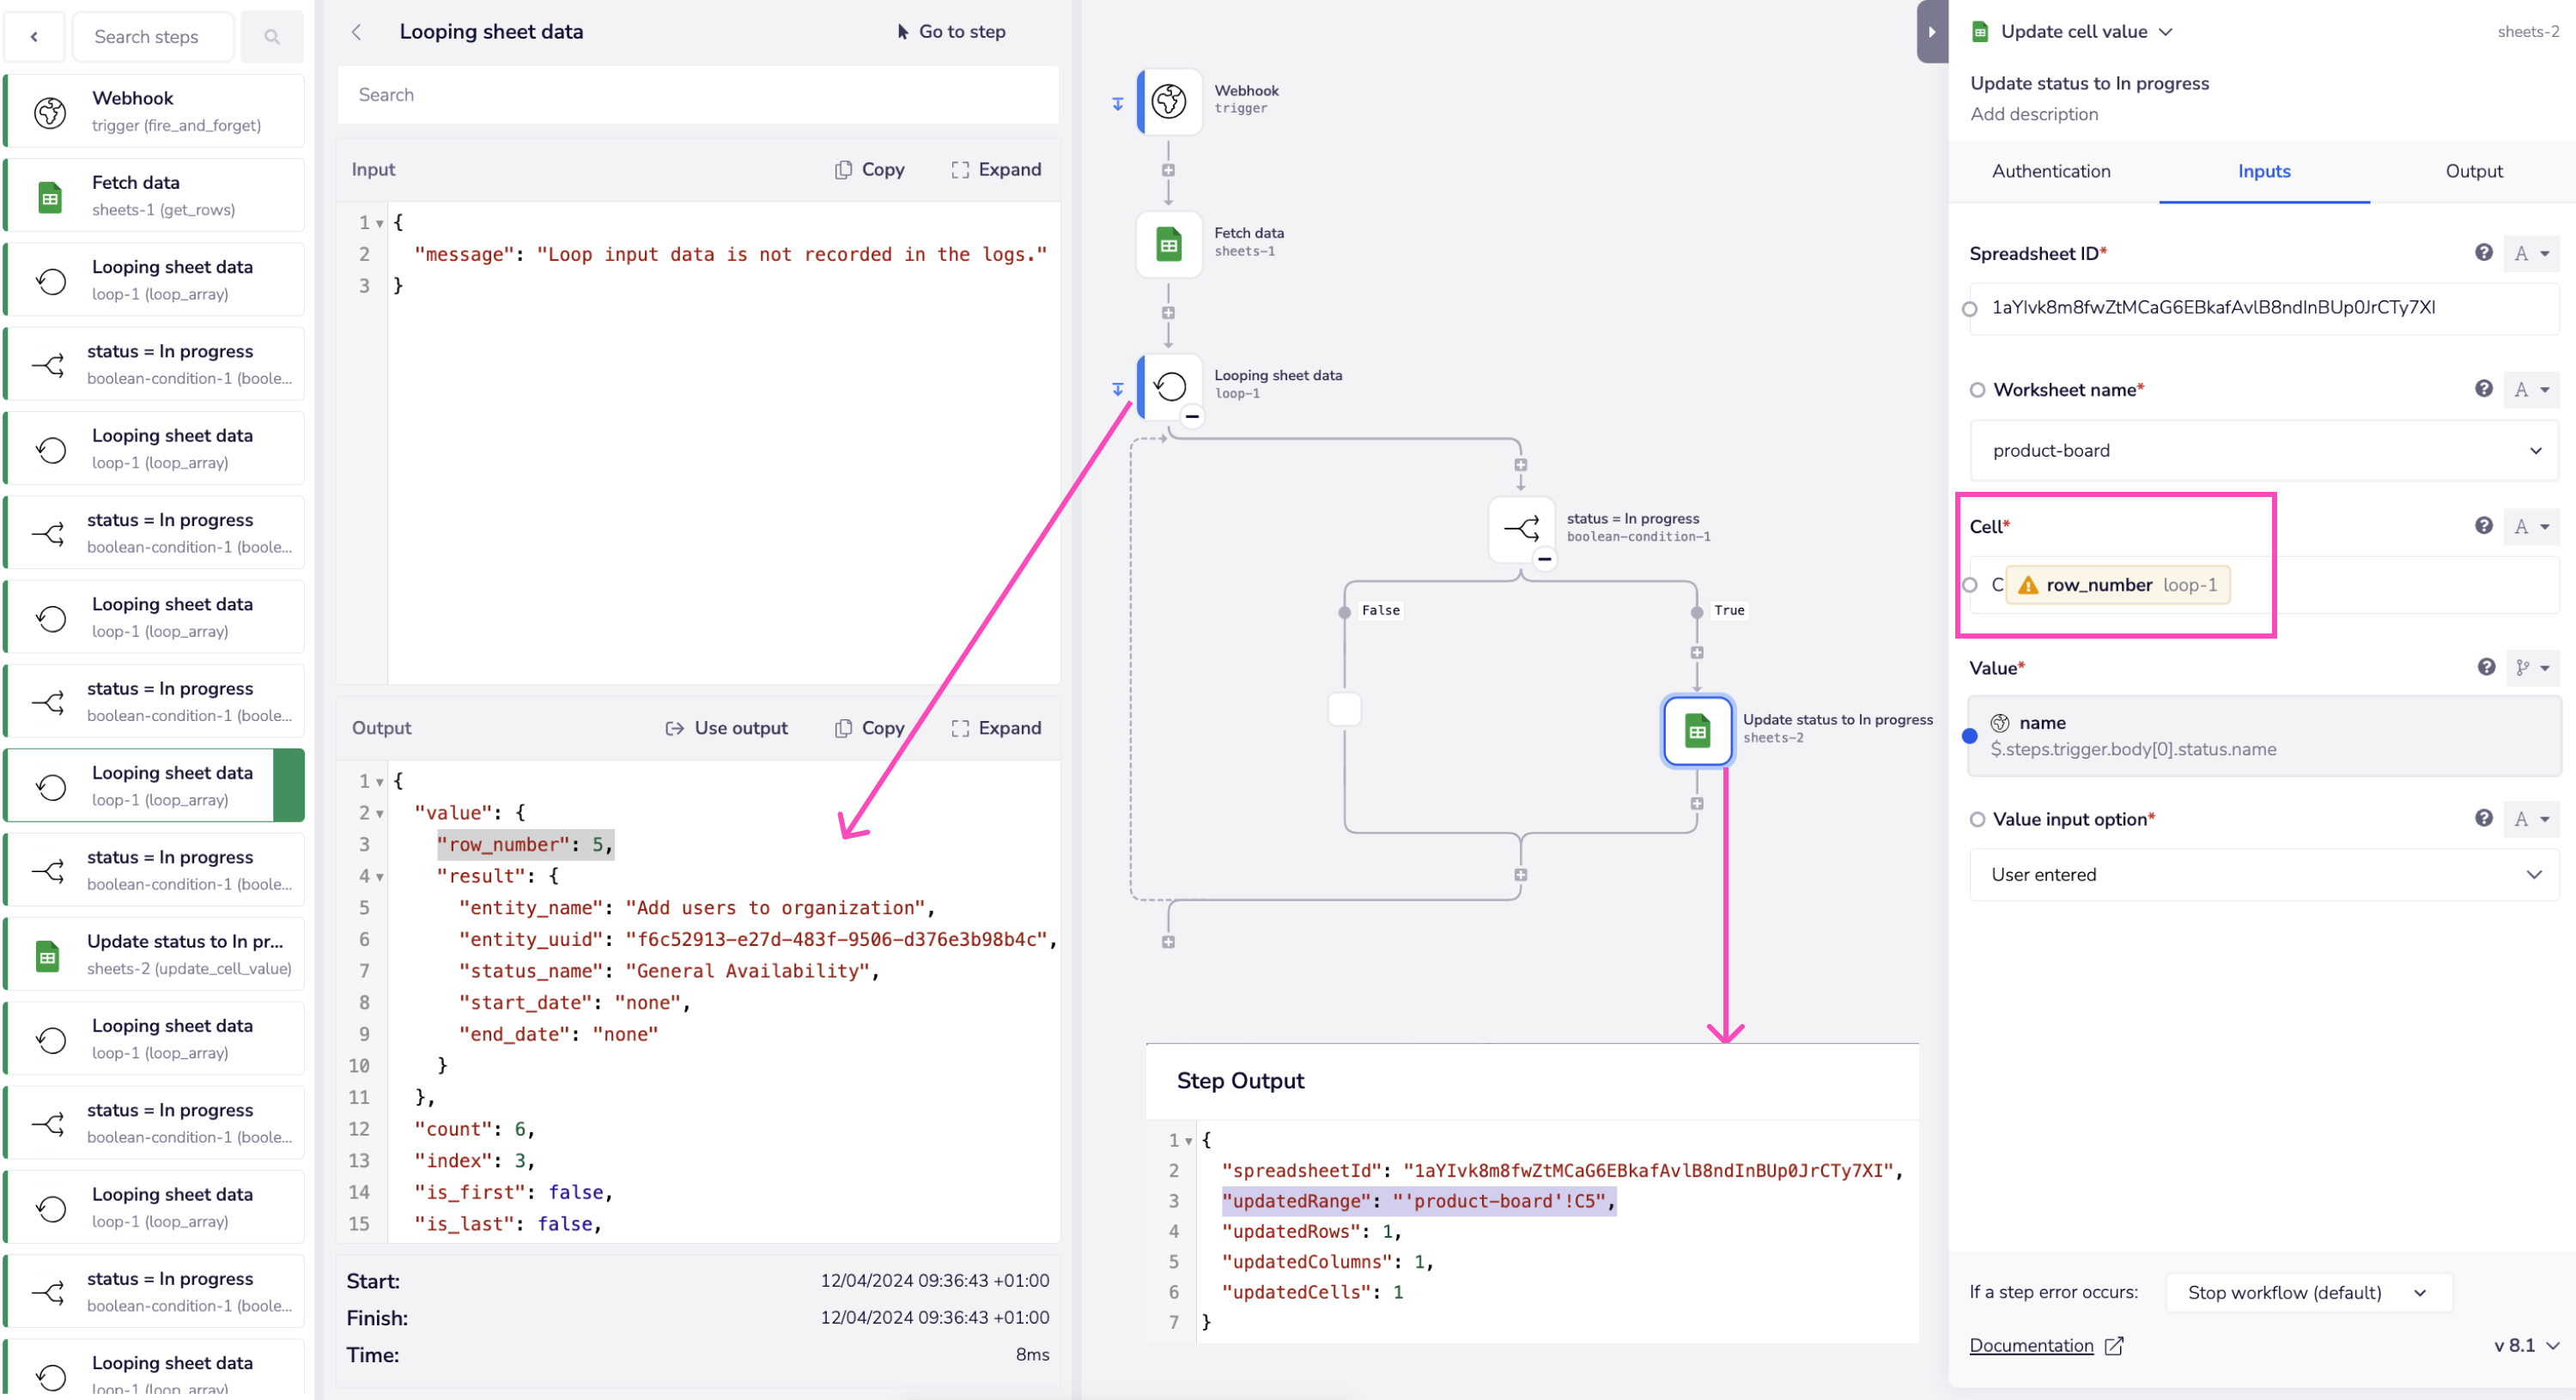 The status for row number 5 has been successfully updated from 'General Availability' to 'In Progress' using the provided cell value.
Detailed examples
This section presents comprehensive workflows that incorporate the Google Sheets connector along with other connectors to demonstrate complex use cases.
TRAY POTENTIAL: Tray.io is extremely flexible. By design there is no fixed way of working with it - you can pull whatever data you need from other services and work with it using our core and helper connectors. This demo which follows shows only one possible way of working with Tray.io and the Google Sheets connector. Once you've finished working through this example please see our Introduction to working with data and jsonpaths page and Data Guide for more details.
Below is an example of a way in which you could potentially use the Google Sheets connector, to create a Google Sheet with columns, data and more. The steps will be as follows:
- Setup a manual trigger and use the Google Sheets to create a blank spreadsheet.
- Add a worksheet to the newly created spreadsheet.
- Automatically input column headers.
- Add data to various cells within the worksheet.
The final outcome should look like this:

1 - Setup trigger & Create Spreadsheet
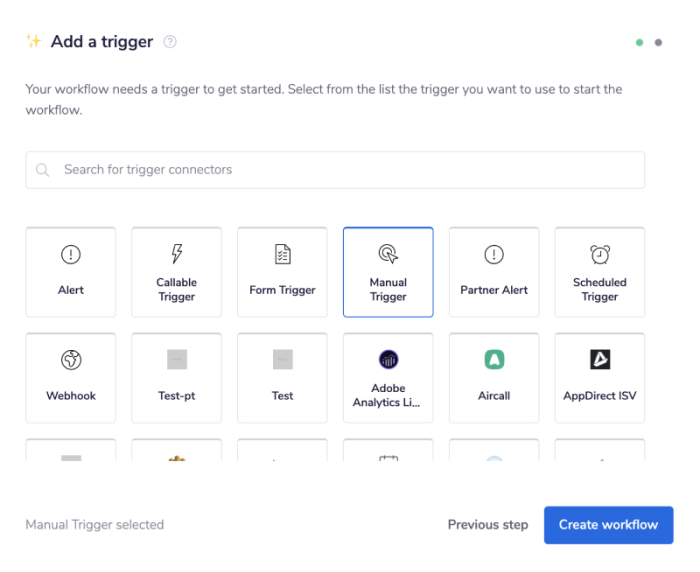
Once you have clicked 'Create new workflow' on your main Tray.io dashboard (and named said new workflow), select the Manual trigger from the trigger options available:
 Once you have been redirected to the Tray.io workflow dashboard, from the connectors panel on the left, add a Google Sheets connector to your second step. Set the operation to 'Create spreadsheet'.
Make sure to give your spreadsheet a 'Title' and fill in the extra fields as you see fit.
Once you have been redirected to the Tray.io workflow dashboard, from the connectors panel on the left, add a Google Sheets connector to your second step. Set the operation to 'Create spreadsheet'.
Make sure to give your spreadsheet a 'Title' and fill in the extra fields as you see fit.
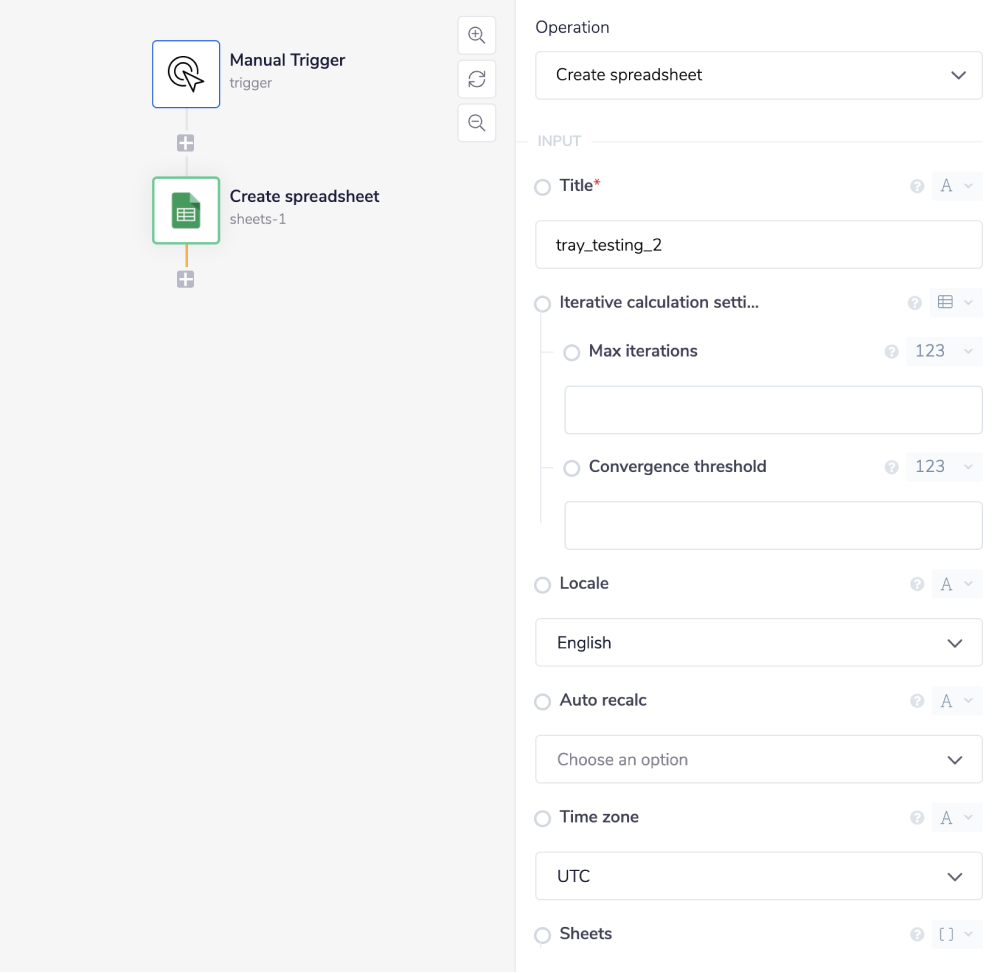 When this operation is successful, it will return all the available data on our chosen spreadsheet, including its ID.
Feel free to re-name your steps as you go along to make things clearer for yourself and other users.
When this operation is successful, it will return all the available data on our chosen spreadsheet, including its ID.
Feel free to re-name your steps as you go along to make things clearer for yourself and other users.
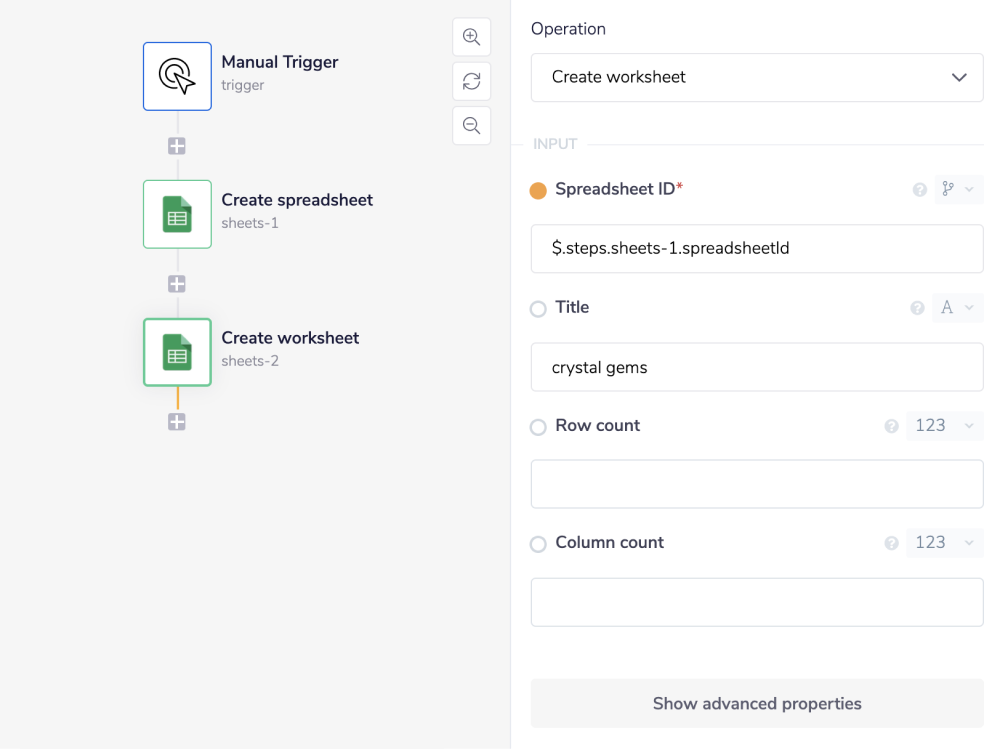
2 - Create a Worksheet
Add another Google Sheets connector to your workflow and set the operation to 'Create worksheet'.
You will need your 'Spreadsheet ID' in order to use this operation, so for sake of ease generate a jsonpath by utilising the connector-snake. Drag your link from the 'Spreadsheet ID' field over your first step ('Create spreadsheet'), and wait for the data options to appear. Select spreadsheetId and your jsonpath with magically appear!
JSONPATHS: For more information on what jsonpaths are and how to use jsonpaths with Tray, please see our pages on Basic data concepts and Mapping data between steps
**CONNECTOR-SNAKE: **The simplest and easiest way to generate your jsonpaths is to use our feature called the Connector-snake. Please see the main page for more details.
Make sure to also give your worksheet a 'Title' like you did your spreadsheet earlier.
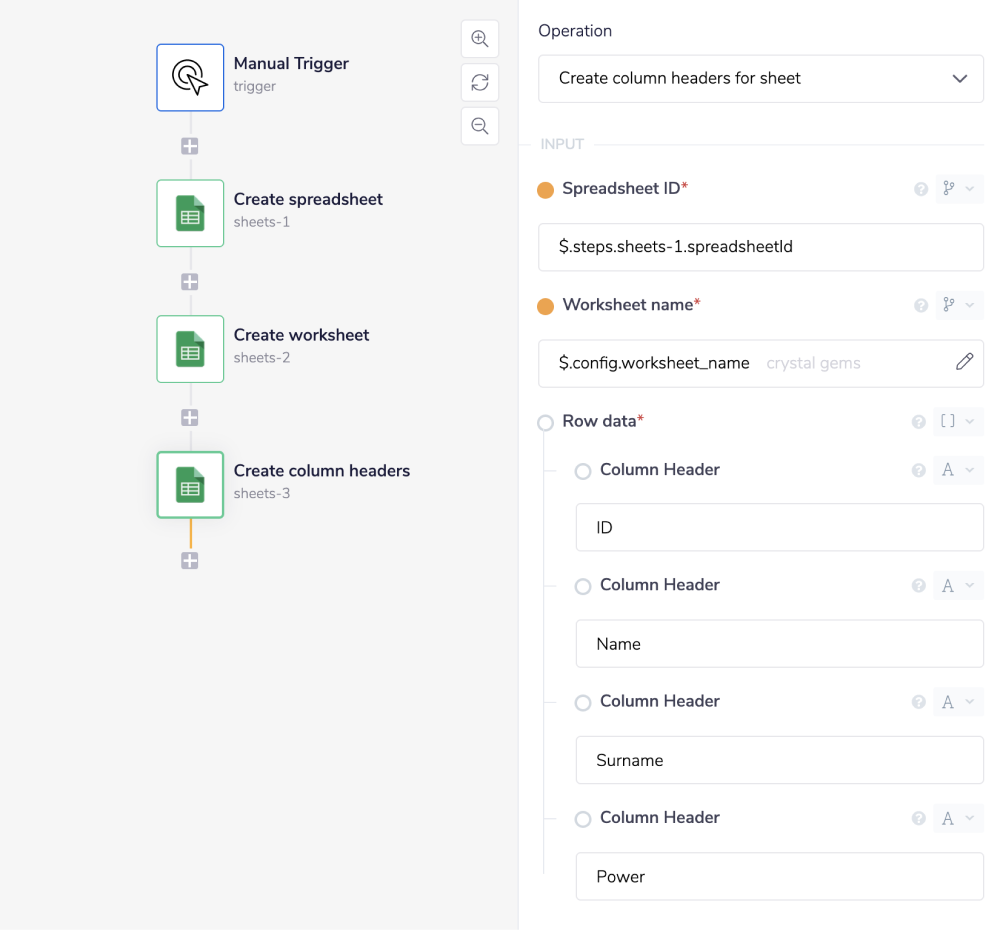
3 - Create column headers
Add a final Google Sheets connector to your workflow and set the operation to 'Create column headers for sheet'.
Generate the 'Spreadsheet ID' and 'Worksheet name' in a similar fashion using the connector-snake from earlier. Note that your worksheet name will come from your previous Google Sheets connector step ('Create worksheet').
You will also need to fill in the 'Row data' -> 'Column Header' fields, in order to have "something to create with".
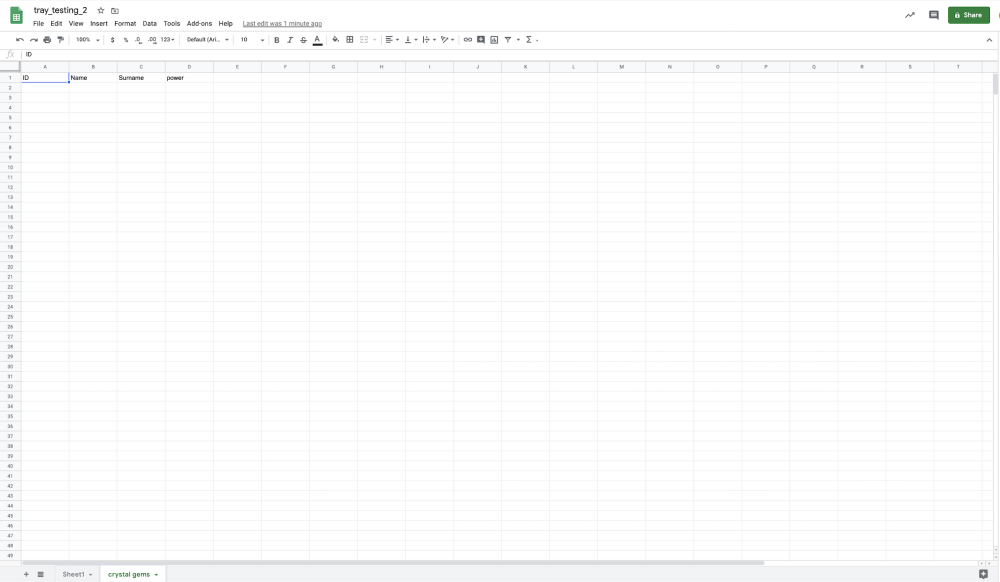
 Now when this workflow is run, you will have created a named spreadsheet, with a named worksheet, along with you desired column headers. Make sure to check your Google Sheets account for proof of your new wondrous invention!
**BEST PRACTICES: **Whenever you do decide to create your own workflow, be sure to check out some of our key articles such as:
Using the Raw HTTP Request ('Universal Operation')
Starting from version 6.1, you can perform custom operations using the Raw HTTP Request feature. This is ideal for accessing endpoints in the Google Sheets connector not covered by predefined operations. Steps to Configure:
- Research Endpoint: Refer to the Google Sheets API documentation v4.0 to find the exact format required for the endpoint.
- Set Up Request: Fill in the details based on the endpoint requirements. For example, if the 'List Worksheets' operation did not exist in our Google Sheets connector, you would use the API documentation to find the relevant endpoint.
Configuration Details:
Configuration details for the List Worksheets endpoint:
| Attribute | Description |
| Method | GET |
| URL | **Base URL: **
https://sheets.googleapis.com/v4
Endpoint:/spreadsheets/[spreadsheet_id]| | Body Type | none | Example Result:
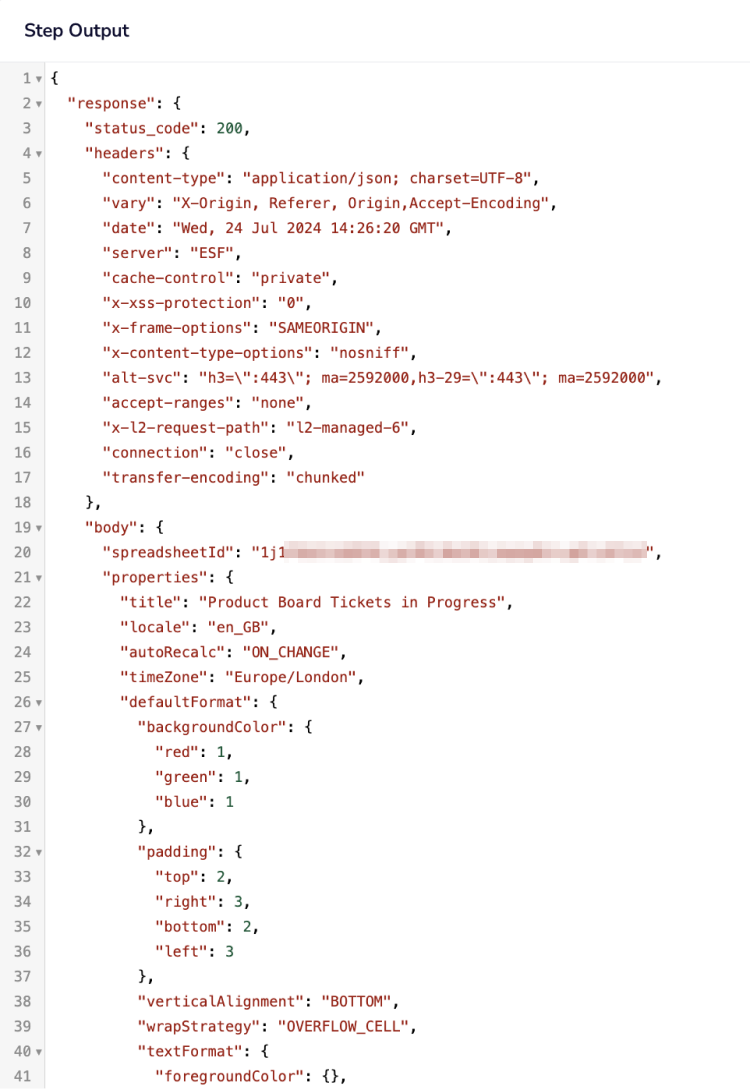
Upon successful execution, you will get the following response:
Example Result:
Upon successful execution, you will get the following response: