Authentication
Step-by-step guide for connecting HubSpot to Tray.io
Overview
The HubSpot connector uses OAuth 2.0 authentication to securely connect your HubSpot account to Tray.io. This guide walks you through the complete authentication process, from adding the connector to your workflow to completing the OAuth authorization flow.
Prerequisites
Before you begin, ensure you have:
- An active Tray.io account with workflow access
- A HubSpot account with appropriate permissions
- Super Admin or App Marketplace access permissions in HubSpot (required to authorize apps)
Setup Guide: Connecting HubSpot to Tray.io
Step 1: Add HubSpot Connector to Your Workflow
- Navigate to your Tray.io workflow in the workflow builder
- Click the plus sign (+) after any step in your workflow (or after the trigger if starting a new workflow)
- Search for "HubSpot" in the connector search dialog
- Select the HubSpot connector from the search results
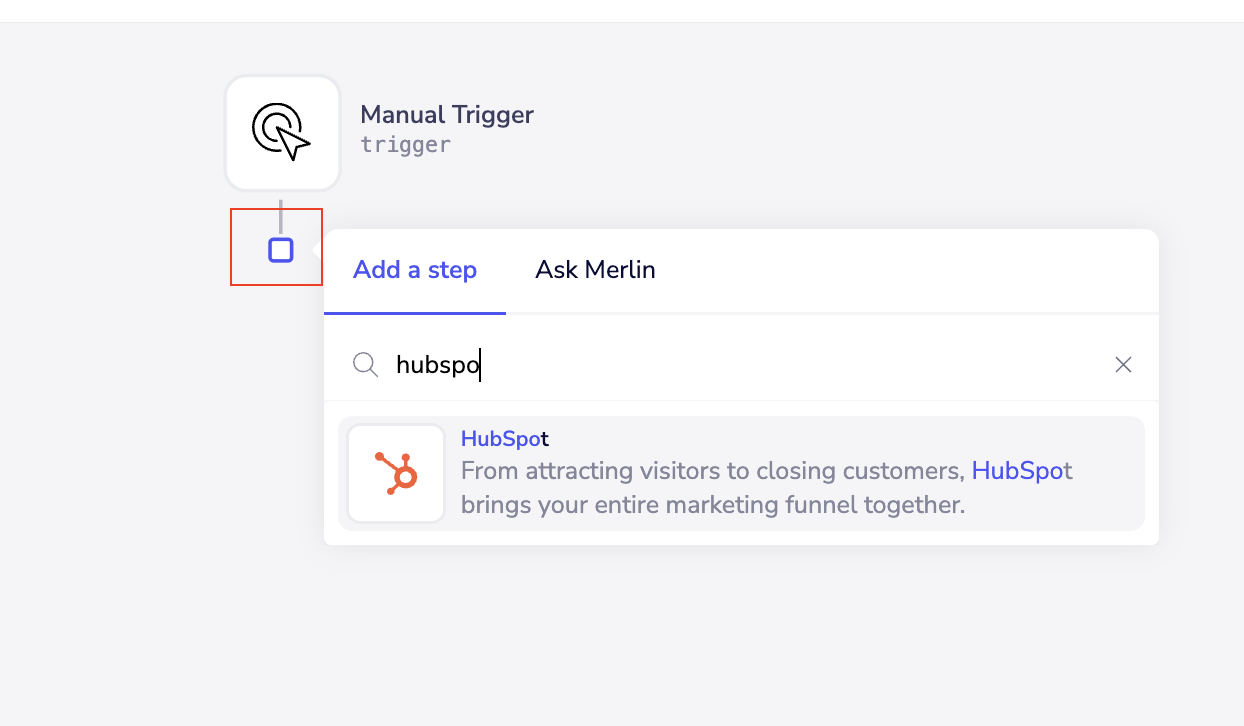
You can add the HubSpot connector at any step in your workflow. It doesn't need to be the first step unless you're using it as a trigger.
Step 2: Open Authentication Setup
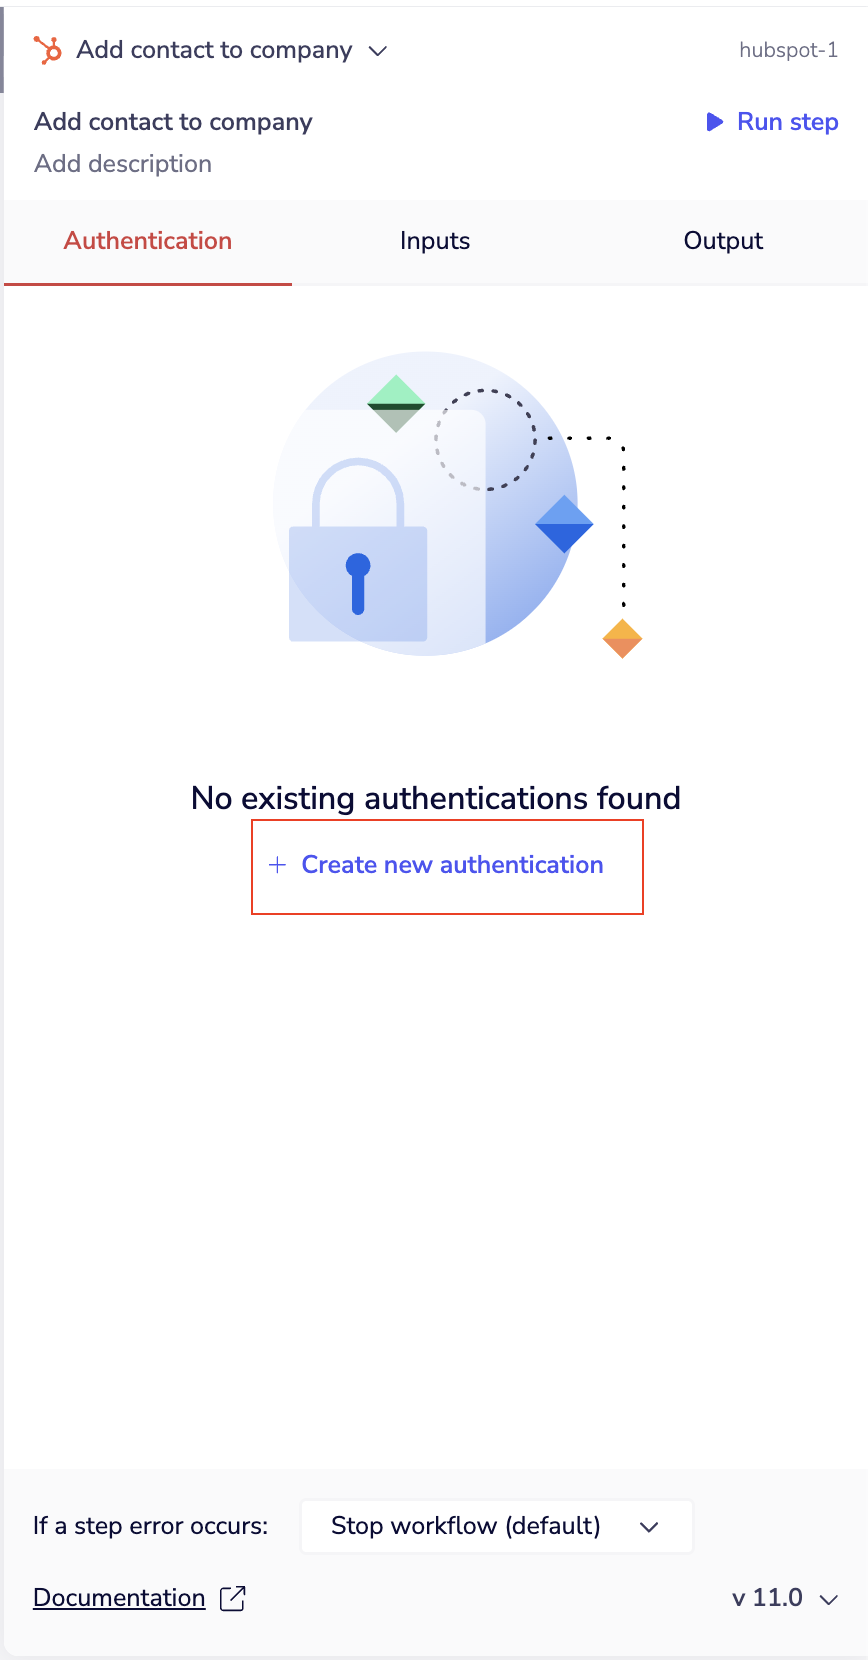
- Click on the HubSpot connector step you just added to display the properties panel on the right
- Select the Authentication tab in the properties panel
- Click the Create new authentication button
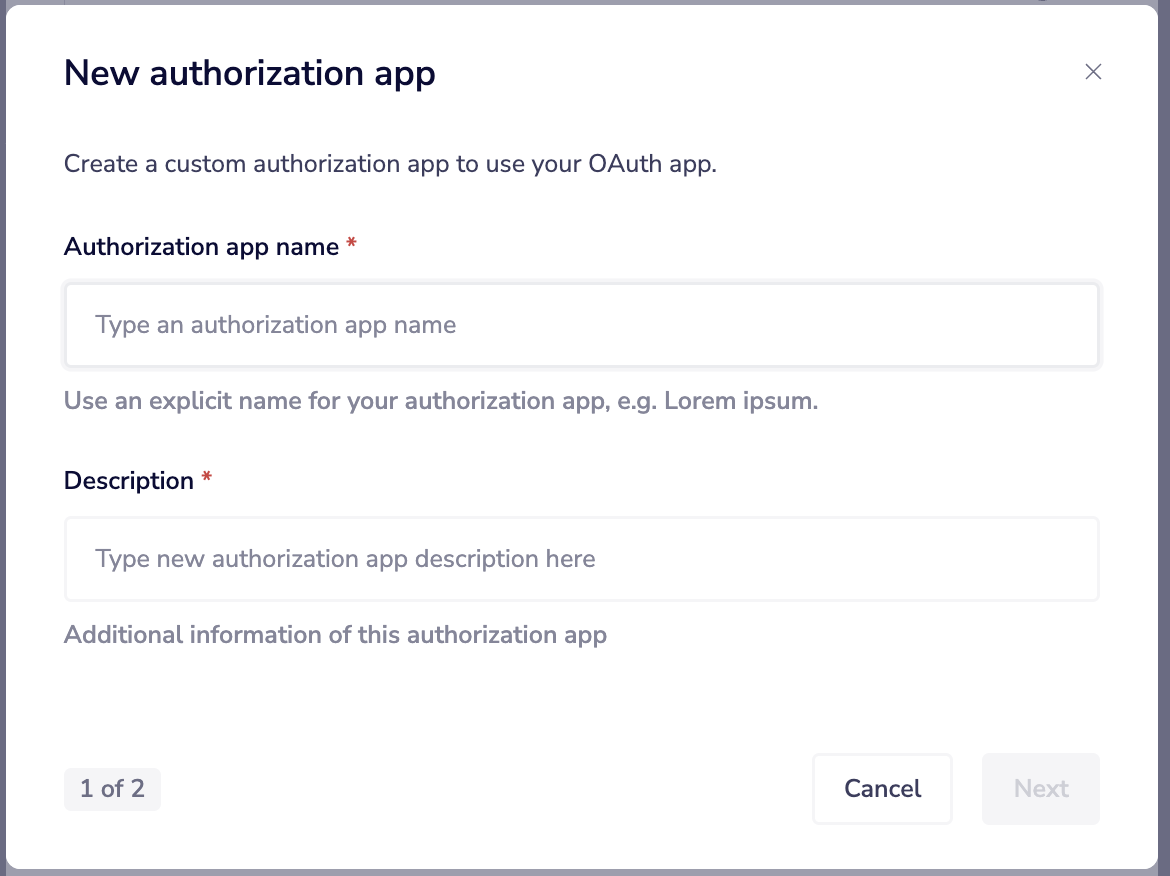
Step 3: Name Your Authentication
The Tray.io authentication modal will appear.
- Name your authentication in a way that will quickly identify it within your list of authentications
- Examples: "HubSpot Production", "HubSpot Sandbox", "HubSpot - Marketing Account"
- Choose authentication visibility:
- Personal: Only you can use this authentication
- Organizational: Others in your organization can use this authentication
- Click Next Step to continue

Use descriptive names for your authentications, especially if you manage multiple HubSpot accounts (e.g., production, sandbox, or different team accounts).
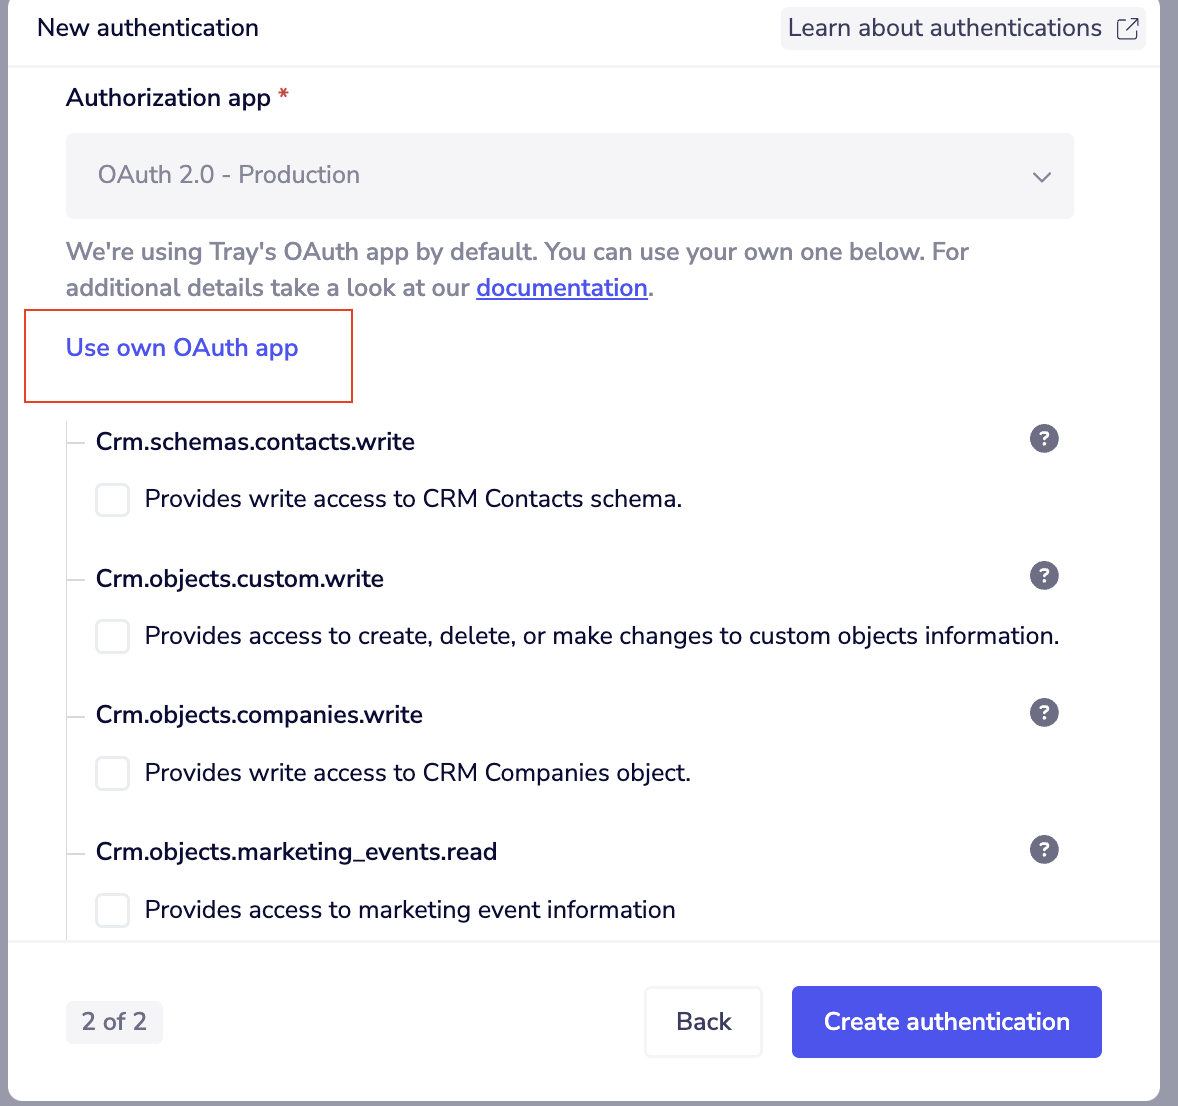
Step 4: Choose OAuth App (Tray's or Your Own)
You have two options for OAuth authentication:
Option A: Use Tray's OAuth App (Recommended for Most Users)
By default, the authentication will use Tray's OAuth application. This is the quickest and easiest option — no changes needed, simply proceed to Step 5 to select scopes.
Option B: Use Your Own OAuth App (For Custom Requirements)
If you need custom OAuth apps for white-labeling or specific requirements, select "Use own OAuth app".
- Click the Use own OAuth app button
- Enter your OAuth app details:
- App Name: Name for your custom OAuth app
- App Description: Brief description
- App Key: Your HubSpot app's Client ID
- App Secret: Your HubSpot app's Client Secret
- Proceed to Step 5 to select scopes
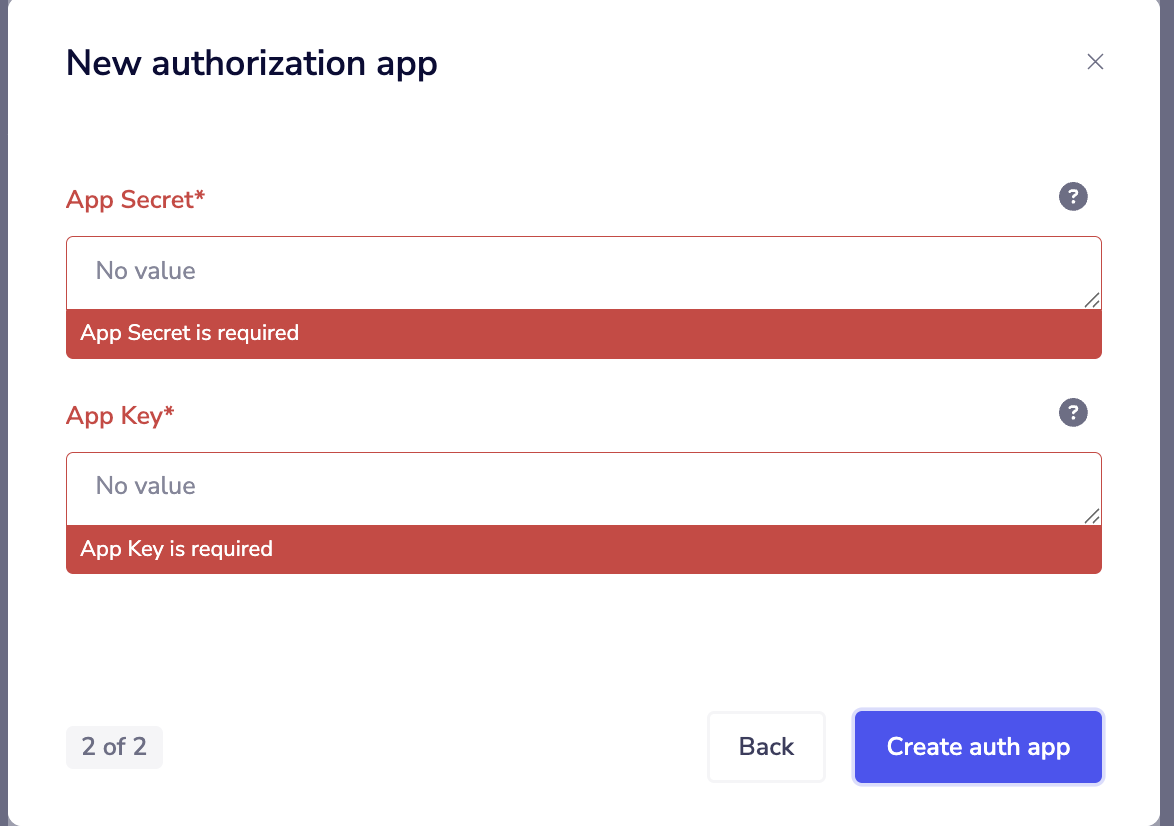
- Click Create authentication to save the custom OAuth app
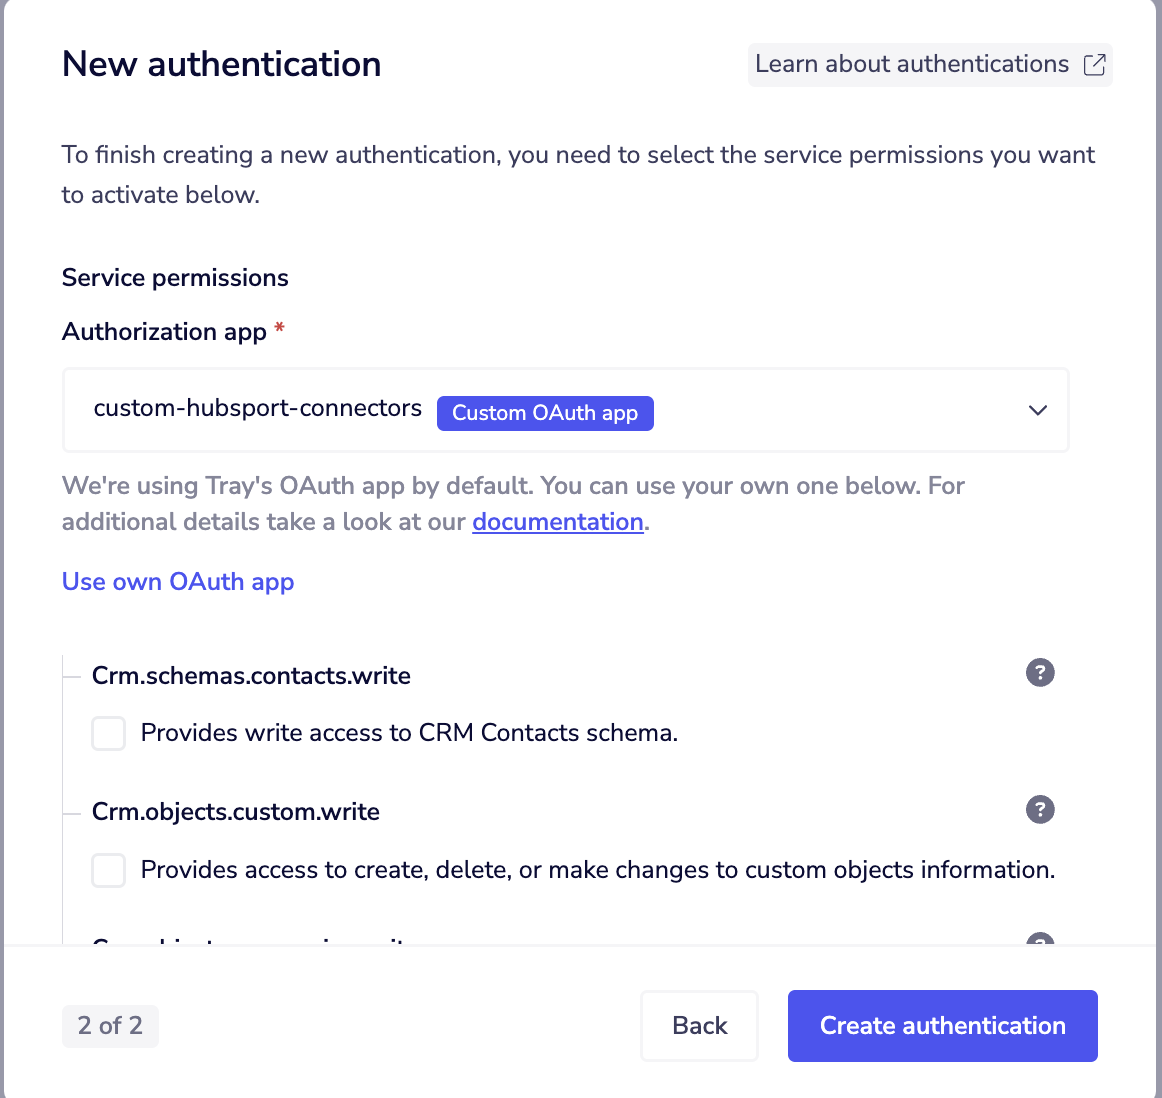
Once saved, you will be taken back to the authentication screen where the Authorization app dropdown will now show your custom app with a Custom OAuth app badge instead of Tray's default.
To get your Client ID and Client Secret, navigate to your HubSpot app in the HubSpot Developer Portal, then go to the Auth tab. For detailed instructions on creating custom OAuth apps, see Notes for Custom Service Environment usage.
OAuth 2: IMPORTANT NOTE
The following operations do not work with Public Applications (including Tray's OAuth app):
- Create object schema
- Delete object schema
- Update object schema
For these operations, you must use your own private OAuth app. See HubSpot's Private vs Public applications documentation for more information.
Step 5: Select Required Scopes
Scopes determine what data and actions the HubSpot connector can access in your HubSpot account.
- Review the available scopes in the authentication modal
- Select the scopes required for your integration:
- Check boxes for the scopes your workflow needs
- Only select scopes you actually require (principle of least privilege)
- Common scopes include:
crm.objects.contacts.read- Read contactscrm.objects.contacts.write- Create/update contactscrm.objects.companies.read- Read companiescrm.objects.deals.read- Read deals
- Click Create authentication once you have selected your scopes
Scope Selection Note: If you're using an authentication created before July 31st 2022, please see our Scopes documentation for important updates about deprecated scopes.
Not sure which scopes you need? Start with read-only scopes and add write scopes only when your workflow requires them. You can always update authentication scopes later.
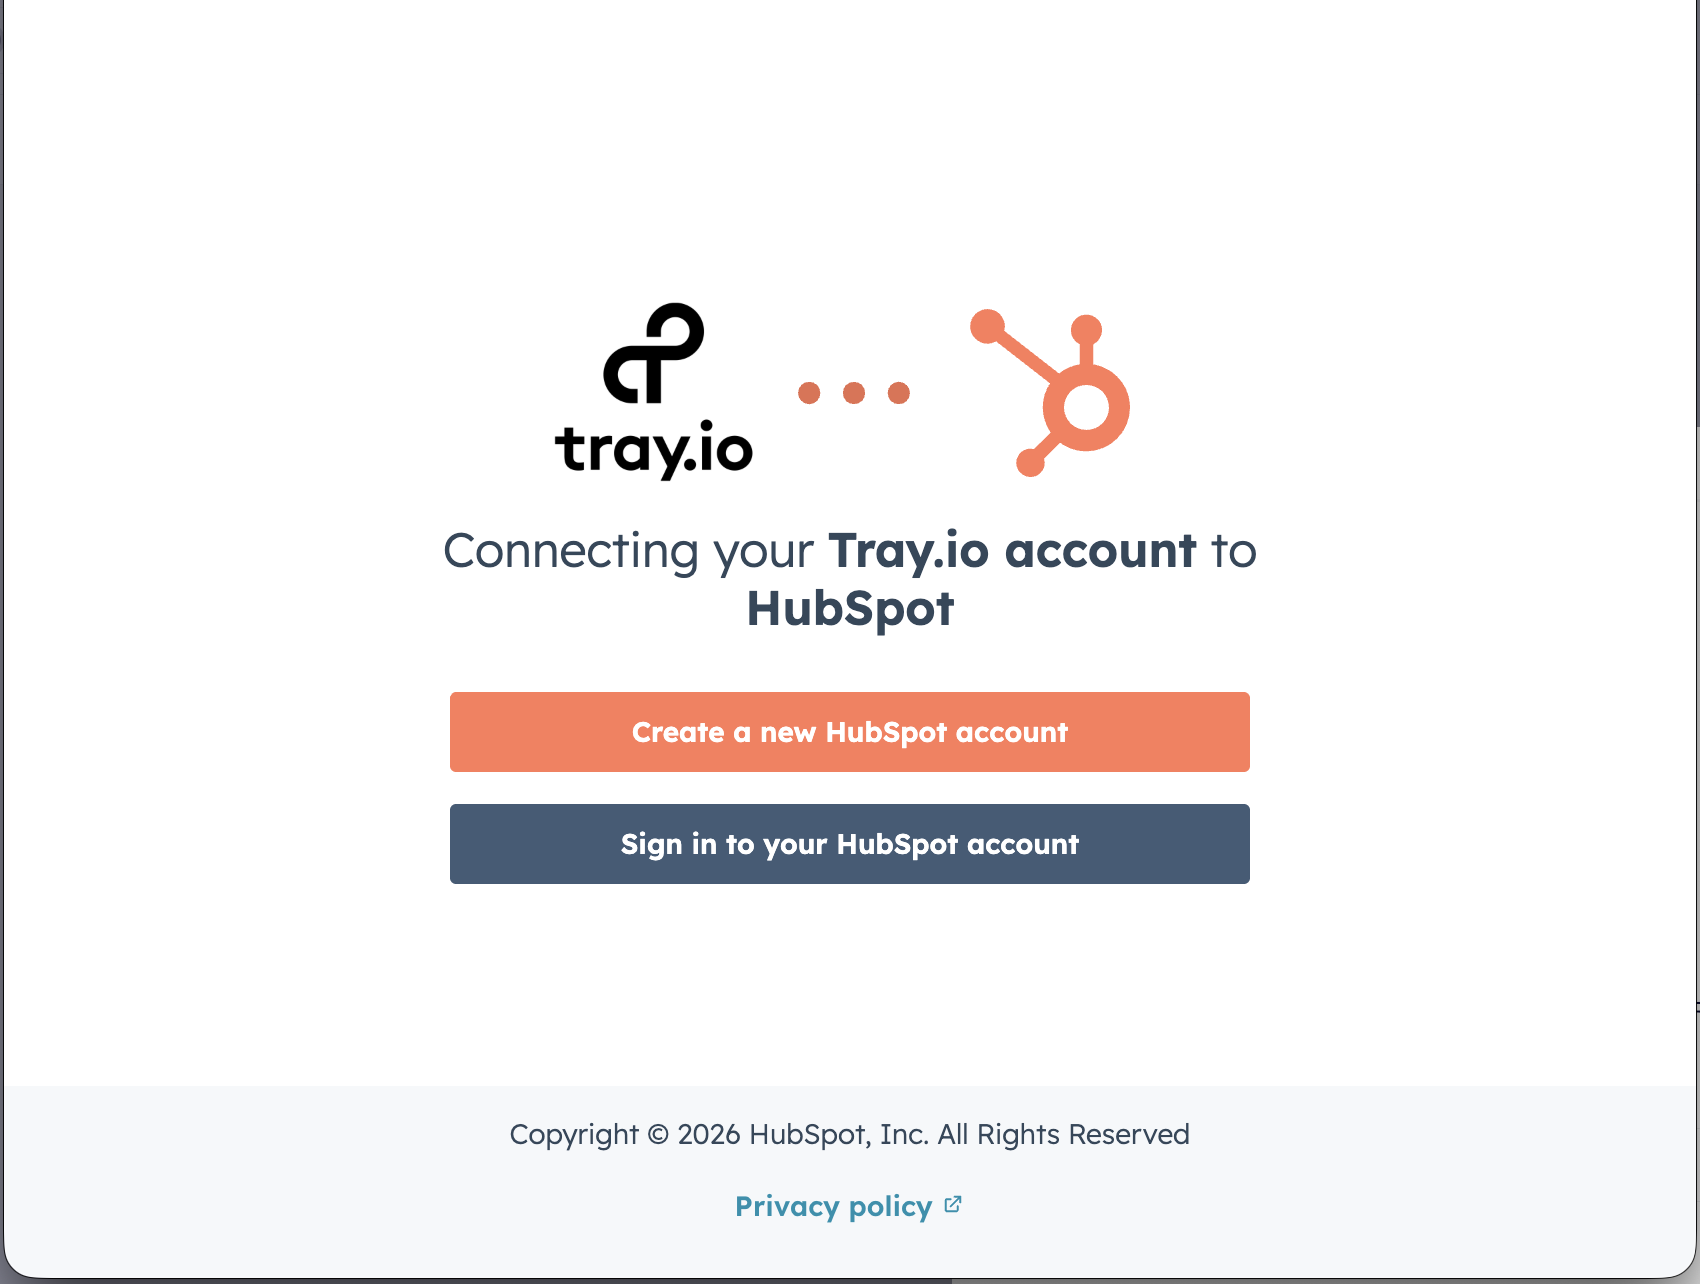
Step 6: Complete OAuth Authorization in HubSpot
After configuring scopes, you'll authorize Tray to access your HubSpot account.
- Click the Create authentication button
- You'll be redirected to HubSpot in a new window/tab
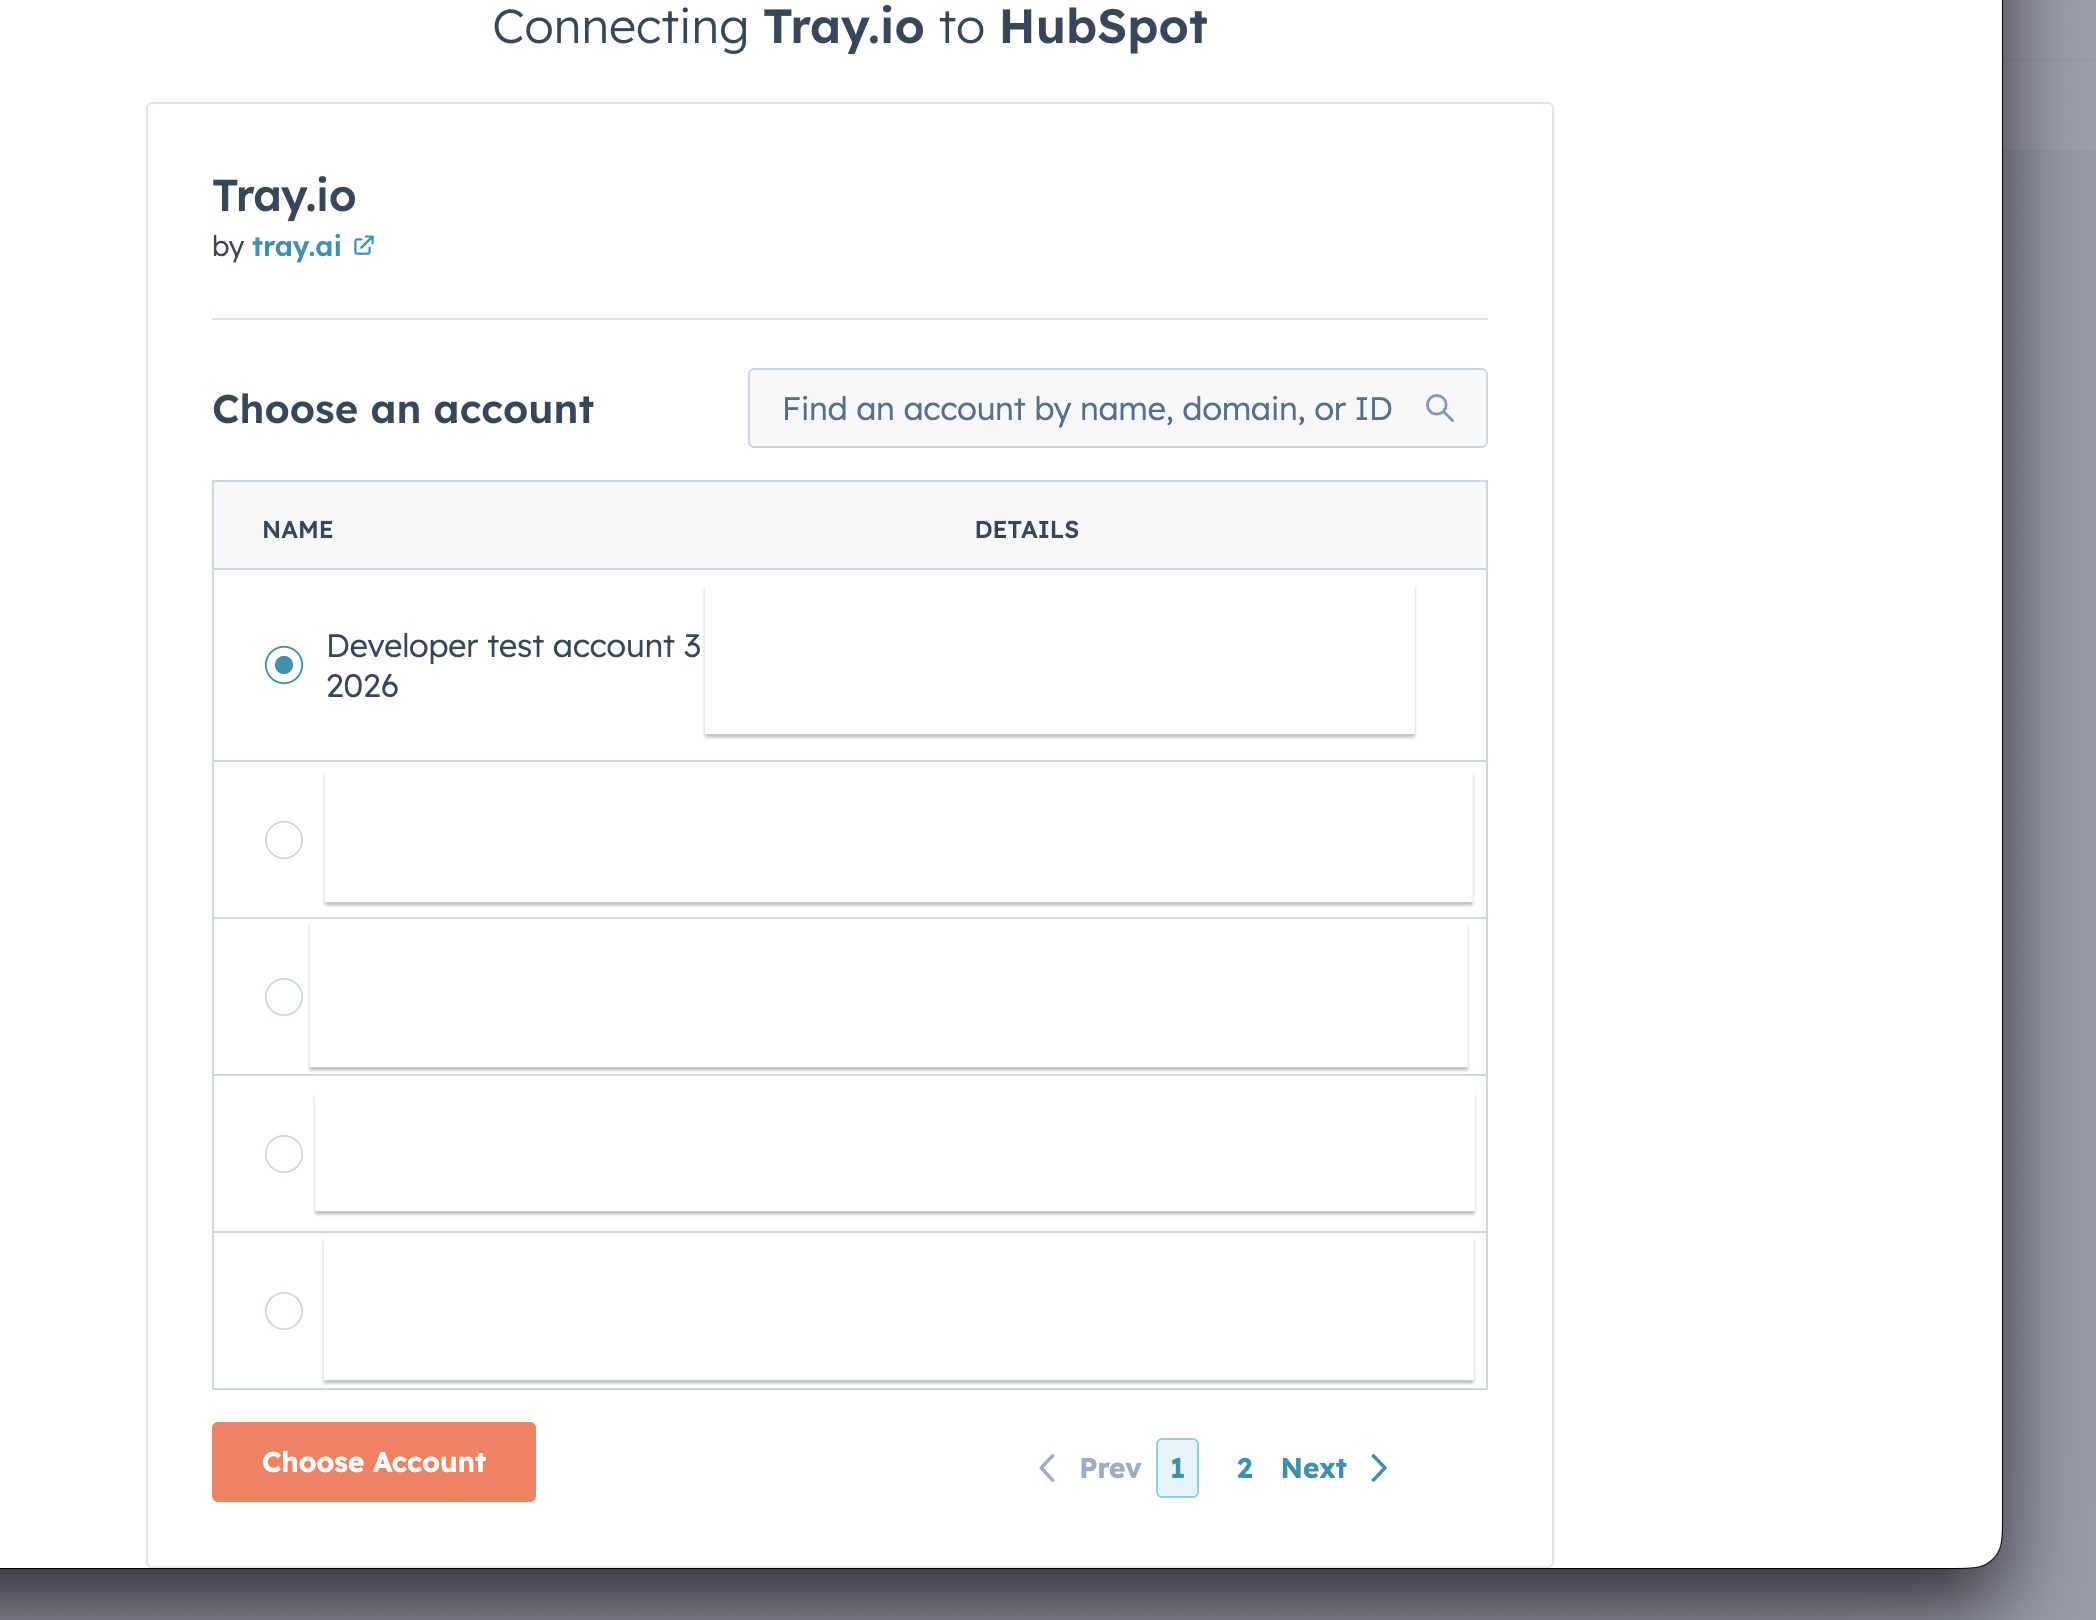
- Log in to your HubSpot account (if not already logged in)
- Select the HubSpot account you want to connect (if you have access to multiple accounts)
- Review the permissions that Tray is requesting (these match the scopes you selected)
- Click Grant access or Authorize to approve the connection
You must have Super Admin or App Marketplace access permissions in HubSpot to authorize the connection. If you don't have these permissions, contact your HubSpot administrator.
Step 7: Confirm Successful Connection
After authorization, you'll be redirected back to Tray.io.
- The authentication modal will close automatically
- Your new authentication will appear in the Authentication dropdown in the properties panel
- It will be automatically selected for the current connector step
Authentication Complete! Your HubSpot connector is now authenticated and ready to use.
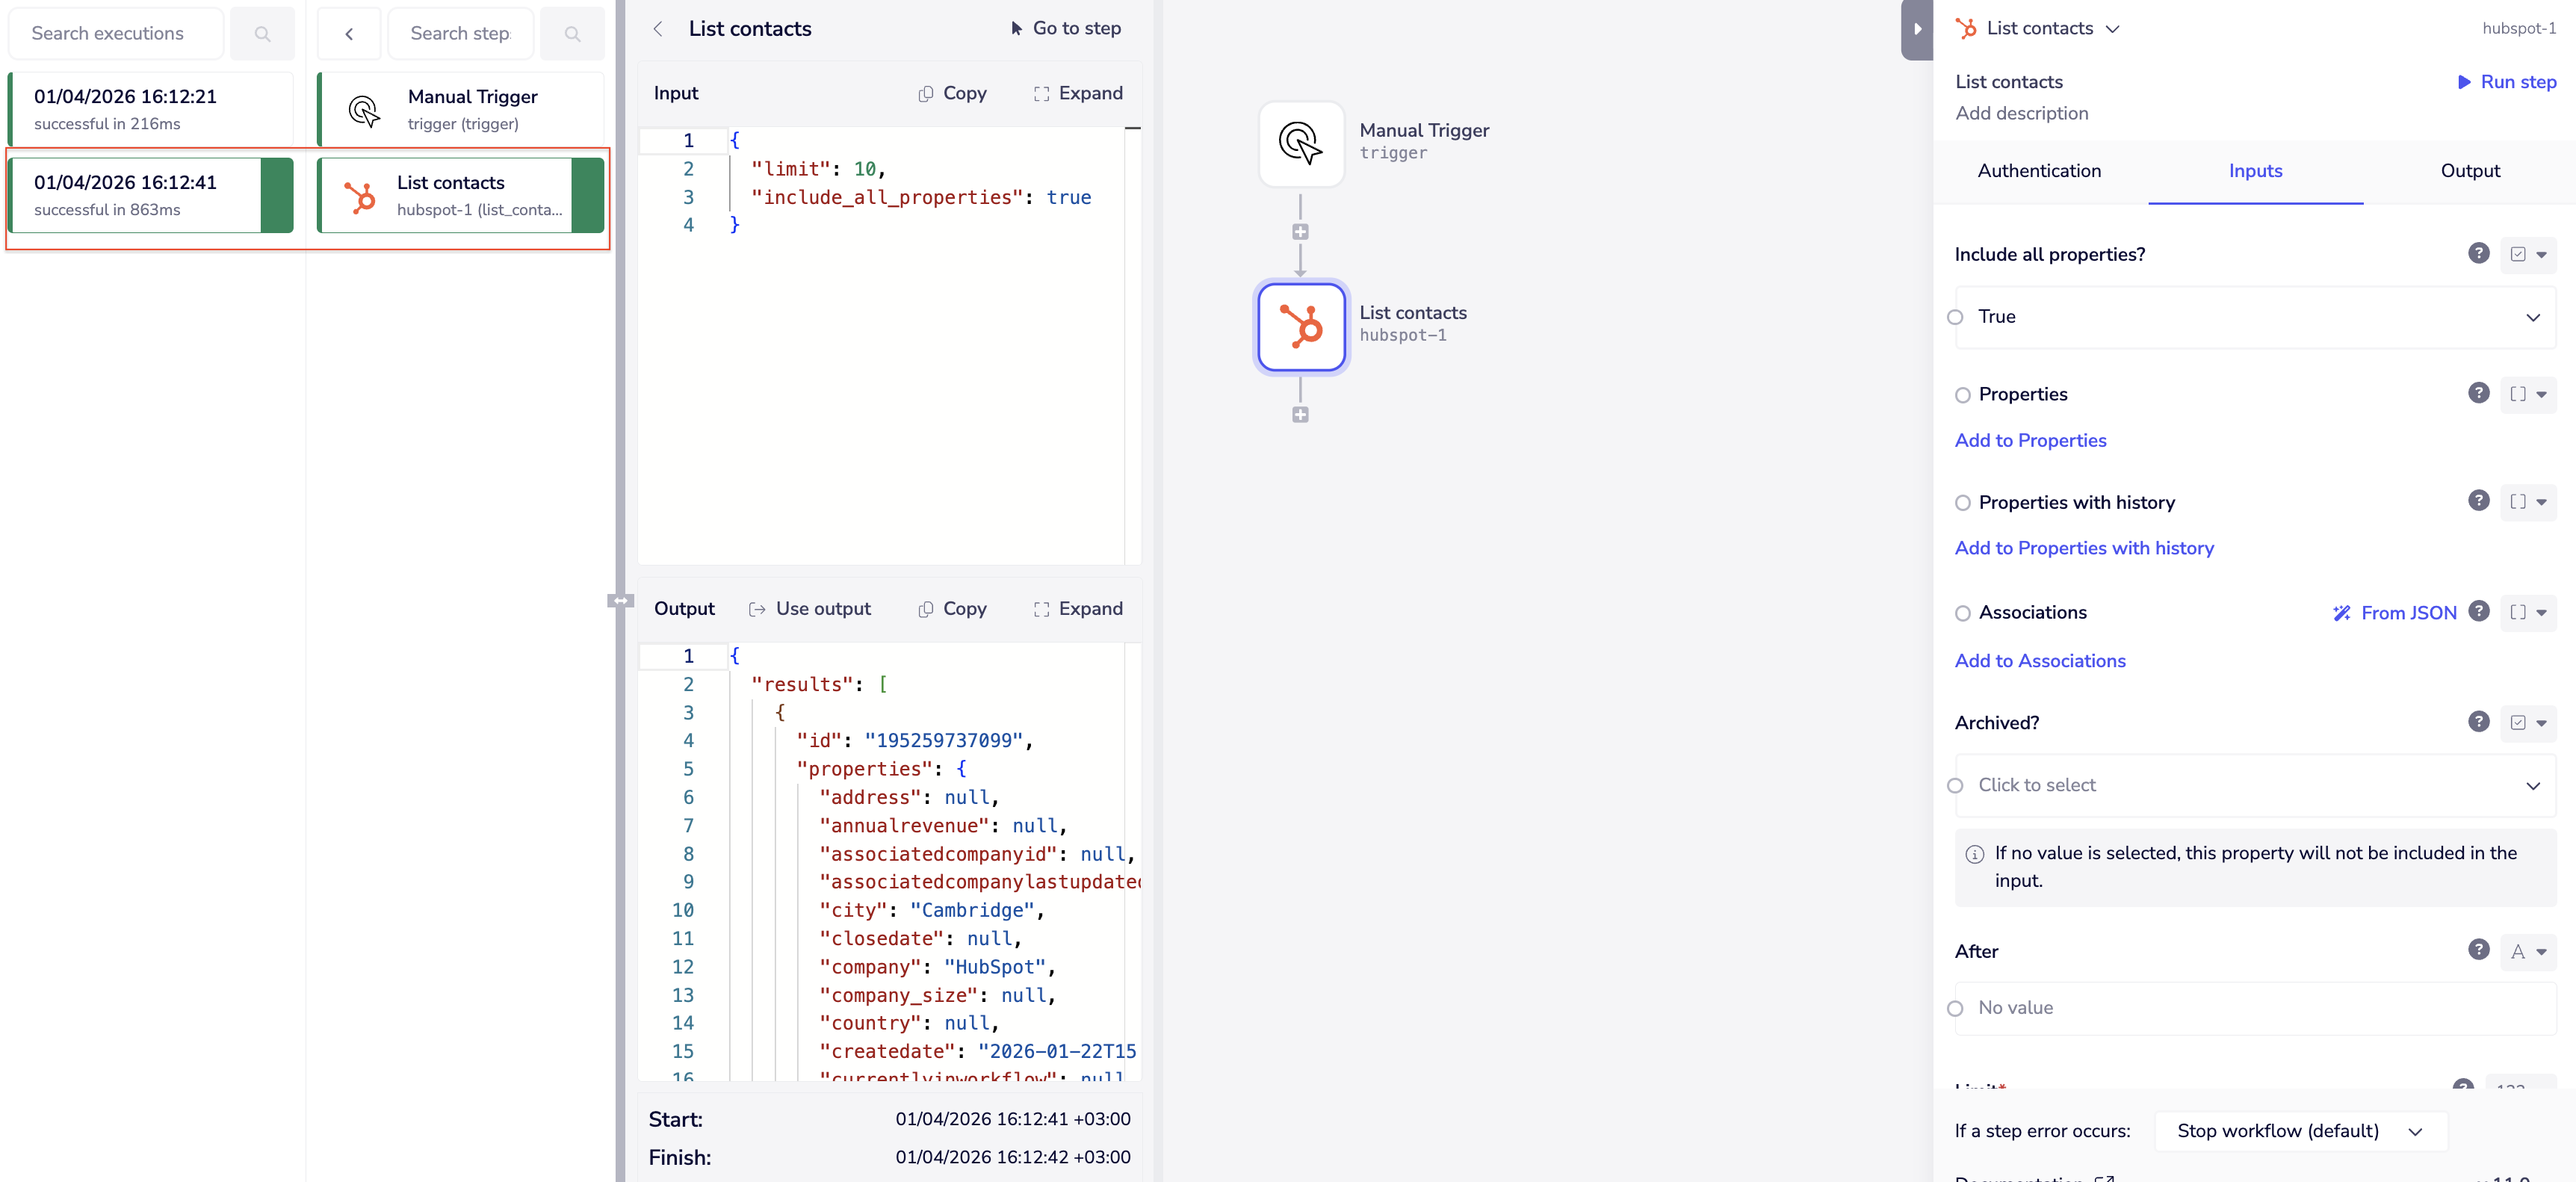
Step 8: Test Your Connection
It's important to verify your authentication is working correctly.
- In your HubSpot connector step, select an operation from the dropdown (e.g., "List contacts")
- Configure any required fields for the operation
- Click the Test step button or Run workflow to test the connection
- Check the Debug panel to verify you're receiving data from HubSpot
If you encounter errors during testing, verify:
- Your authentication is selected in the Authentication dropdown
- You've selected the appropriate scopes for the operation you're testing
- Your HubSpot account has data available (e.g., contacts exist if testing "List contacts")
Uninstallation & Disconnection Guide
This section covers how to disconnect HubSpot from Tray.io, whether you need to remove the connector from a workflow or completely revoke access.
Removing HubSpot Connector from a Workflow
To remove a HubSpot connector step from your workflow:
- Open the workflow containing the HubSpot connector
- Hover over the HubSpot connector step you want to remove
- A trash icon will appear
- Click the trash icon to delete the step
- Confirm deletion if prompted

Removing a connector step from a workflow does not delete the authentication. Other workflows using the same authentication will continue to work.
Disconnecting HubSpot Authentication in Tray
To disconnect an authentication without deleting workflows:
Option 1: Remove from Specific Workflow Step
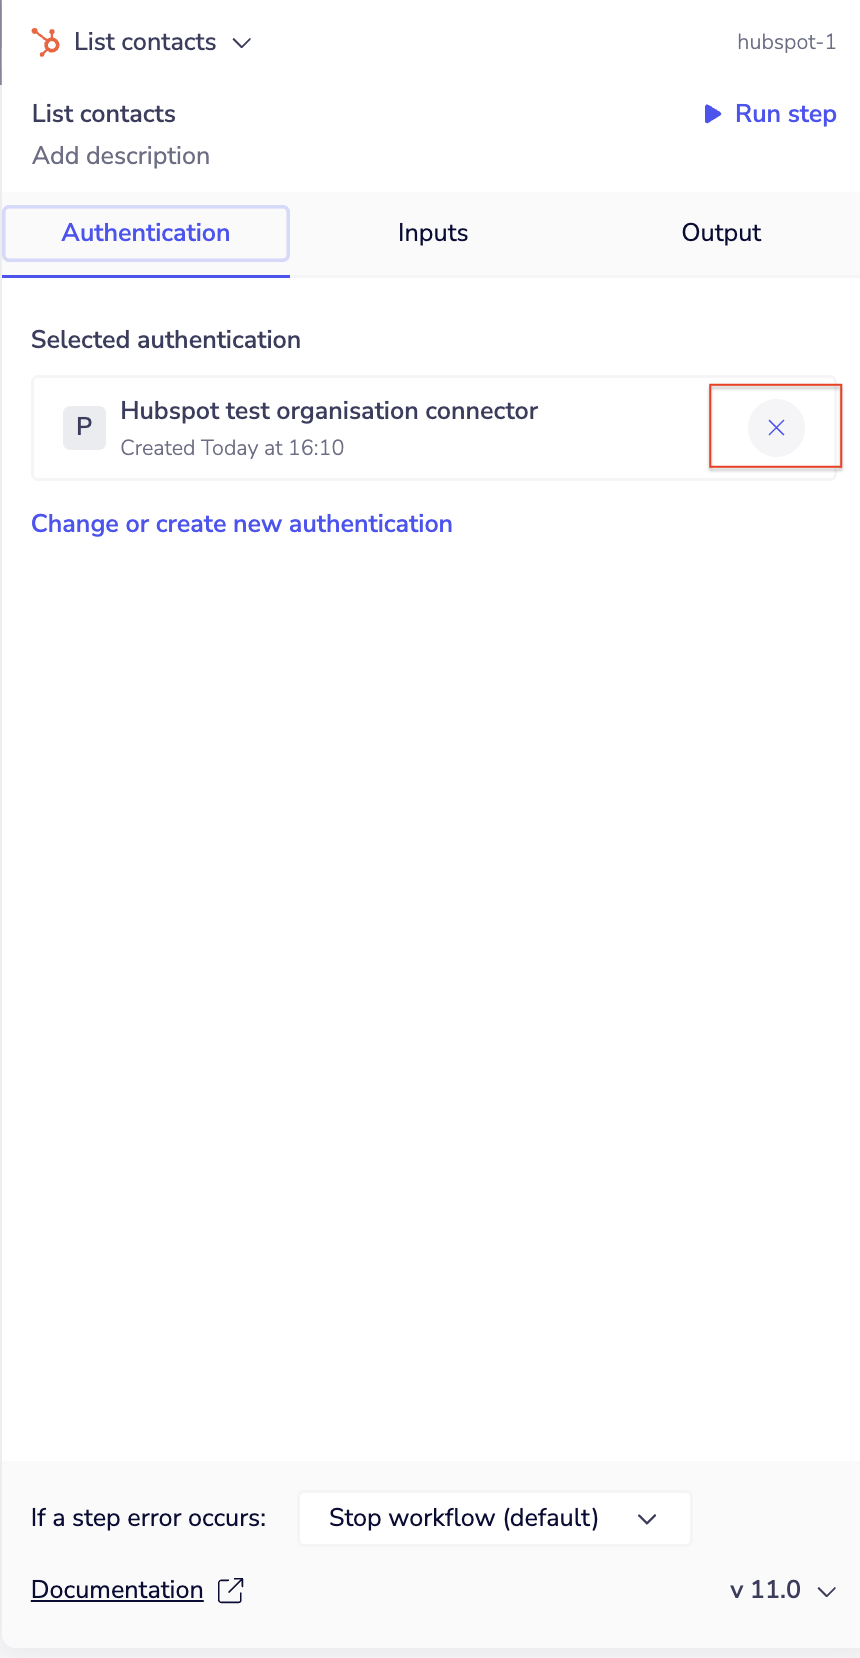
- Open the workflow and click on the HubSpot connector step
- In the Authentication tab of the properties panel, you will see the currently selected authentication
- Click the X button next to the authentication to deselect it
- The connector step will no longer use that authentication
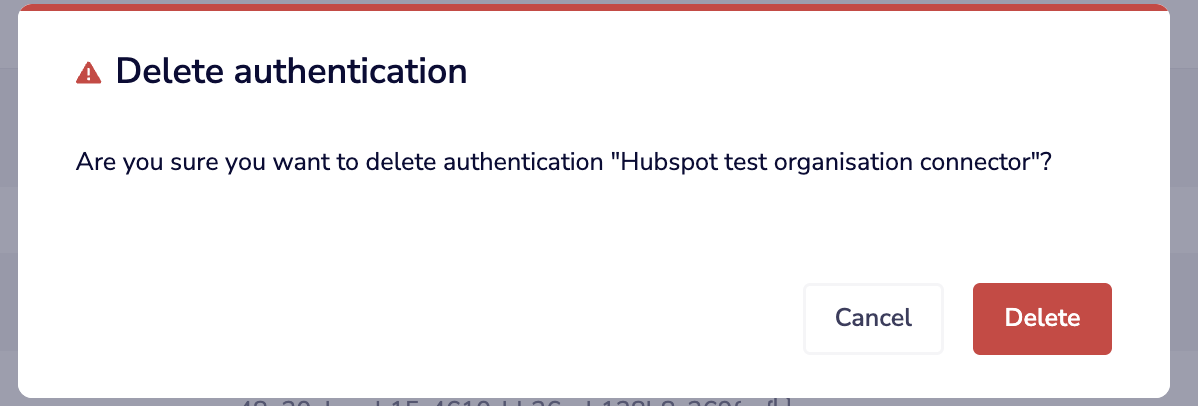
Option 2: Delete Authentication Entirely
To delete an authentication from your Tray account:
- Navigate to the Authentications tab in the top navigation
- Find the HubSpot authentication you want to delete in the list
- Click the context menu on the right side of the authentication row
- Select Delete

If the authentication is not used by any workflow, a confirmation modal will appear. Click Delete to confirm.
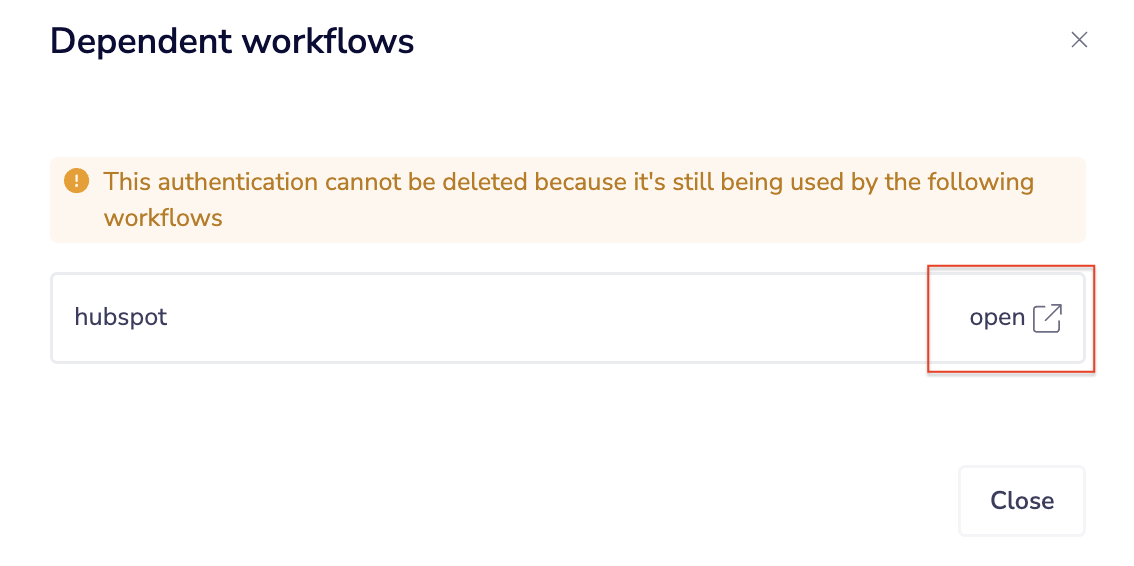
If the authentication is still used by one or more workflows, deletion will be blocked. A Dependent workflows modal will appear listing each affected workflow, with an open link to navigate directly to it. You must remove the authentication from those workflows before you can delete it.
Revoking Access in HubSpot (Complete Disconnection)
To completely revoke Tray.io's access to your HubSpot account, navigate to the Connected Apps page in HubSpot:
- Log in to your HubSpot account
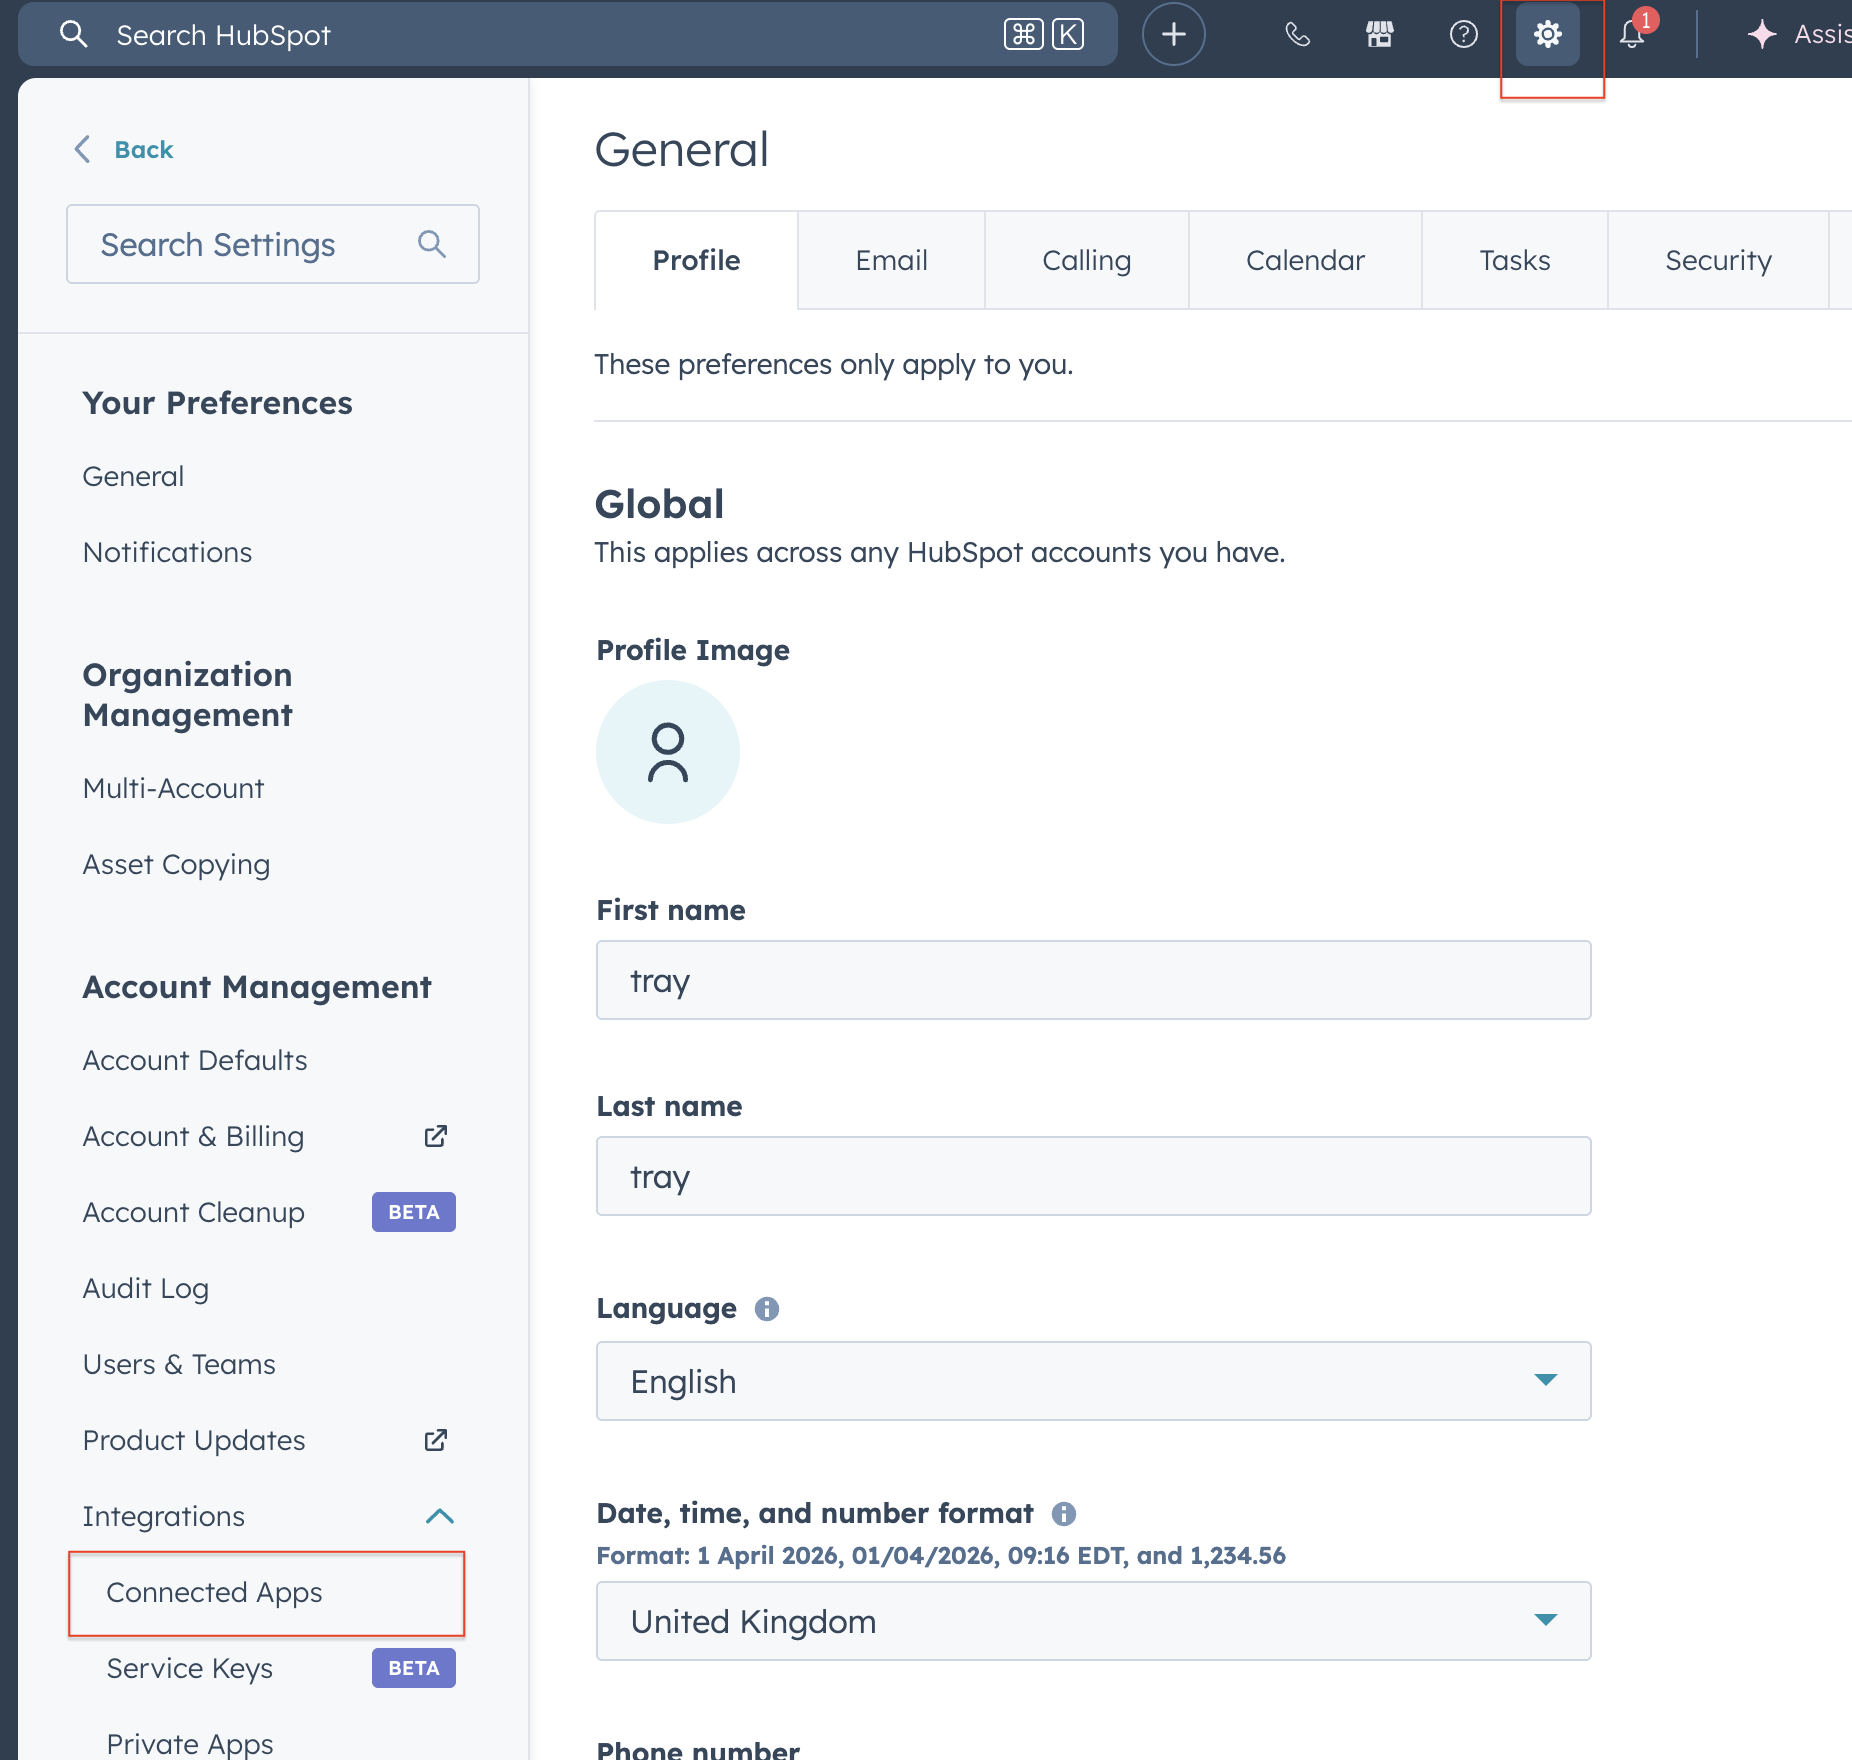
- Click the settings icon (gear icon) in the top navigation bar
- Navigate to Integrations → Connected Apps in the left sidebar
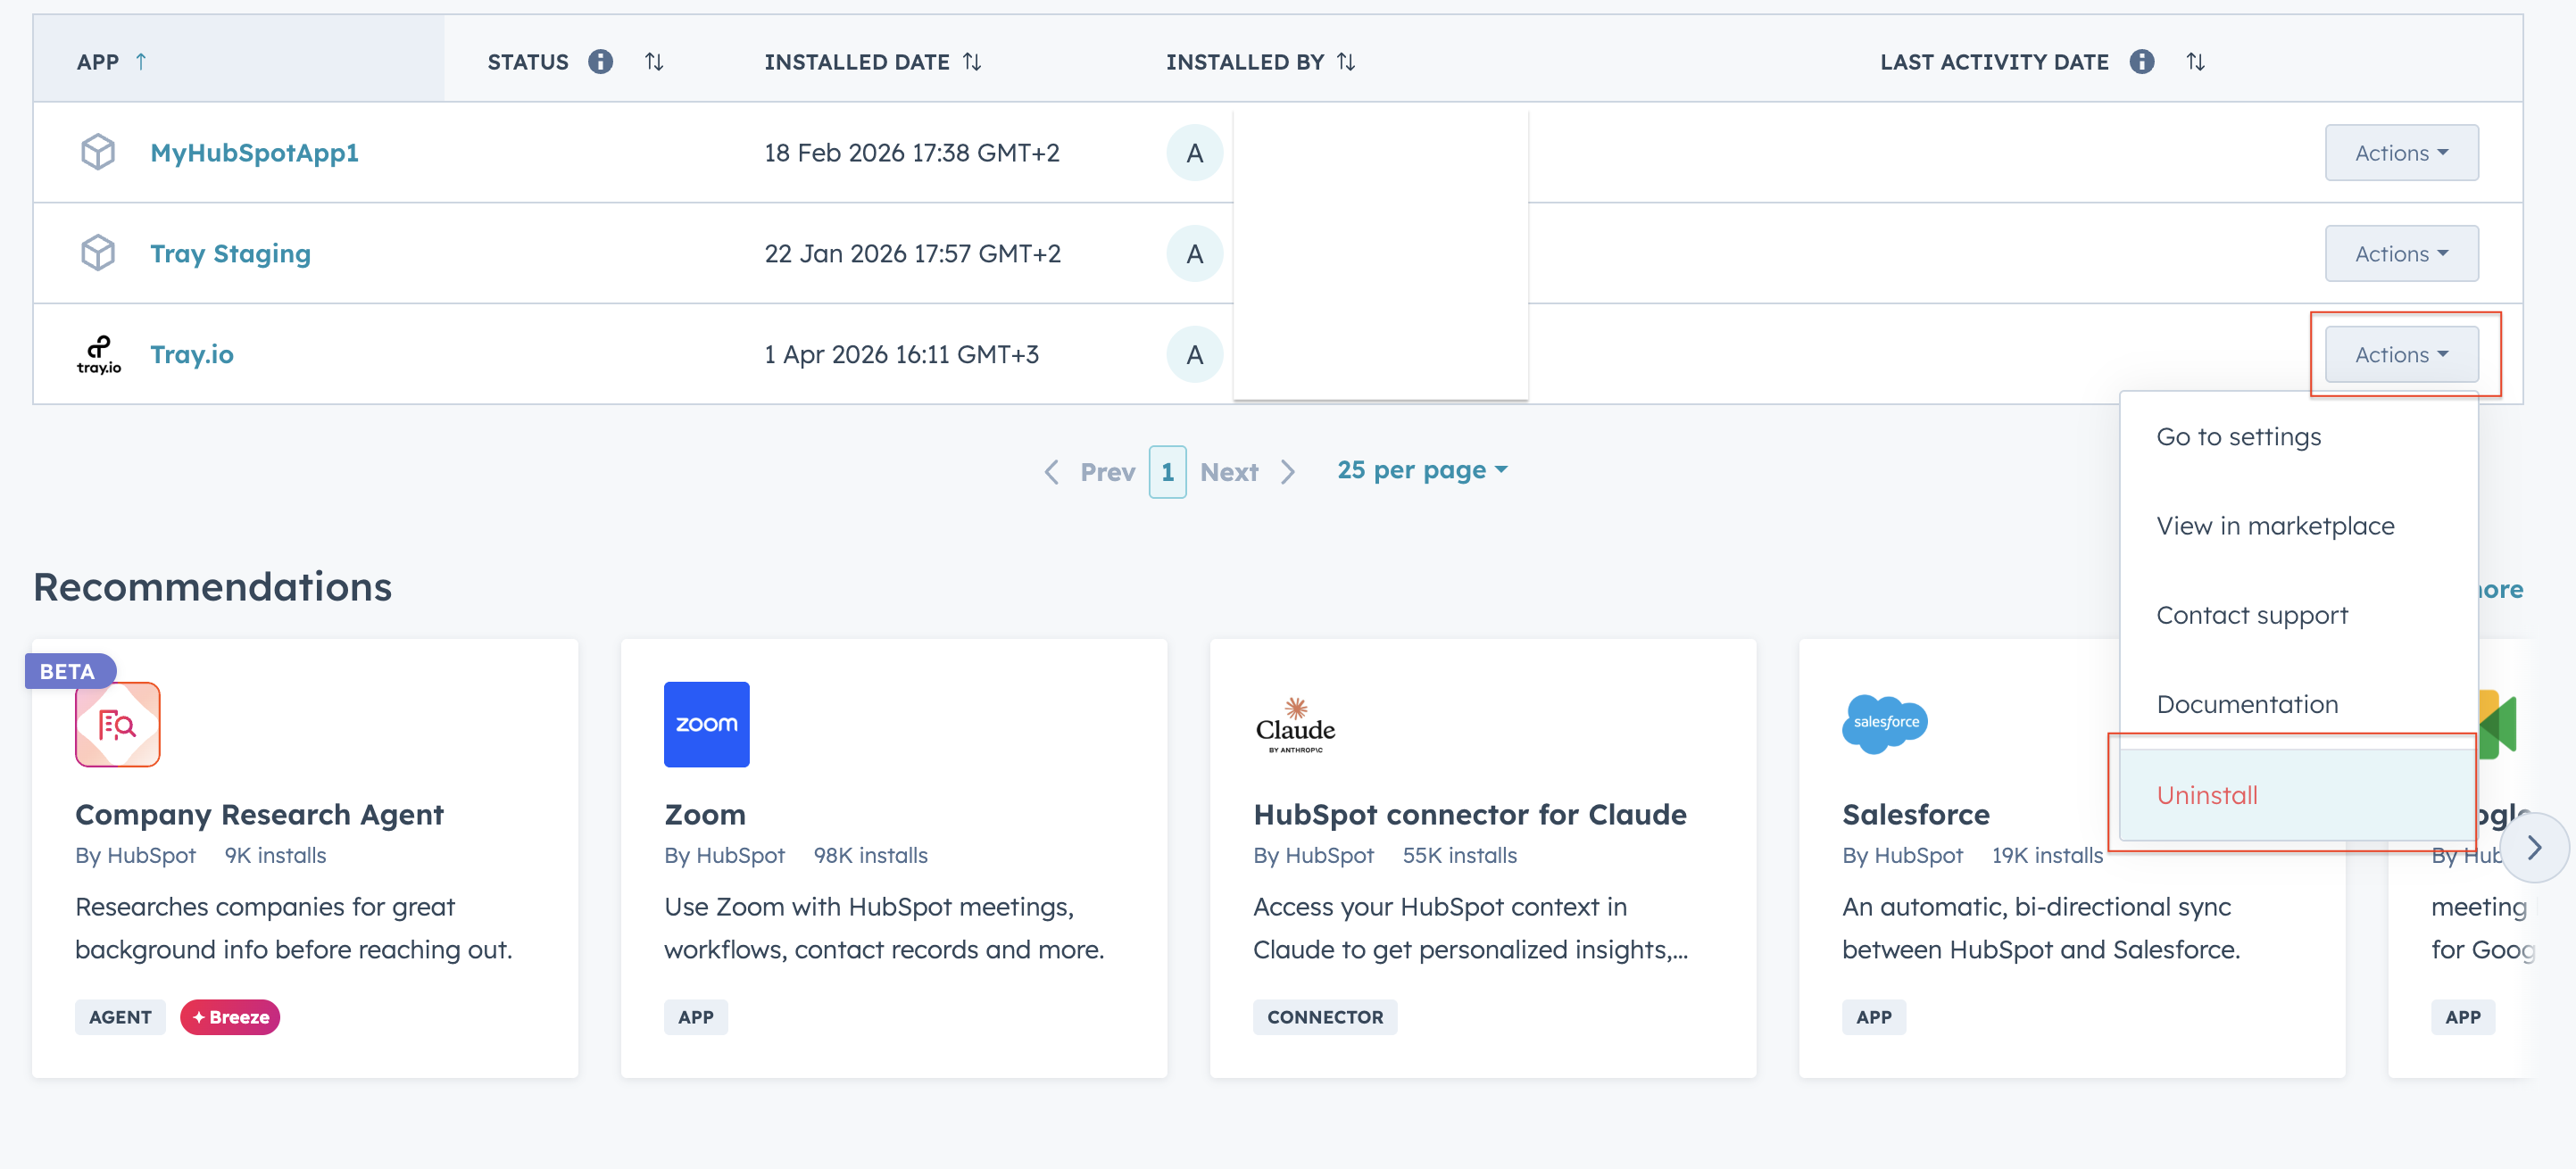
You can use this page to verify that Tray.io is connected and view connection details such as when the connection was authorized, which scopes are granted, and the last activity timestamp.
To uninstall:
- Find "Tray.io" in the list of connected apps
- Click Actions next to Tray.io
- Select Uninstall from the dropdown menu
- A confirmation modal will appear
- Type "uninstall" to confirm (as required by HubSpot)
- Click Uninstall to revoke access
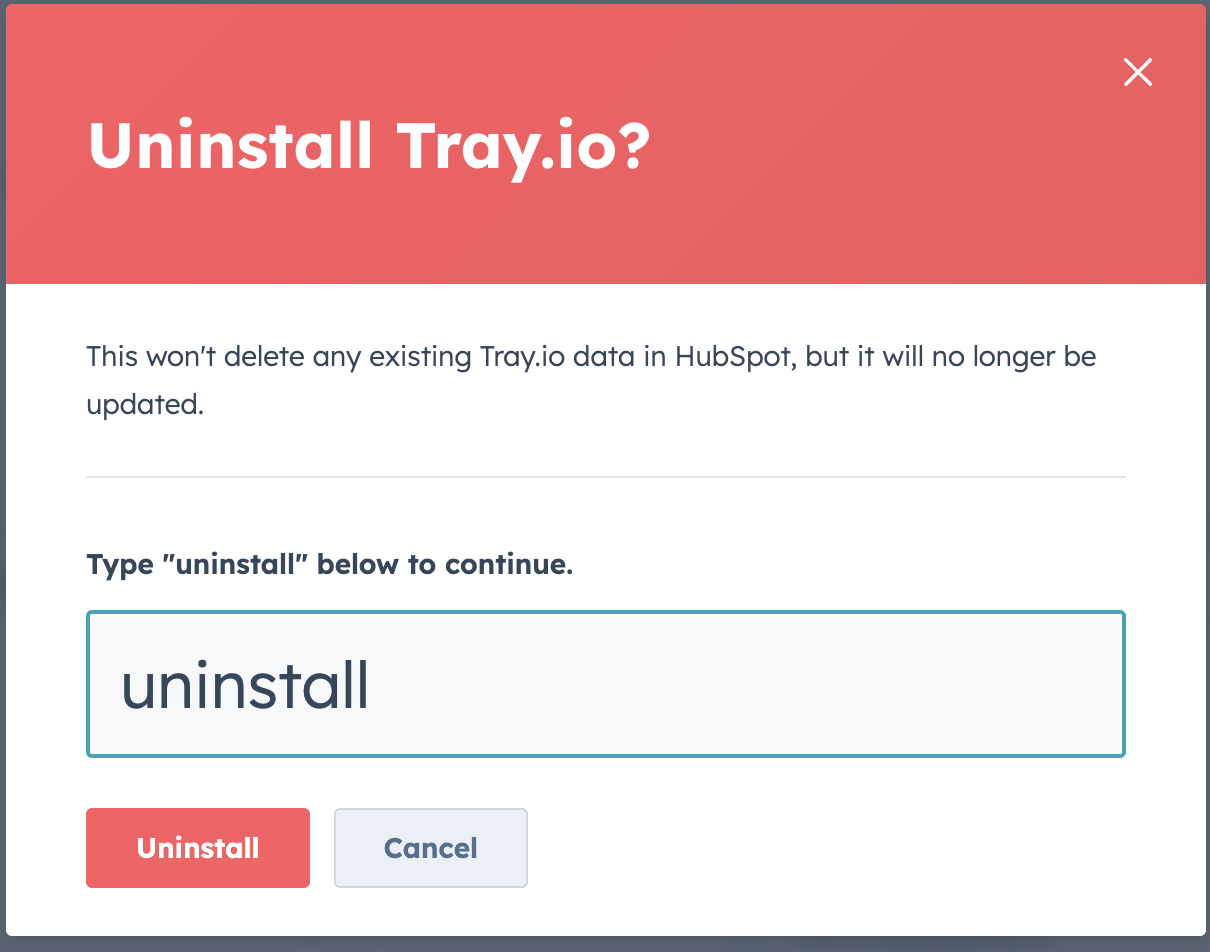
After revoking access in HubSpot, all Tray workflows using HubSpot authentications will immediately fail with authorization errors.
Step 2: Clean Up Tray Authentications
After revoking in HubSpot, remove the now-invalid authentications from Tray:
- Go to Settings → Authentications in Tray.io
- Find all HubSpot authentications that were connected to the revoked account
- Delete each authentication following the steps in "Delete Authentication Entirely" above
- Update any workflows that were using these authentications
Complete Disconnection Achieved! Tray.io no longer has any access to your HubSpot account.
What Happens to Workflows After Disconnection?
When you disconnect or revoke HubSpot access:
| Action | Impact on Workflows | Impact on Authentications |
|---|---|---|
| Remove connector from workflow | That specific workflow no longer uses HubSpot | Authentication remains active for other workflows |
| Change authentication on step | Step stops using old auth, continues with new auth | Old authentication remains active |
| Delete authentication in Tray | All workflows using it will fail | Authentication permanently deleted |
| Revoke in HubSpot Connected Apps | All workflows immediately fail with auth errors | Authentications become invalid but still exist in Tray |
Best Practice for Complete Disconnection:
- First, disable or update all workflows using the HubSpot authentication
- Then, delete the authentication from Tray
- Finally, revoke access in HubSpot Connected Apps
This order prevents workflows from failing unexpectedly in production.
Re-connecting After Disconnection
If you need to reconnect HubSpot after disconnecting:
- Follow the Setup Guide above to create a new authentication
- Update all affected workflows to use the new authentication
- Test each workflow to ensure proper connectivity
You cannot "restore" a revoked authentication - you must create a completely new authentication and re-authorize with HubSpot.
Troubleshooting Authentication Issues
"Permission Denied" or "Insufficient Permissions" Error
Problem: You don't have the required HubSpot permissions to authorize the app.
Solution:
- You need Super Admin or App Marketplace access permissions in HubSpot
- Contact your HubSpot administrator to grant you these permissions
- Alternatively, ask an administrator to create the authentication for your organization
Authentication Fails During OAuth Flow
Problem: OAuth authorization fails or redirects to an error page.
Solution:
- Clear your browser cache and cookies
- Try using an incognito/private browsing window
- Ensure you're logging in to the correct HubSpot account
- Check that pop-ups are not blocked by your browser
"Scope Not Available" Error When Using Operations
Problem: An operation fails with a scope-related error.
Solution:
- Edit your authentication to add the required scope
- Navigate to Settings → Authentications, find your HubSpot auth, and click Edit
- Select the additional scopes needed for your operations
- Re-authorize with HubSpot to apply the new scopes
Authentication Works But No Data Returns
Problem: Connection succeeds but operations return empty results.
Solution:
- Verify your HubSpot account actually has data (contacts, companies, deals, etc.)
- Check that your scopes include read permissions for the objects you're trying to access
- Ensure you're using the correct HubSpot account (if you have multiple)
"Token Expired" or "Invalid Token" Errors
Problem: Authentication worked before but now fails with token errors.
Solution:
- HubSpot access tokens can expire or be revoked
- Delete the old authentication and create a new one following the Setup Guide above
- Check HubSpot Connected Apps to ensure Tray.io is still listed and authorized
Additional Resources
- HubSpot Trigger Documentation - Setting up webhooks and event subscriptions
- Notes on Using HubSpot - Important implementation notes and scope details
- Custom OAuth Apps for Embedded Customers - White-labeling and custom OAuth configuration
- HubSpot Examples - Workflow examples and use cases
- HubSpot API Documentation - Official HubSpot API reference
For additional support with HubSpot authentication, contact Tray.io support or consult the HubSpot Developer Community.