Microsoft SQL Database
Interact with Microsoft's SQL database service.
Overview
The tray Microsoft SQL database connector gives you the ability to interact with Azure's SQL database service.
Connecting to your database
You can authenticate with Azure using the login credentials for the database you wish to access. The username and password related to the server admin or Azure AD user authorized to access the database. The Server field relates to the server name property in the overview panel of your database in the Azure portal.
IMPORTANT!:Be sure to whitelist ALL the Tray public IP addresses based on your region to allow Tray to connect with your database, by editing the firewall rules in the overview panel of your account Refer to the Tray public IPs document for complete list of the Tray public IP addresses. It is extremely important that your Microsoft SQL database is only accessible with a strong username and password combination when whitelisting these IP addresses, as they will be used by anyone using the connector in a Tray workflow.
Authentication
Within the workflow builder, highlight the Microsoft SQL database connector.
In the Microsoft SQL database connector properties panel to the right of the builder, click on the Authenticate tab and the 'New authentication' button.
 This will result in a Tray authentication pop-up modal. The first page will ask you to name your authentication and select the type of authentication you wish to create ('Personal' or 'Organisational').
The next page asks you for your 'User name', 'Password', 'Server' and the 'Database'. There are also 'Encrypt' and 'Port' options depending on your use case.
This will result in a Tray authentication pop-up modal. The first page will ask you to name your authentication and select the type of authentication you wish to create ('Personal' or 'Organisational').
The next page asks you for your 'User name', 'Password', 'Server' and the 'Database'. There are also 'Encrypt' and 'Port' options depending on your use case.
 The 'User name' and 'Password' are the same as the authentication credentials you used to login into the Microsoft SQL database.
The 'Server' property refers to the server name. By default, the server name is:
The 'User name' and 'Password' are the same as the authentication credentials you used to login into the Microsoft SQL database.
The 'Server' property refers to the server name. By default, the server name is: MSSQLSERVER. As a user, you may have several to choose from. Open up SQL Server Configuration Manager and navigate to the SQL Server Services panel to view your options.
Once you are there, a new panel should open up to the right-hand side, displaying all the available servers (listed by name).
Only the server instances which begin with SQL Server and have their SQL ID's following in parenthesis are applicable.
Take for instance, a server listed in the below image: SQL Server (SQL2008). This is an ideal candidate because it meets the parameters mentioned above. The only aspect of this name that is needed for the authentication process is the SQL ID, aka: SQL2008.
Copy the ID and paste it into your Tray authentication modal.
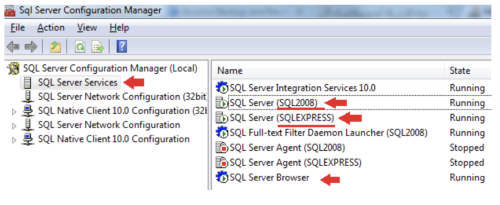
IMPORTANT!: Please make sure that your 'SQL Server' and 'SQL Server Browser' services are up and running, as displayed in the image above, before continuing. Otherwise, you won't be able to connect to the servers and complete the authentication process with Tray.io.
The 'Database' property refers to the database name. You will need to run a Microsoft SQL database query in order to obtain this.
Please refer to the following Microsoft documentation page for variants of this.
The 'Encrypt' field is automatically checked for you in the authentication modal. Feel free to uncheck this if it does not suit your use case.
Regarding the 'Port' property, by default the SQL database uses port number TCP: 1433.
This can be changed to suit your preferences, which is why your current database may not be set to the default port number. It may have already been changed for security reasons.
For more information on how to discover your actual port number, please see this article on Different ways to find your SQL Server Port Number for more details.
Once you have added these fields to your Tray authentication pop-up window, your modal should look similar to this:
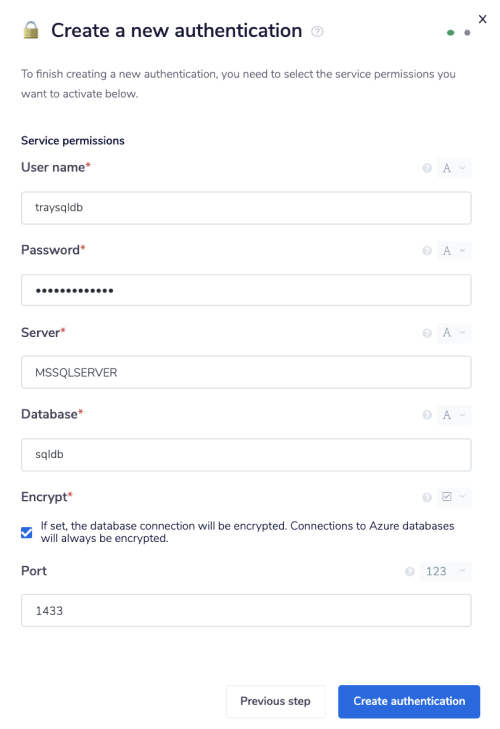 Click on the 'Create authentication' button to continue.
Go back to your settings authentication field (within the workflow builder properties panel), and select the recently added authentication from the dropdown options now available.
Your connector authentication setup should now be complete.
Click on the 'Create authentication' button to continue.
Go back to your settings authentication field (within the workflow builder properties panel), and select the recently added authentication from the dropdown options now available.
Your connector authentication setup should now be complete.