AWS Redshift
The Redshift connector allows you to query your Redshift database directly within tray.io, without having to worry about data pipelines or servers.
Overview
The Redshift connector allows you to query your Redshift database directly within tray.io, without having to worry about data pipelines or servers.
Connecting to your Redshift instance
To allow Tray.io to connect to your Redshift database, you'll need to either make your database publicly accessible or you can white list ALL the Tray public IP addresses based on your region. Refer to the Tray public IPs document for complete list of the Tray public IP addresses. Note: be sure to make it so that your Redshift database is only accessible with a strong username and password combination when white listing these IP addresses. To do this:
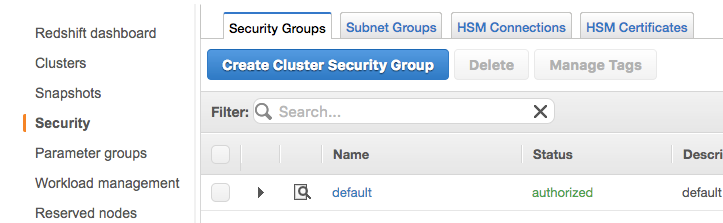
- Open up the "Security" section of your Redhift AWS. Open the "default" security group.
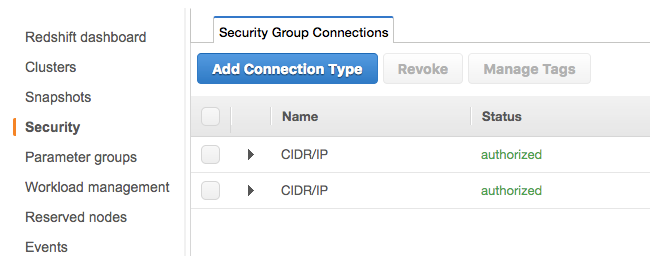
- Click "Add Connection Type"
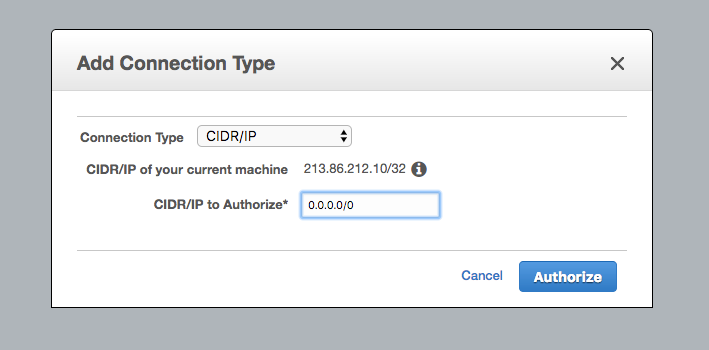
- Add a new "Connection Type", using the "CIDR/IP" connection type, and one of the above IP addresses as the IP address to authorize.
Authentication
Assuming that you already have a Redshift cluster set up, and have configured the access settings mentioned above correctly, we can proceed with the authentication process.
When using the Redshift connector, the first thing you will need to do is go to your Tray.io account page, and select the workflow you wish to work on. Once in the workflow builder itself, search and drag the Redshift connector from the connectors panel (on the left hand side) onto your workflow.
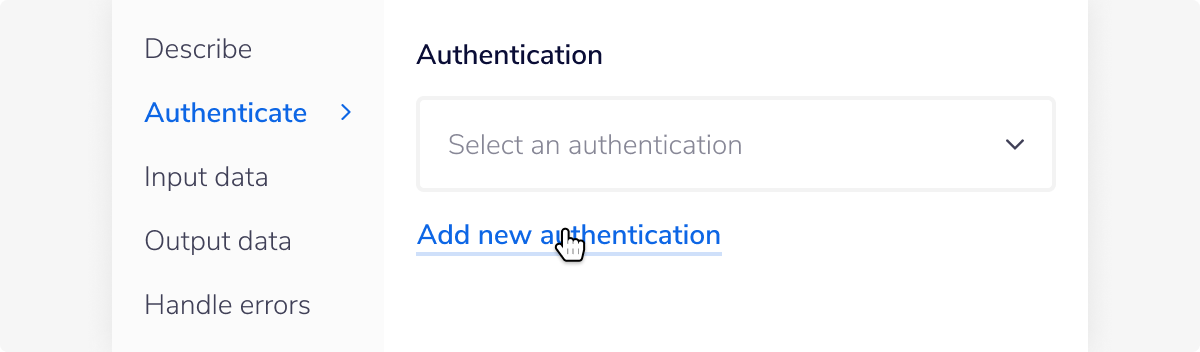
With the new Redshift connector step highlighted, in the properties panel on the right, click on the Authenticate tab and 'Add new authentication' (located under the 'Authentication' field).
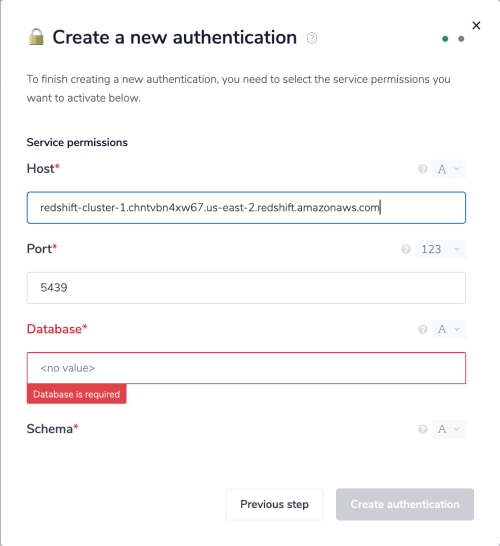
 This will result in a Tray.io authentication pop-up window. The first page will ask you to name your authentication, and state which type of authentication you wish to create ('Personal' or 'Organisational').
As you can see, the next page asks you for the details about your redshift cluster ('Host', 'Port', 'Database', and 'Schema') and your credentials ('User' and 'Password').
In order to get details about your reshift cluster, log on to AWS and head over to the Clusters screen in your Amazon Redshift account. From the available list of clusters, select the one that you're trying to connect.
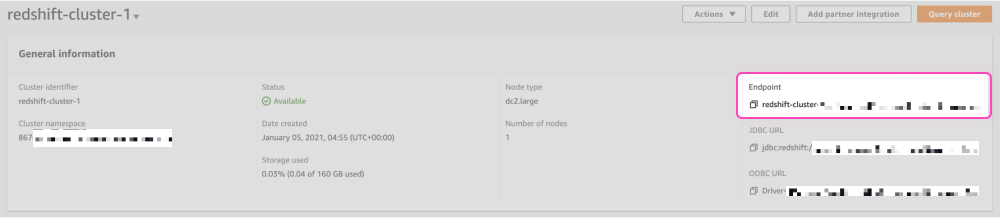
Firstly, it asks for 'Host'. The Host name is the 'Endpoint' listed within the 'General informtion' section. You will need to edit the given URL before adding it to your Tray.io authentication model.
For example, if your 'Endpoint' URL is:
This will result in a Tray.io authentication pop-up window. The first page will ask you to name your authentication, and state which type of authentication you wish to create ('Personal' or 'Organisational').
As you can see, the next page asks you for the details about your redshift cluster ('Host', 'Port', 'Database', and 'Schema') and your credentials ('User' and 'Password').
In order to get details about your reshift cluster, log on to AWS and head over to the Clusters screen in your Amazon Redshift account. From the available list of clusters, select the one that you're trying to connect.
Firstly, it asks for 'Host'. The Host name is the 'Endpoint' listed within the 'General informtion' section. You will need to edit the given URL before adding it to your Tray.io authentication model.
For example, if your 'Endpoint' URL is: redshift-cluster-1.chjrudn4xw74.us-east-2.redshift.amazonaws.com:5427/dev, users will need to remove everything after :5427 in order to have valid information for the 'Host' field.
Once this is done, copy and paste the URL into said 'Host' field.
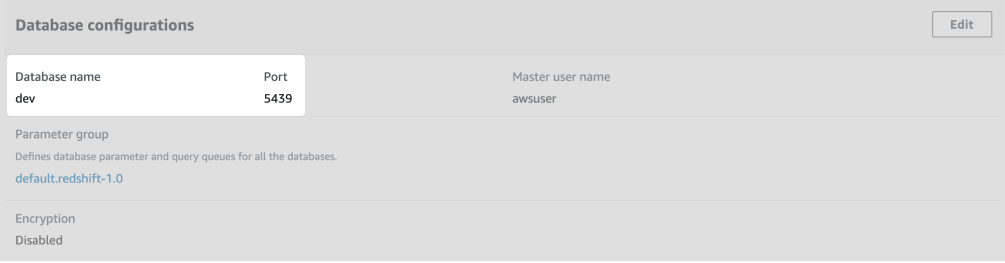
 To get the 'Port' and 'Database' fields, head to your AWS account. On the same page from which you just copied your 'Host' URL, select the 'Properties' tab. This should be below the 'General information' section.
Scroll down to the 'Database configurations' area. Here, you will find your cluster's 'Database name' and 'Port'. Copy and paste this information into your Tray.io authentication popup model.
To get the 'Port' and 'Database' fields, head to your AWS account. On the same page from which you just copied your 'Host' URL, select the 'Properties' tab. This should be below the 'General information' section.
Scroll down to the 'Database configurations' area. Here, you will find your cluster's 'Database name' and 'Port'. Copy and paste this information into your Tray.io authentication popup model.
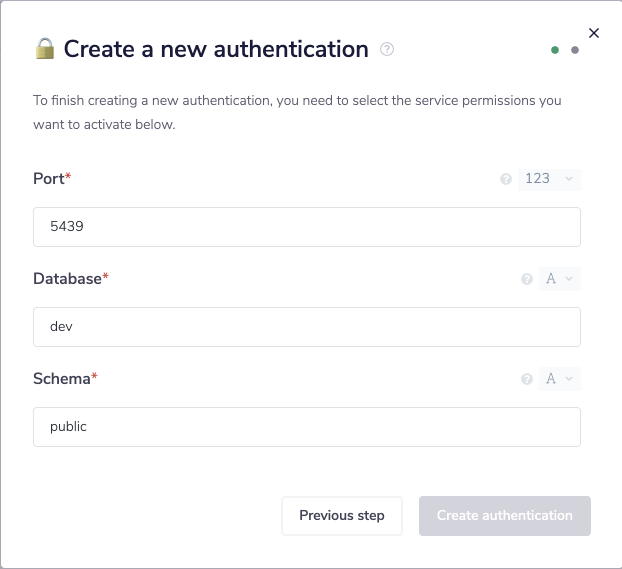
 The 'Schema' field will depend on your individual use case, and the schemas you have available.
If you have created a variety of schemas (but are not sure which ones are available for your use), copy and paste the following query into Redshift's Query Editor:
The 'Schema' field will depend on your individual use case, and the schemas you have available.
If you have created a variety of schemas (but are not sure which ones are available for your use), copy and paste the following query into Redshift's Query Editor: select * from pg_namespace;.
This query retrieves a full list of available schemas from the database, including the public schema.
You can then perform basic search queries in order to identify which tables are grouped under each schema. Users should enter the appropriate schema name in the 'Schema' field.
 Finally, please provide your user credentials.
PLEASE NOTE: These user credentials are specific to the Redshift cluster and not AWS services.
In this example the primary user's credentials are displayed. Aka, the credentials that were created when first configuring the cluster.
If you want to use other individual's credentials for authentication, use the following query select * from pg_user; to retrieve their user details.
Remember that users will need certain access rights in order to query & manipulate the database.
 Once you have added these fields to your Tray.io authentication popup window, click on the 'Create authentication' button. Go back to your settings authentication field (within the workflow builder properties panel), and select the recently added authentication from the dropdown options now available.
Your connector authentication setup should now be complete.
Once you have added these fields to your Tray.io authentication popup window, click on the 'Create authentication' button. Go back to your settings authentication field (within the workflow builder properties panel), and select the recently added authentication from the dropdown options now available.
Your connector authentication setup should now be complete.