Notes on using Redshift
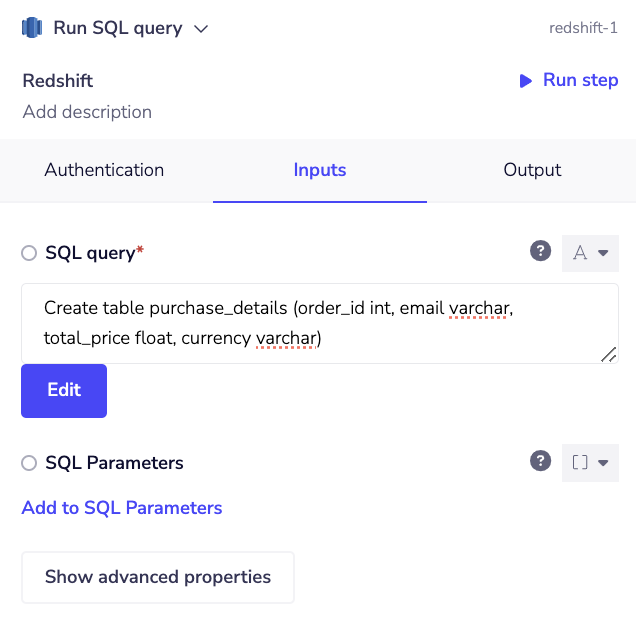
Run SQL query
The Run SQL query operation helps communicate with the Redshift database by executing raw specified SQL commands. The SQL commands can be used to perform actions like create and manipulate database objects, run queries, load tables, and modify the data in tables.
A sample query to create a table in the Redshift database would be something similar to this:
Create table purchase_details (order_id int, email varchar, total_price float, currency varchar)
 The Amazon Redshift is based on PostgreSQL. Amazon Redshift and PostgreSQL have several very important differences that you must be aware of while working with the Redshift database. For information about how Amazon Redshift SQL differs from PostgreSQL, see the Amazon Redshift and PostgreSQL document.
For the ease of working with the Redshift PostgreSQL queries, refer to the Redshift's SQL commands document.
The Amazon Redshift is based on PostgreSQL. Amazon Redshift and PostgreSQL have several very important differences that you must be aware of while working with the Redshift database. For information about how Amazon Redshift SQL differs from PostgreSQL, see the Amazon Redshift and PostgreSQL document.
For the ease of working with the Redshift PostgreSQL queries, refer to the Redshift's SQL commands document.
Basic examples
This section provides simple, step-by-step instructions on how to work with specific operations of the Redshift connector.
Insert records
There are various ways in which you can upload (insert/update) data in to the Redshift tables based on your requirements and scenarios. Below are the few example work flows that will help you gain a better understanding of these ways:
- Insert single record
- Batch insertion of records
- Adding a record to a particular table
- Add or update record
Please note that the these demos which follow do not represent a 'fixed' way of working with Tray.io. They only show possible ways of working with Tray.io and the Redshift connector. Once you've finished working through this example please see our page Introduction to working with data and jsonpaths and Data Guide for more details.
In these examples, we have shown that you have received some customer data via the Webhook trigger, and now need to process it into Redshift. However users may have received this data in any number of other ways such as from the Salesforce or SurveyMonkey connector, through the CSV Editor, and so on.
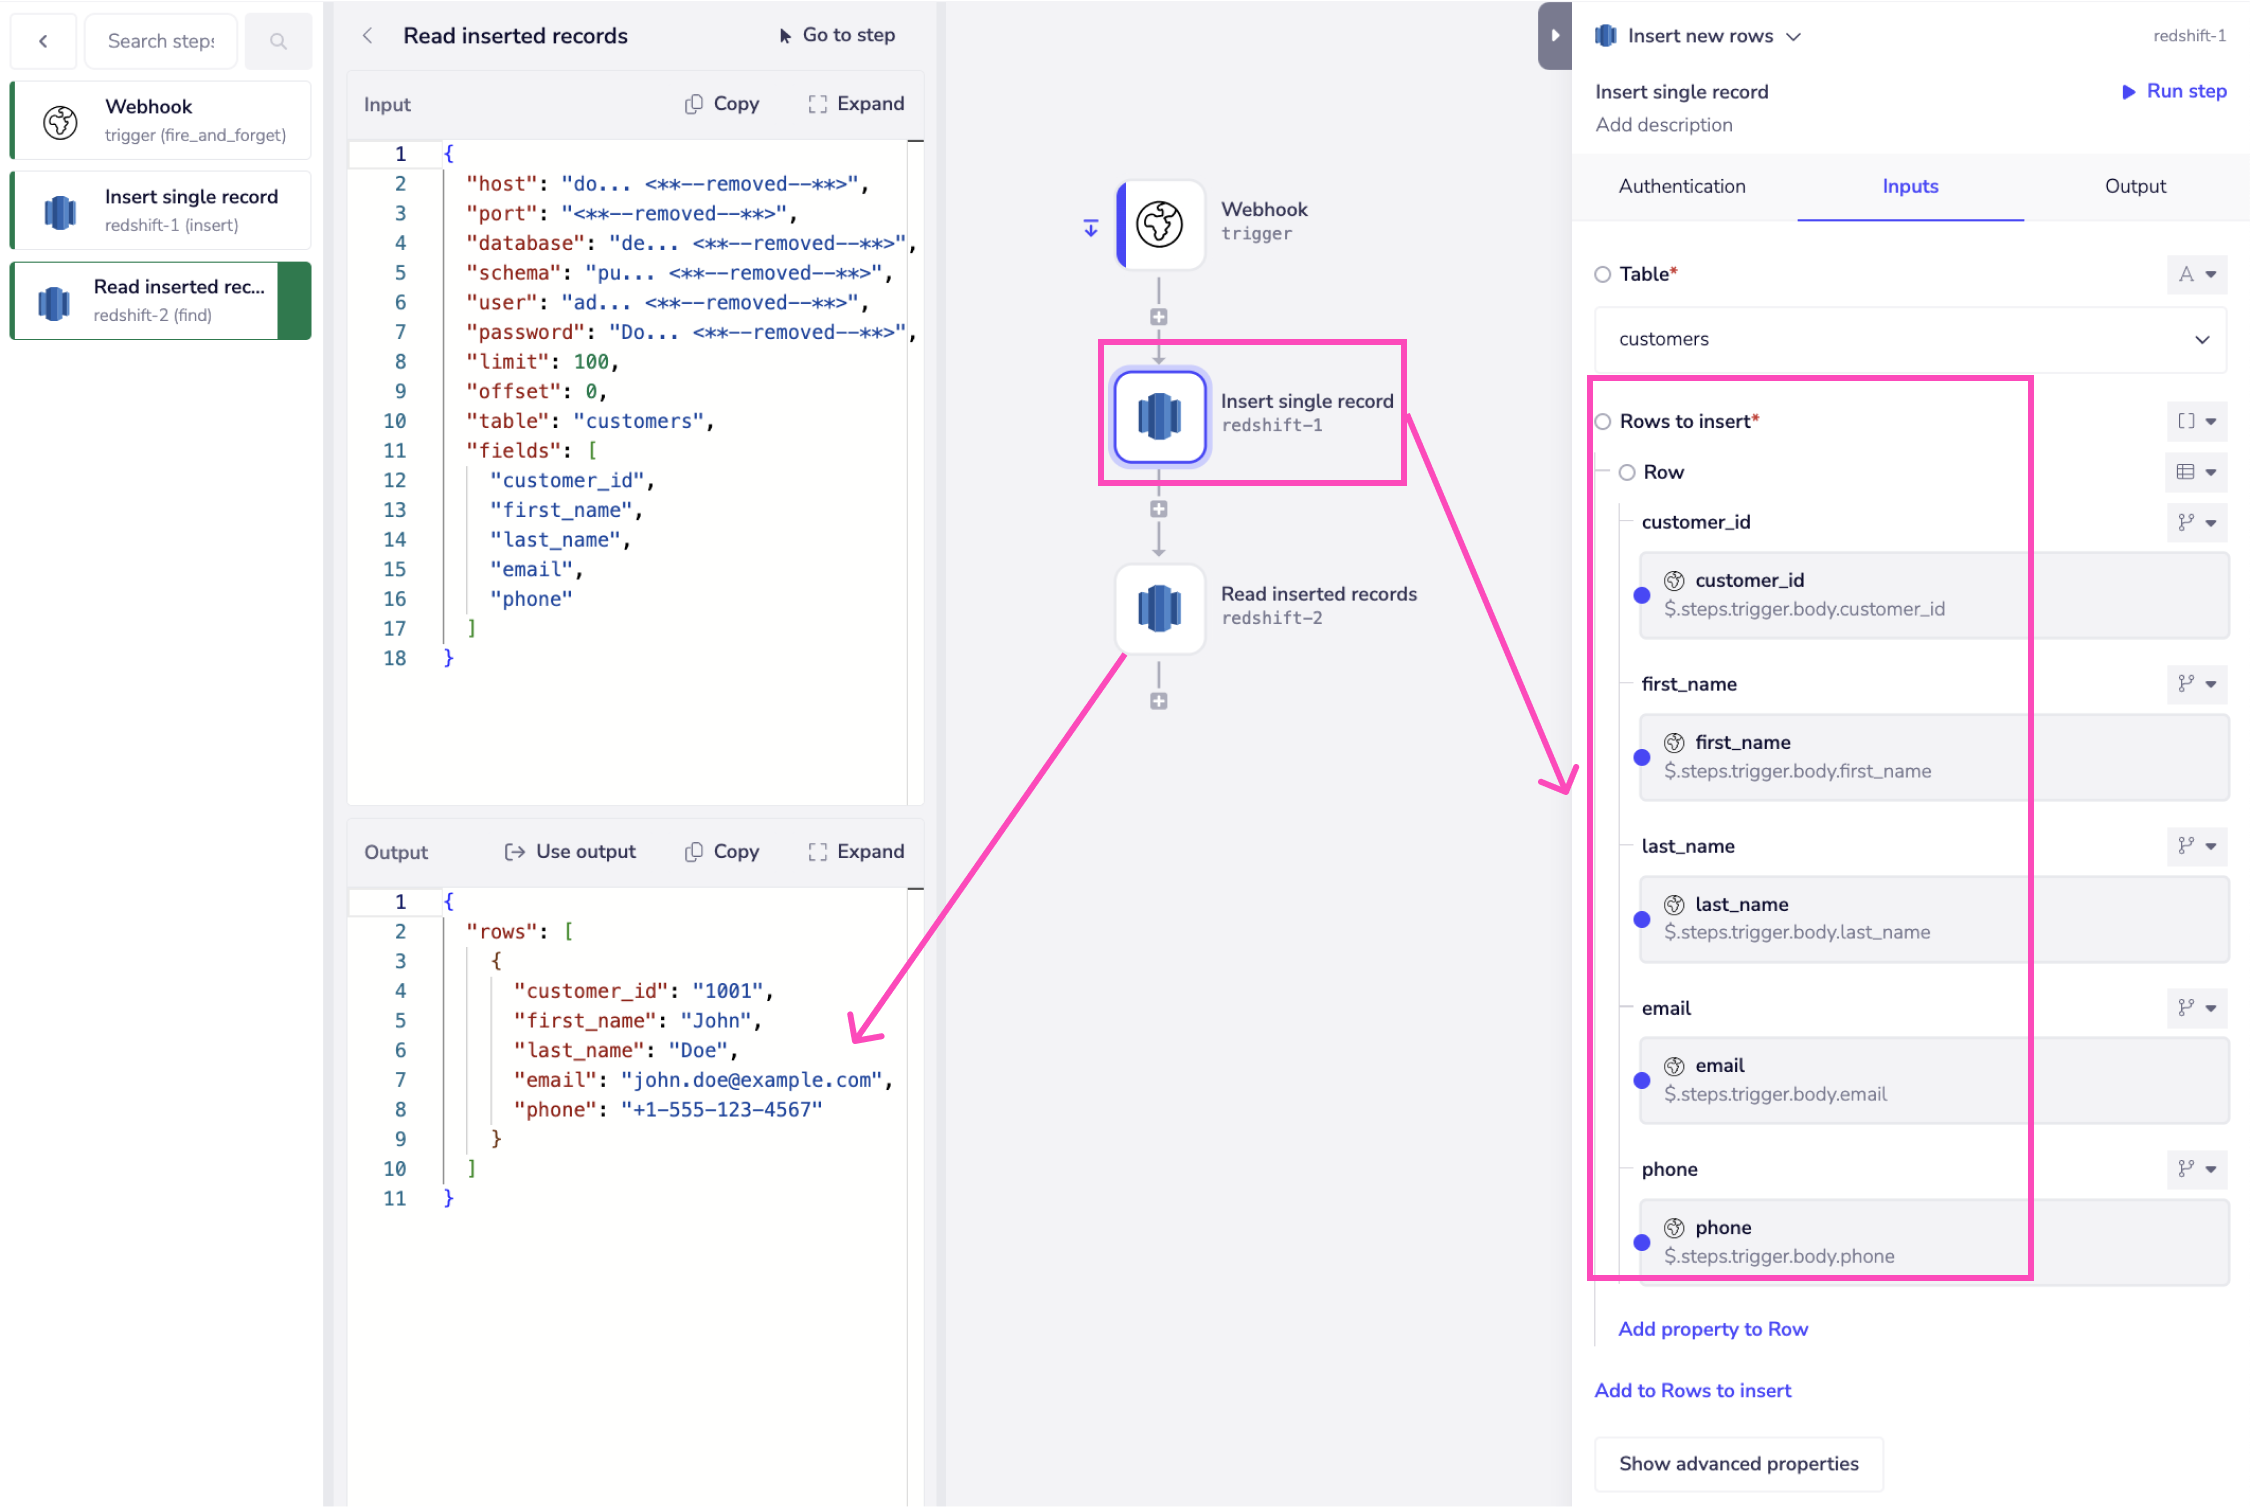
Insert single records
The Insert Single Record operation allows you to insert a single customer record into a Redshift table. Once inserted, you can verify the record by using the Find Rows operation to read the inserted data. The below example demonstrates how you can insert single record into a Redshift table. While working with multiple records use batch insert method. Consider the following JSON payload received by a Webhook, which contains a single customer record:
\{
  "customer_id": 1001,
  "first_name": "John",
  "last_name": "Doe",
  "email": "john.doe@example.com",
  "phone": "+1-555-123-4567"
\}
To insert a single record, you need to map each column from the table as a property of the row. For each field, the corresponding value in the JSON payload (trigger data) is mapped to the appropriate Redshift column.
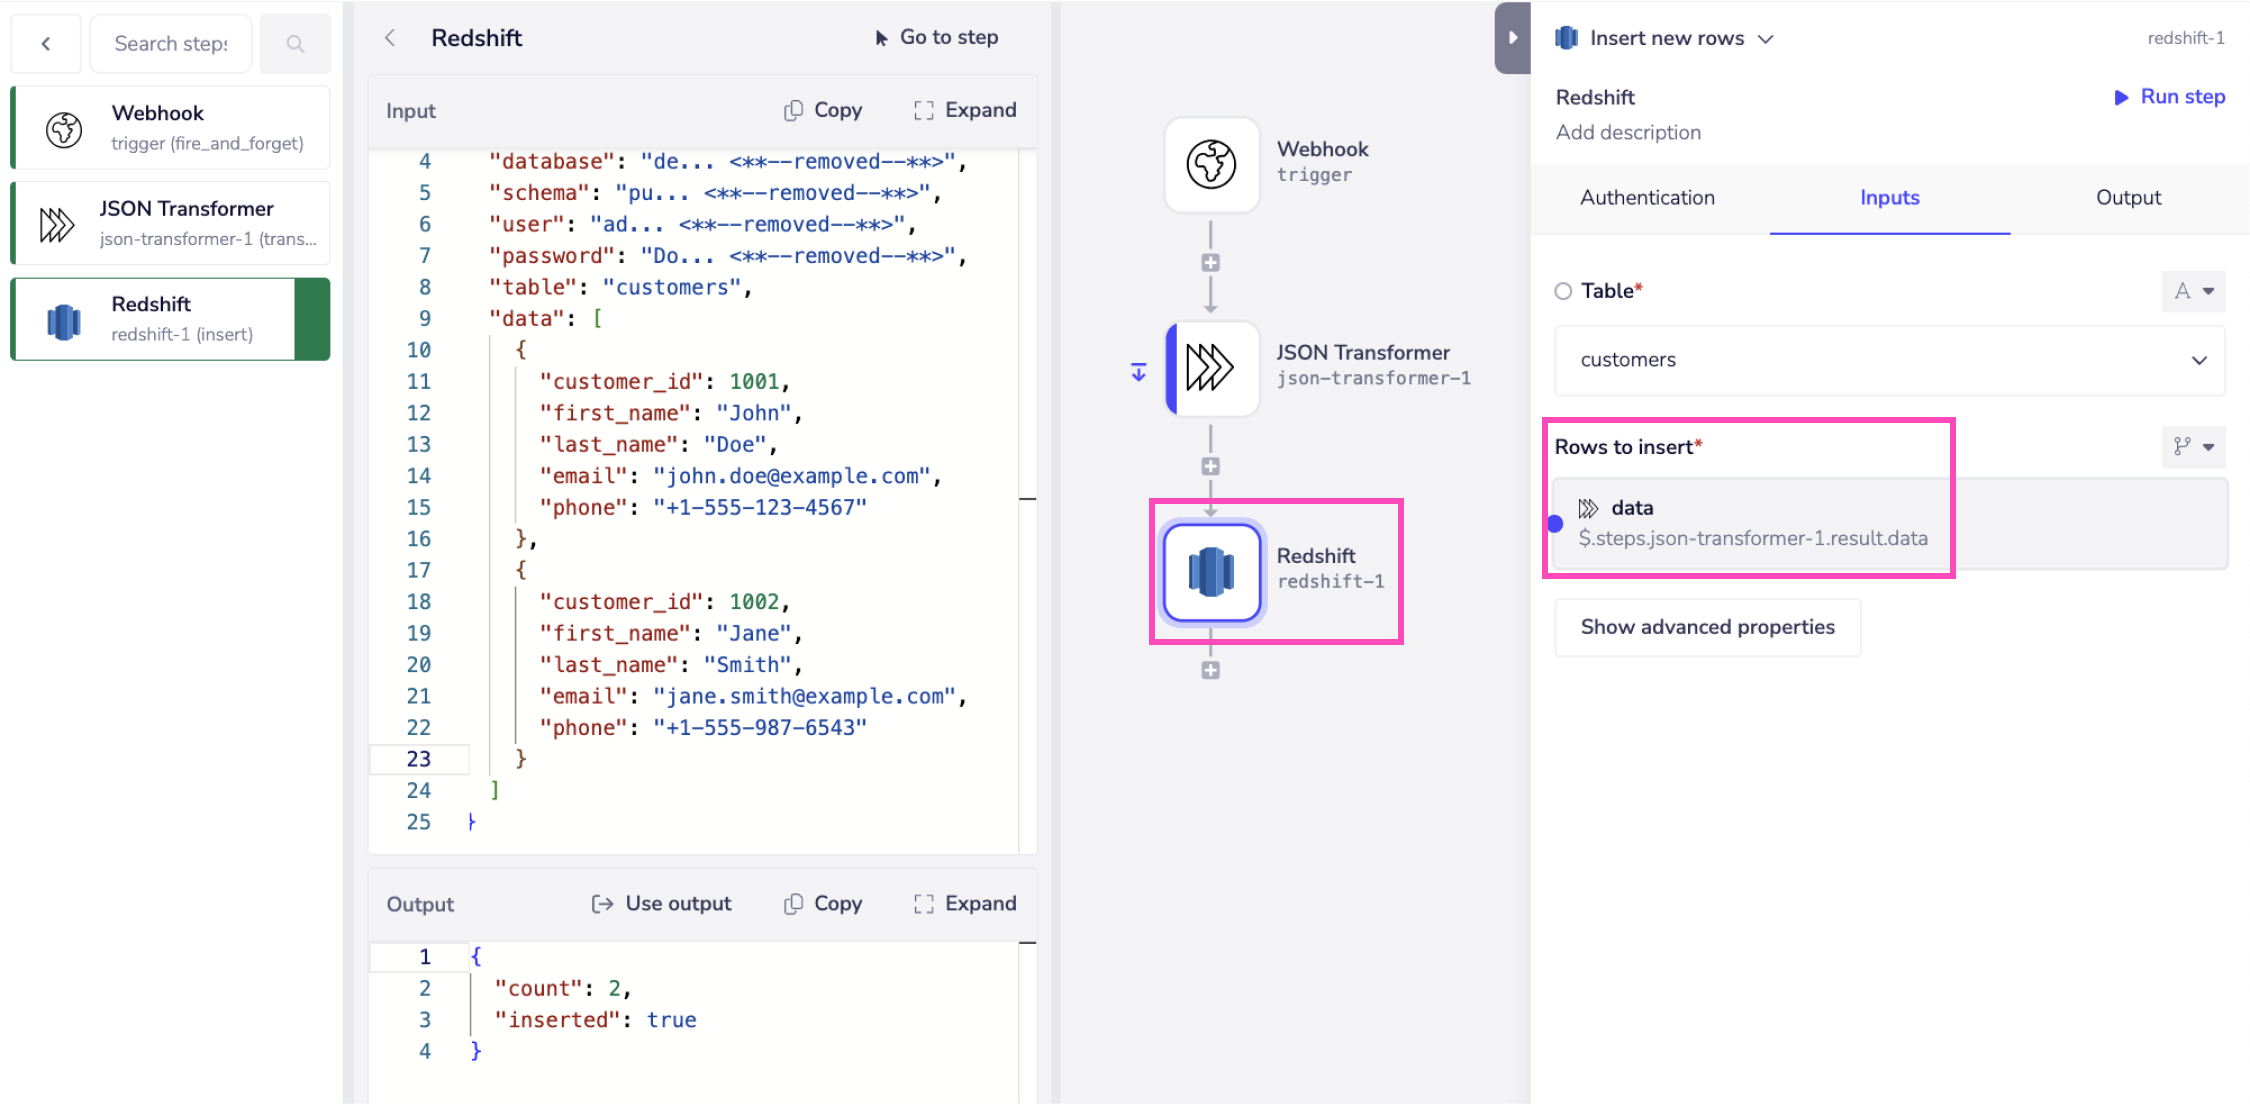
Batch insertion of records
The workflow uses Insert Rows into Table operation to insert multiple records in batch. When inserting records, it's important to ensure that they are formatted correctly according to the table's schema. You can verify the expected format using sample payloads. The workflow is designed to receive and process various types of data through a Webhook. For example, let's consider a scenario where the following JSON payload is received:
\\{
  "customers": [
    {
      "id": 1001,
      "name": \\{
        "first": "John",
      \\\},
      "contact": \\{
        "email": "john.doe@example.com",
      \},
      "registration": \\{
        "date": "2023-04-15",
    \\{
      "id": 1002,
      "name": \\{
        "first": "Jane",
      \\\},
      "contact": \\{
        "email": "jane.smith@example.com",
      \},
      "registration": \\{
        "date": "2023-04-15",
    }
  ]
}
To properly format this data for insertion into the Redshift table, we used the JSON Transformer connector. Alternatively, you can achieve the same transformation using a script or Python connector. The following JSONata script is applied to structure the data as required for Redshift:
\\{
  "data": customers.\{
    "customer_id": id,
    "first_name": name.first,
    "last_name": name.last,
    "email": contact.email,
    "phone": contact.phone
  \\\}
}
This transformation prepares the customer data by extracting key fields like customer_id, first_name, last_name, email, and phone from the incoming JSON payload.
Once the data has been transformed, it is passed to the Redshift connector to be inserted into the customers table.
Adding a record to a particular table
This workflow demonstrates how to insert records into different Redshift tables based on incoming data.
The database has three tables: account, prospect, and sequenceState. The workflow determines the correct table using the tableName field from the data.
Triggered by a Webhook that receives data in JSON format. The tableName field (e.g., "create.prospect") indicates which table to use.
The records received by the Webhook are in JSON format:
{
"data": \{
"id": "20",
"first_name": "Blake",
"last_name": "Mosley",
"phone": "+1 (956) 577-2515"
\},
Remember that the format in which you receive data will vary depending on where it is coming from - pulling records from Salesforce, Outreach, etc., will have different results/views.
We are using the Text Helper connector to isolate the table name (e.g., prospect) from the tableName value.
Branch connector routes the workflow based on the table name, inserting the records into the appropriate Redshift table (e.g., prospect, account, or sequenceState). If no match is found, the workflow terminates.
This workflow demonstrates how to insert records into multiple Redshift tables based on the received data.
The Redshift database considered in this example contains three tables, namely 'account', 'prospect', and 'sequenceState'. So depending on the tableName specified in the received data, the workflow will add the data to the specified table.
The steps will be as follows:
- Pull the records from the source (a webhook trigger in this example) and extract the table name from the value of the tableName attribute.
- Navigate the course of the workflow to the appropriate branch using the Branch connector based on the value (table name) received from the previous step.
- Insert the new records into the appropriate Redshift table. The final outcome should look like this:
1 - Pull records and extract the table name
When using a Webhook trigger 'When webhook is received, auto respond with HTTP 200' is the most common operation, unless you want to specify a custom response. Be sure to click the 'Enable' button before continuing. This makes the workflow ready to receive incoming calls. Be sure to click the 'Enable' button before continuing. This makes the workflow ready to receive incoming calls. The records received by the Webhook are in JSON format:
{
"data": \{
"id": "20",
"first_name": "Blake",
"last_name": "Mosley",
\},
"meta": {
"tableName": "create.prospect"
}
}
Remember that the format in which you receive data will vary depending on where it is coming from - pulling records from Salesforce, Outreach, etc., will have different results/views.
Next, add the Text Helper connector and set the operation to 'Get text after'.
The Text Helper connector using the 'Get text after' operation returns a substring based on the inputs provided.
As you can see in the image below, given a jsonpath to the 'String' field using the connector-snake ($.steps.trigger.body.meta.tableName) and a value to the 'Pattern' field as create.. It returns the substring between where the pattern was found depending on the 'Match number' 2 and the beginning of the string.
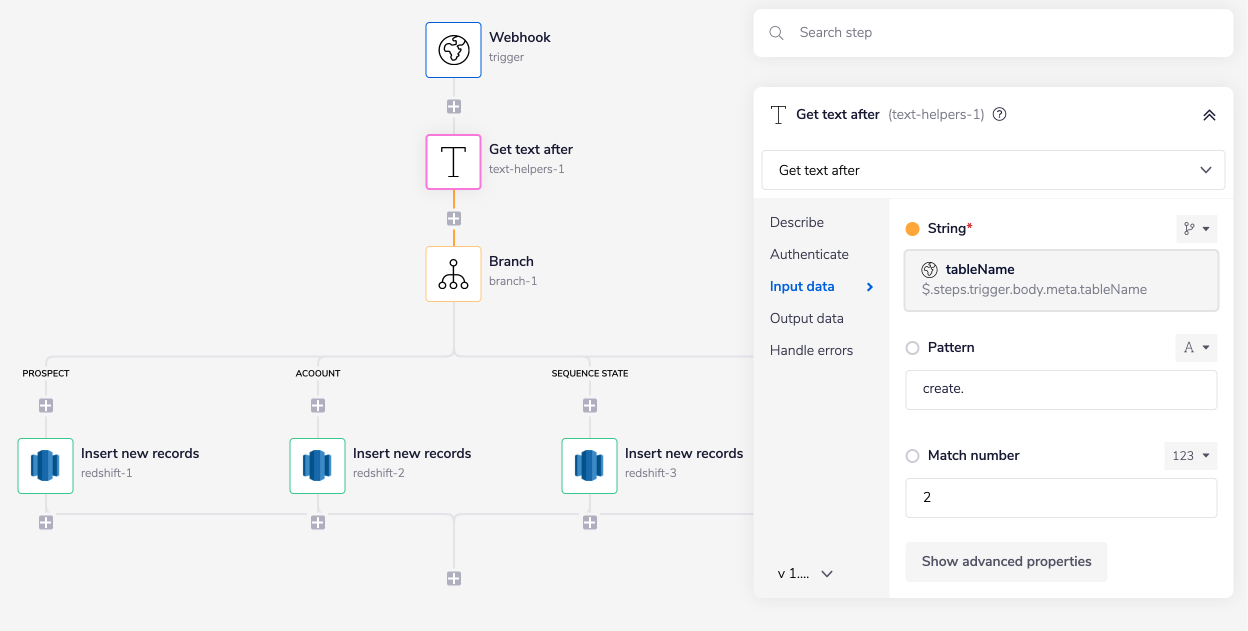 To understand this operation, consider the example JSON provided above. Based on the provided jsonpath and values for each field, the retrieved values are:
- String:
create.prospect - Pattern:
create. - Match number:
2So when the values of the String and Pattern fields are compared, the match found iscreate.. So the operation provides the substring that comes after(second) the match. In this case, as you can see in the image below, the substring returned by the operation isprospect.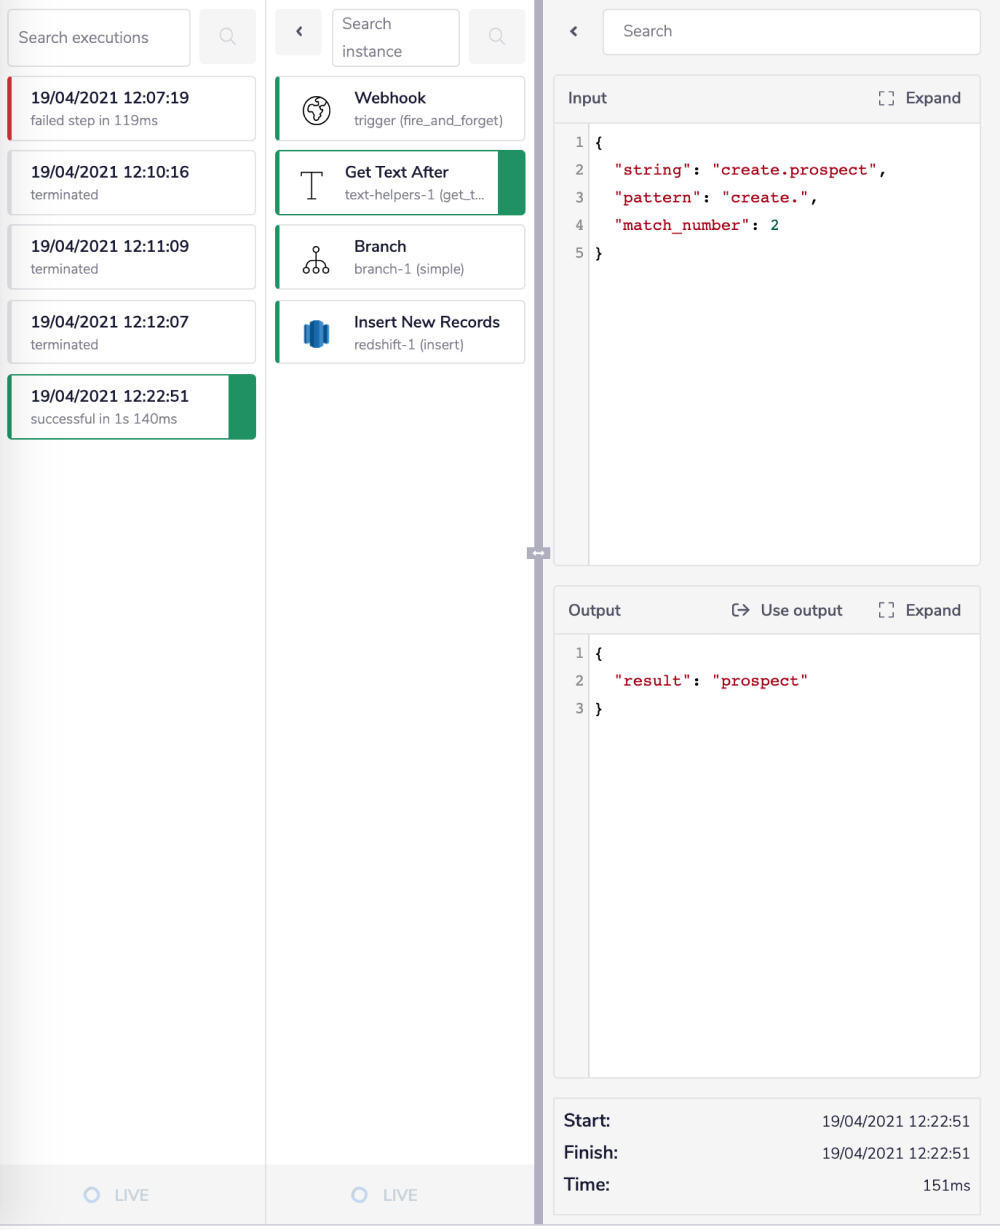 Based on this step's output, the workflow will navigate to the branch with the Label as 'Prospect'.
For more clarification on the pathways, you have available, open the Debug panel to view your step's Input and Output.
Based on this step's output, the workflow will navigate to the branch with the Label as 'Prospect'.
For more clarification on the pathways, you have available, open the Debug panel to view your step's Input and Output.
2 - Navigate and add records
Add a Branch connector with the 'Value To Test' field set to $.steps.text-helpers-1.result. You can use the connector-snake to generate this automatically.
Set the 'Value' and 'Label' pair for each branch with the Redshift table names, as shown in the image below.
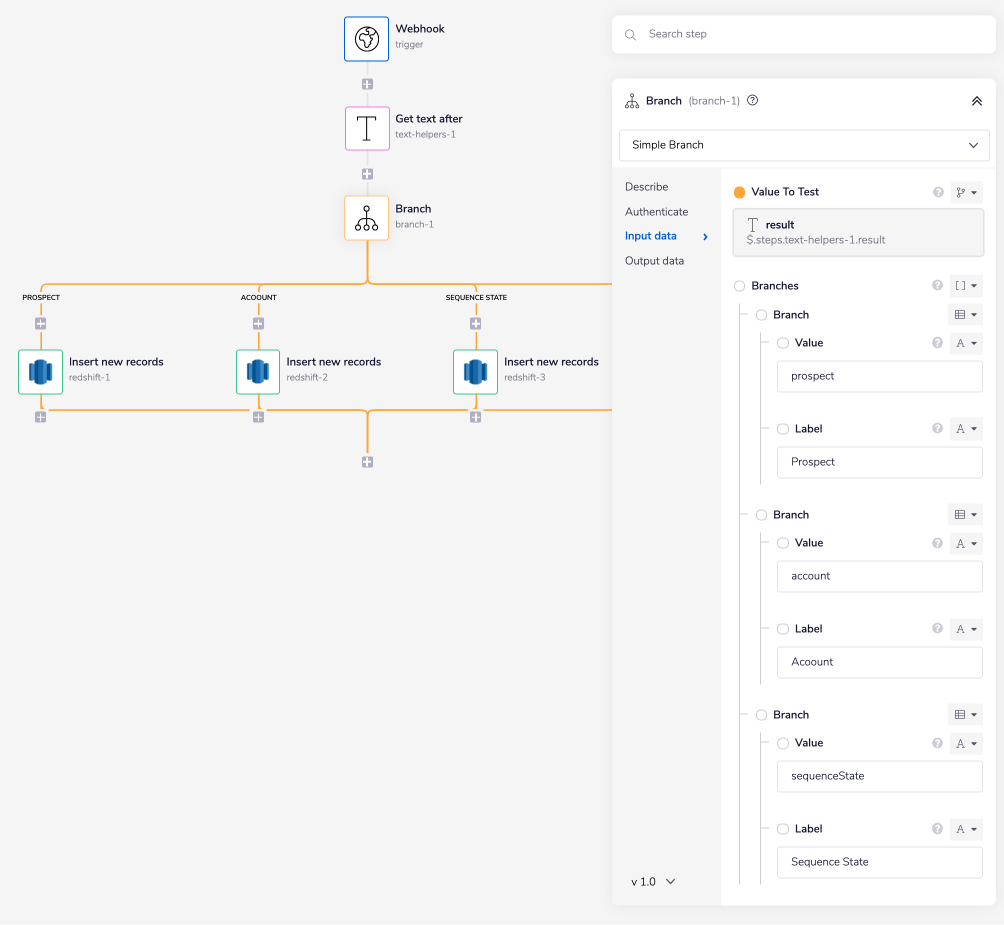 The Branch connector will navigate the workflow execution based on the input received from the previous step. The possible values you could receive from the previous step are 'prospect', 'account', and 'sequenceState', thus the three branches.
The third branch is an auto-generated 'Default' branch, which will terminate the workflow if the branch does not receive any of the three values mentioned above as an input.
For the workflow to terminate, add the Terminate connector under this fourth branch, i.e., the 'DEFAULT' branch.
Next, add the Redshift connector under each branch except the 'DEFAULT' branch, and set the operation to 'Insert new rows'.
As you can see, the 'Table' and the 'Rows to insert' fields are mandatory.
Select the appropriate table name from the drop-down options based on the branch your Redshift connector is on. As you can see we have selected the table name for the first branch as
The Branch connector will navigate the workflow execution based on the input received from the previous step. The possible values you could receive from the previous step are 'prospect', 'account', and 'sequenceState', thus the three branches.
The third branch is an auto-generated 'Default' branch, which will terminate the workflow if the branch does not receive any of the three values mentioned above as an input.
For the workflow to terminate, add the Terminate connector under this fourth branch, i.e., the 'DEFAULT' branch.
Next, add the Redshift connector under each branch except the 'DEFAULT' branch, and set the operation to 'Insert new rows'.
As you can see, the 'Table' and the 'Rows to insert' fields are mandatory.
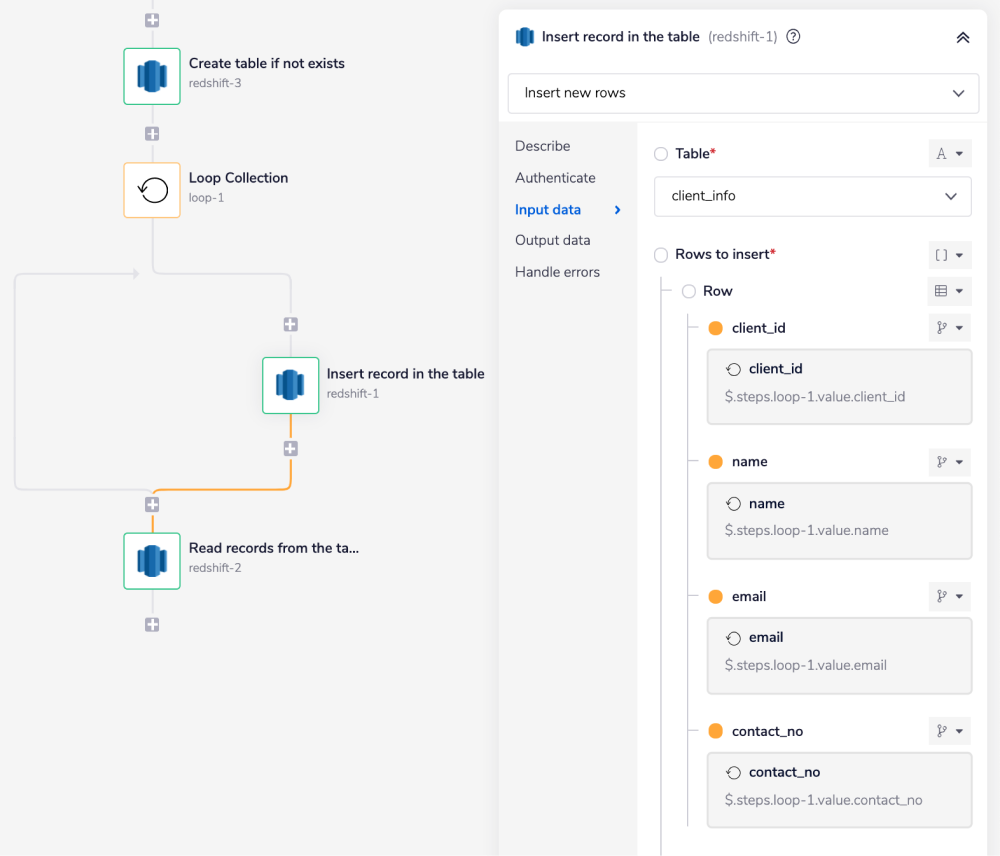
Select the appropriate table name from the drop-down options based on the branch your Redshift connector is on. As you can see we have selected the table name for the first branch as prospect.
Using a connector-snake find the jsonpath for the 'Row' field from the Trigger step. It should appear similar to this: $.steps.trigger.body.data.
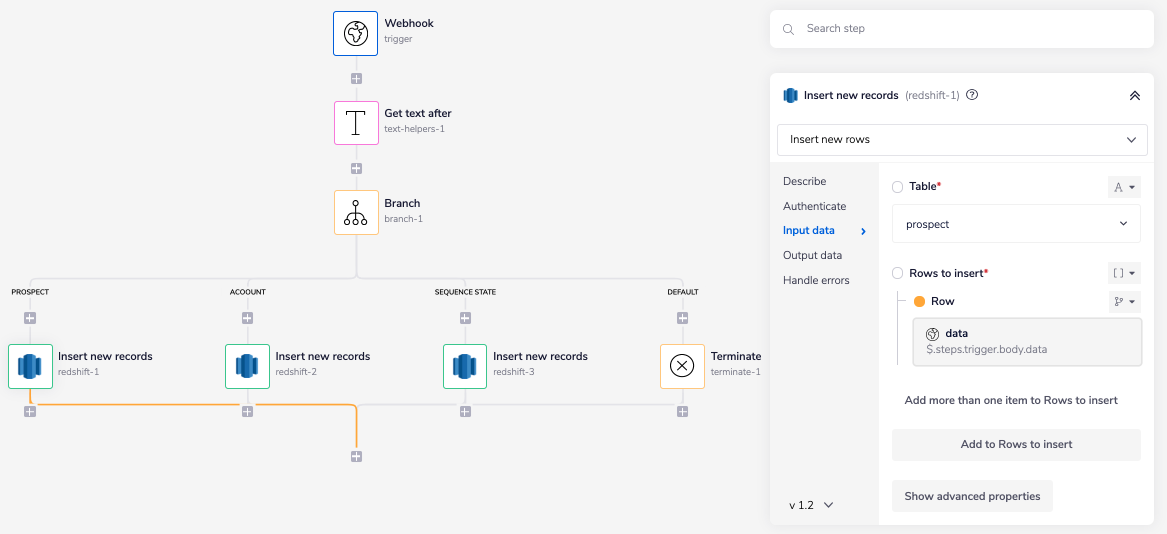 Similarly, add values for the 'Table' and the 'Rows to insert' fields for the Redshift connectors under the 'ACCOUNT' and 'SEQUENCE STATE' branches.
The Insert new rows operation will insert the records received through the Webhook trigger in the selected Redshift table.
Similarly, add values for the 'Table' and the 'Rows to insert' fields for the Redshift connectors under the 'ACCOUNT' and 'SEQUENCE STATE' branches.
The Insert new rows operation will insert the records received through the Webhook trigger in the selected Redshift table.
Add or update record
The below example demonstrates how you could potentially use the Redshift connector to insert and update the records into the Redshift database. In this workflow, the record to be uploaded to the Redshift database is received through the Webhook trigger. The received record includes the event attribute which specifies if the record is to be created or updated. The steps will be as follows:
- Pull the records from the source (a webhook trigger in this example) and navigate the course of the workflow to the appropriate branch using the Branch connector based on the value (event) received from the previous step.
- Insert or update the record to the Redshift database.
The final outcome should look like this:
1 - Pull records and navigate
When using a Webhook trigger 'When webhook is received, auto respond with HTTP 200' is the most common operation, unless you want to specify a custom response. Be sure to click the 'Enable' button before continuing. This makes the workflow ready to receive incoming calls. Be sure to click the 'Enable' button before continuing. This makes the workflow ready to receive incoming calls. The records received by the Webhook are in JSON format:
\\{
 "data": \\{
   "id": "20",
    "first_name": "Blake",
    "last_name": "Mosley",
 \\\},
 "meta": \\{
  "event": "create"
 \\}
}
Remember that the format in which you receive data will vary depending on where it is coming from - pulling records from Salesforce, Outreach, etc., will have different results/views.
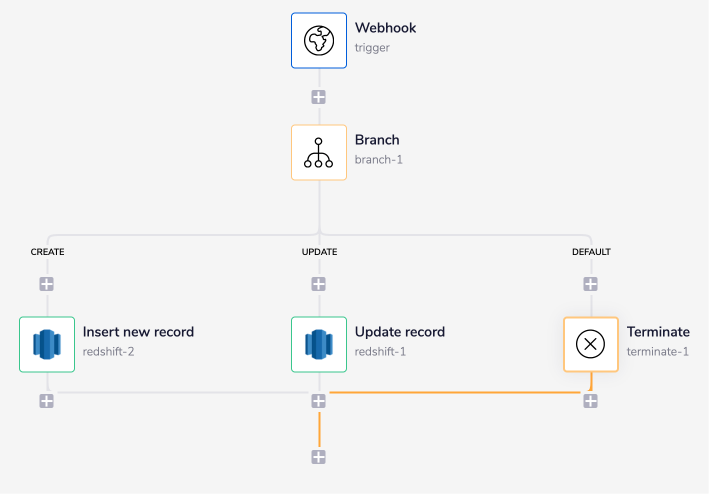
Next, add the Branch connector with the 'Value To Test' field set to $.steps.trigger.body.meta.event. You can use the connector-snake to generate this automatically.
Set the 'Value' and 'Label' pair for the first two branches as 'create' and 'update' as shown in the image below.
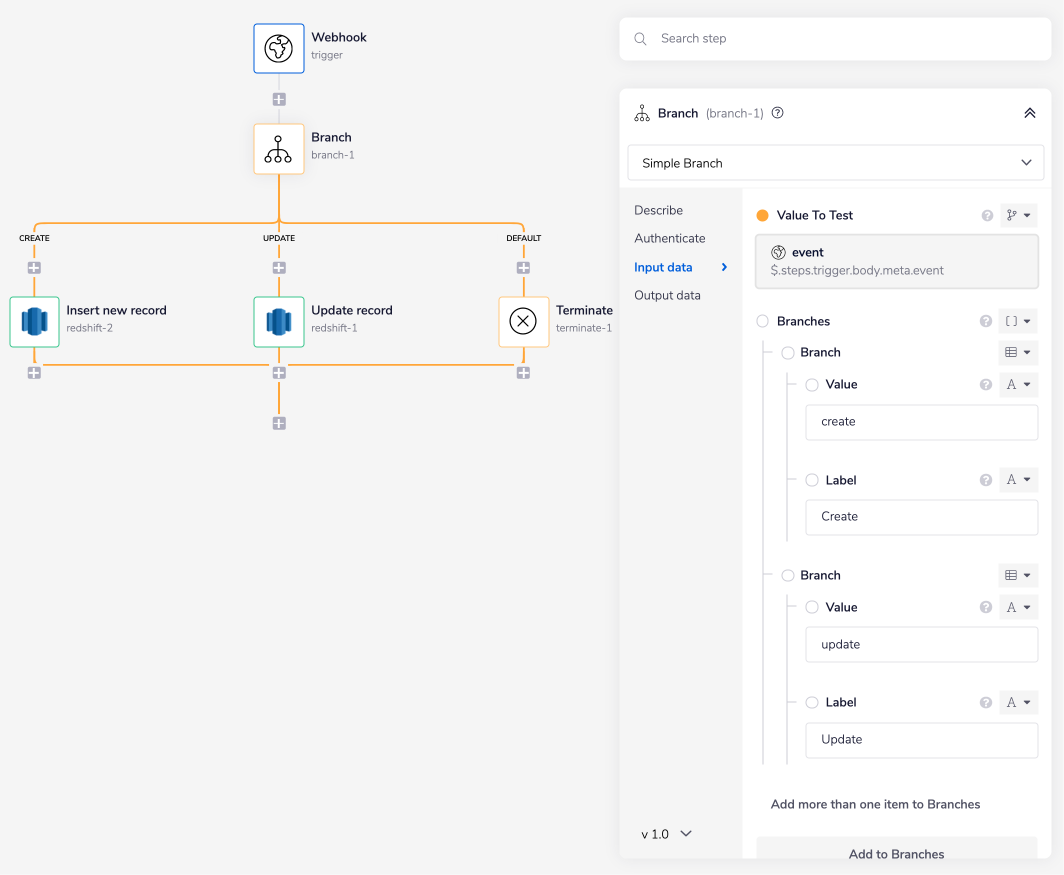 The Branch connector will navigate the workflow execution based on the value of the event attribute received in the JSON data from the trigger. The possible values you could receive are 'create' and 'update', thus the first two branches.
The third branch is an auto-generated 'Default' branch, which will terminate the workflow if the branch does not receive any of the two values mentioned above as an input.
For the workflow to terminate, add the Terminate connector under this fourth branch, i.e., the 'DEFAULT' branch.
The Branch connector will navigate the workflow execution based on the value of the event attribute received in the JSON data from the trigger. The possible values you could receive are 'create' and 'update', thus the first two branches.
The third branch is an auto-generated 'Default' branch, which will terminate the workflow if the branch does not receive any of the two values mentioned above as an input.
For the workflow to terminate, add the Terminate connector under this fourth branch, i.e., the 'DEFAULT' branch.
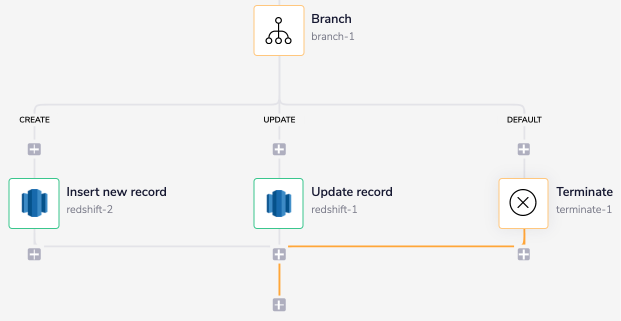
2 - Insert or update the record
Now, add the Redshift connector under each branch except the 'DEFAULT' branch.
As you can see in the image below, the first Redshift connector under the 'CREATE' branch will insert a new record into the Redshift database. The second Redshift connector under the 'UPDATE' branch will update the received record into the Redshift database.
 The two Redshift connectors for insert and update operation can be configured as follows:
Redshift connector to insert a record:
To insert the record, set the operation to 'Insert new rows'.
As you can see, the 'Table' and the 'Rows to insert' fields are mandatory.
Select the table name of your choice from the available drop-down options. As you can see, in this example, we have selected the table name as
The two Redshift connectors for insert and update operation can be configured as follows:
Redshift connector to insert a record:
To insert the record, set the operation to 'Insert new rows'.
As you can see, the 'Table' and the 'Rows to insert' fields are mandatory.
Select the table name of your choice from the available drop-down options. As you can see, in this example, we have selected the table name as customer_details.
Using a connector-snake find the jsonpath for the 'Row' field from the Trigger step. It should appear similar to this: $.steps.trigger.body.data.
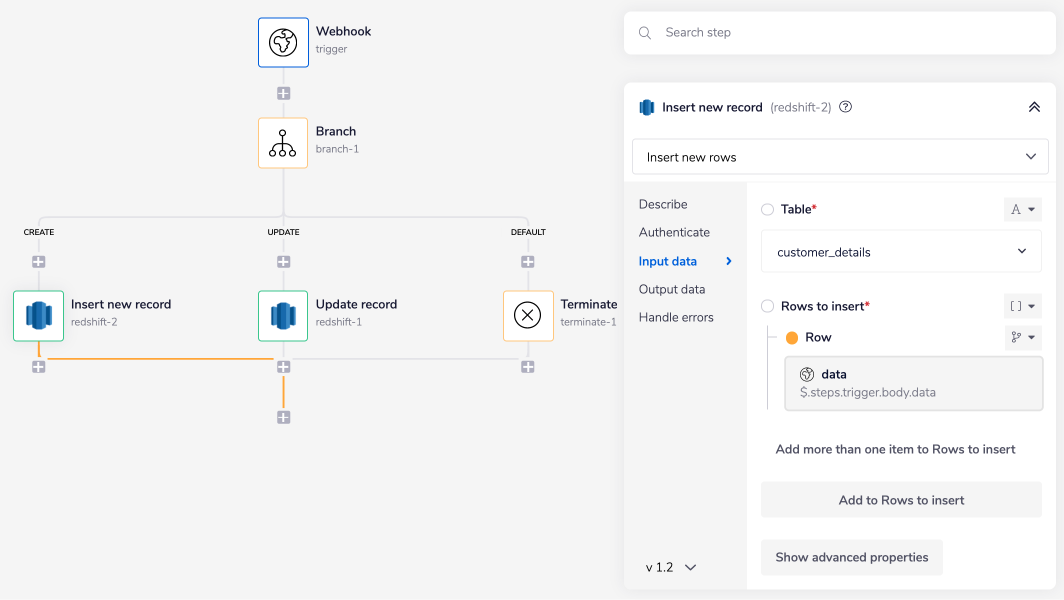 Now, based on the selected table and the jsonpath for the received data, the workflow will insert the received record into the selected Redshift table.
Redshift connector to update a record:
To update the record, set the operation to 'Update rows'.
Set the values for the 'Table' and the 'Rows to insert' fields similarly as we did above.
Before updating the record, the Update rows operation matches the existing 'id' from the selected Redshift table with the ID of the data received from the trigger:
Now, based on the selected table and the jsonpath for the received data, the workflow will insert the received record into the selected Redshift table.
Redshift connector to update a record:
To update the record, set the operation to 'Update rows'.
Set the values for the 'Table' and the 'Rows to insert' fields similarly as we did above.
Before updating the record, the Update rows operation matches the existing 'id' from the selected Redshift table with the ID of the data received from the trigger: $.steps.trigger.body.data.id.
Thus, as you can see in the image below, the condition is set to specify the id of the existing record that needs to be updated.
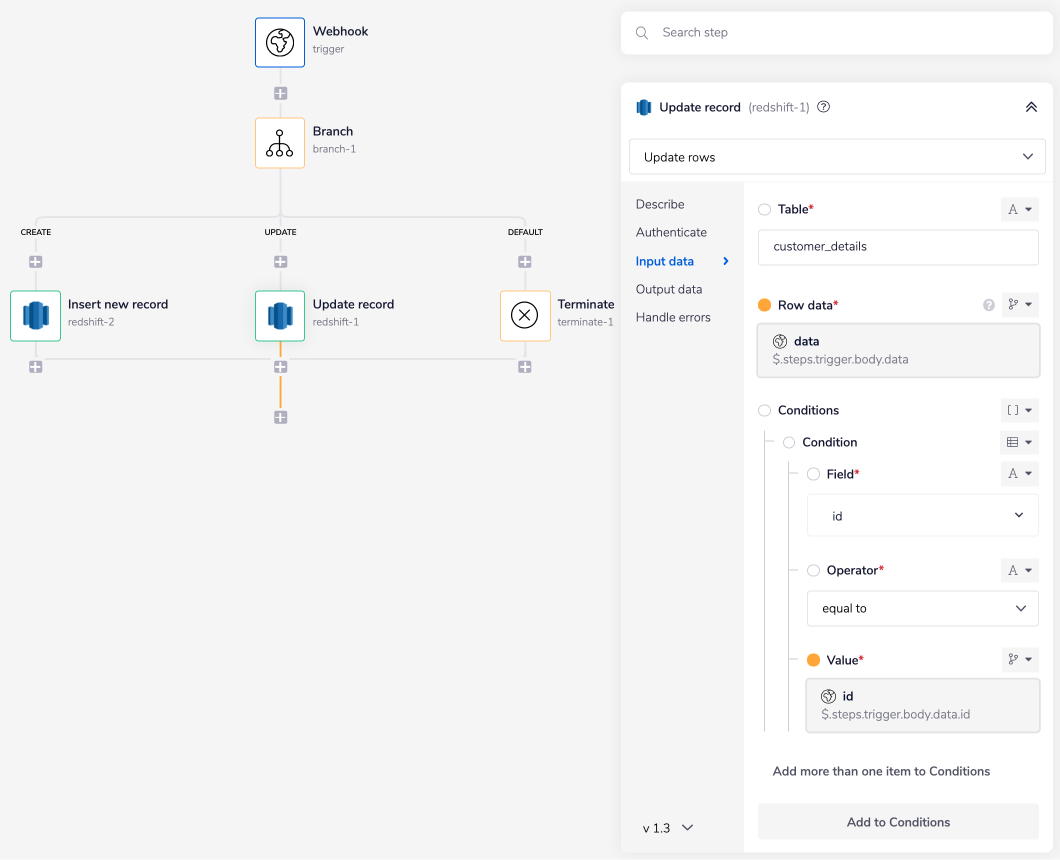 Now, based on the specified table, jsonpath, and the condition, the workflow will locate and update the record if it already exists.
Managing Data
Processing dynamic data
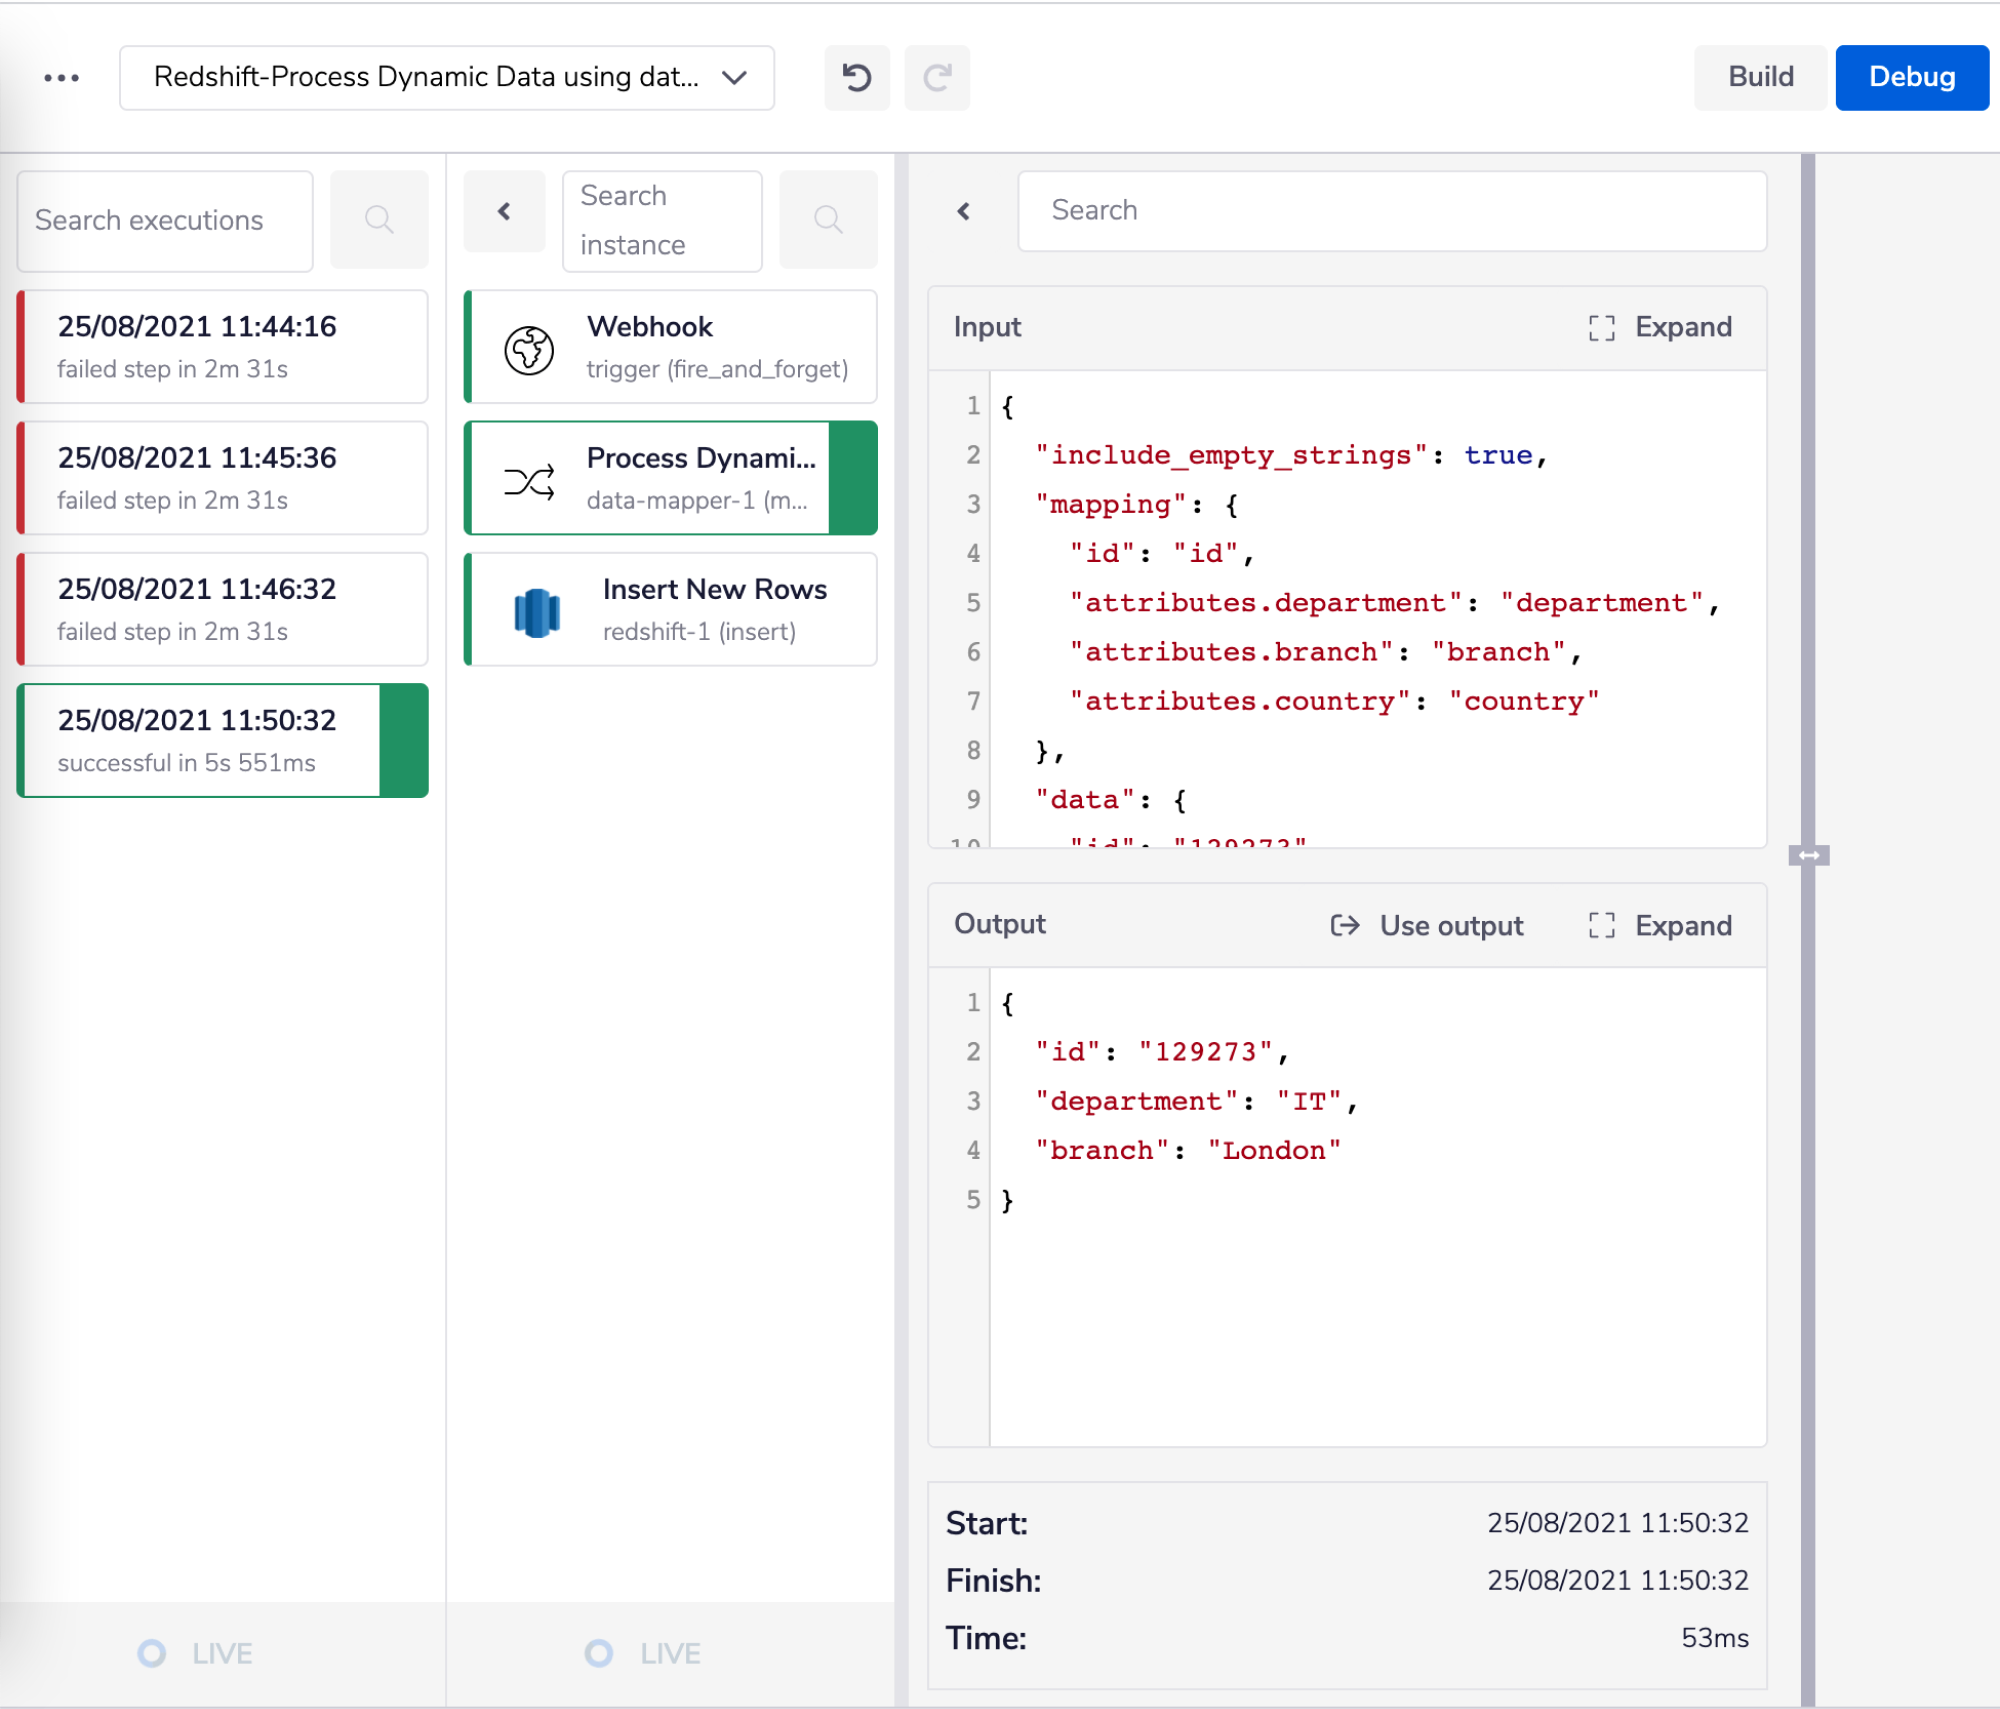
Sometimes, depending on the data source, your workflow may receive dynamic data payloads - i.e., the attributes within may vary for each execution of your workflow. Let's assume an example where you wish to insert some data into a Redshift database. The data that you have received for the first execution of your workflow is in this format:
\\{
	"data": {
		"id": "129273",
		"attributes": \\{
			"department": "IT",
		\\\}
	"meta": \\{
		"deliveredAt": "2021-01-29T07:52:28.094+00:00"
	\\}
}
For the second execution, your workflow may receive the data with more attributes like this:
\\{
	"data": {
		"id": "129273",
		"attributes": \\{
			"department": "IT",
			"branch": "London",
			"country": "uk",
		\\\}
	"meta": \\{
		"deliveredAt": "2021-01-29T07:52:28.094+00:00"
	\\}
}
PLEASE NOTE: It is essential that the attributes received in the JSON data correspond to the column names in your Redshift database table.
So in such a situation, where it is difficult to gauge the attributes you may receive in your data for each execution. We cannot map each attribute with their respective column names in order to upload the data in the Redshift table, i.e., something like this, as shown in the image below, is not possible:
 To understand the mapping of each attribute with the column name, please refer to the Insert records workflow explained above.
So as a solution, you have to upload the data in bulk, i.e., in one go. This is possible only if the received JSON data has a flat structure.
The best way to transform a nested JSON structure into a flat structure is by using a Data Mapper connector.
So the following workflow demonstrates how you could deal with dynamic data using a Data Mapper connector that flattens the nested JSON and uploads this data into your Redshift database table.
To understand the mapping of each attribute with the column name, please refer to the Insert records workflow explained above.
So as a solution, you have to upload the data in bulk, i.e., in one go. This is possible only if the received JSON data has a flat structure.
The best way to transform a nested JSON structure into a flat structure is by using a Data Mapper connector.
So the following workflow demonstrates how you could deal with dynamic data using a Data Mapper connector that flattens the nested JSON and uploads this data into your Redshift database table.
PLEASE NOTE: The Data Mapper connector, as explained in this workflow, can be used only with the dynamic data for which you know the possible list of attributes.
In this example, we show data being received via the Webhook trigger - i.e., a scenario whereby you have configured an external service to automatically send new record data to your Tray.io workflow.
In practice, you can receive data in any structure, and in other ways, such as from any pre-built Tray.io service trigger or from a previous workflow step which has pulled data from another source (e.g., Salesforce 'Find Records', CSV Reader, etc.)
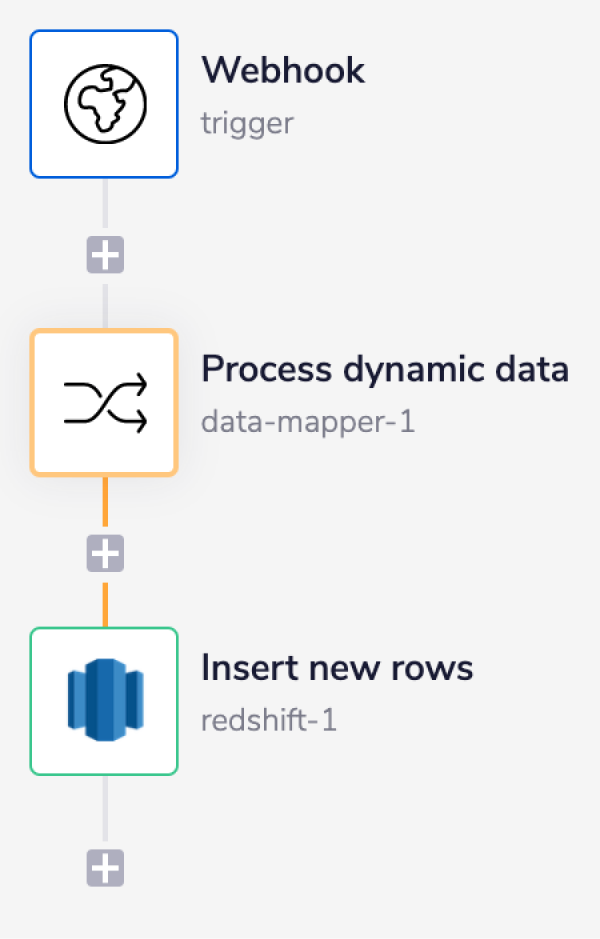
- The Webhook trigger with operation as 'Auto respond with HTTP 200' listens for the incoming data.
- The Process dynamic data step is a Data Mapper connector step which flattens the received JSON data in order to handle the incoming dynamic data.
The 'Mapping' field transforms the nested structure i.e
attributes.[column_name]to a flat structure, i.e. just the[column_name]. The 'Mapping' field contains a list of all the possible attributes that you wish to get a flat structure for.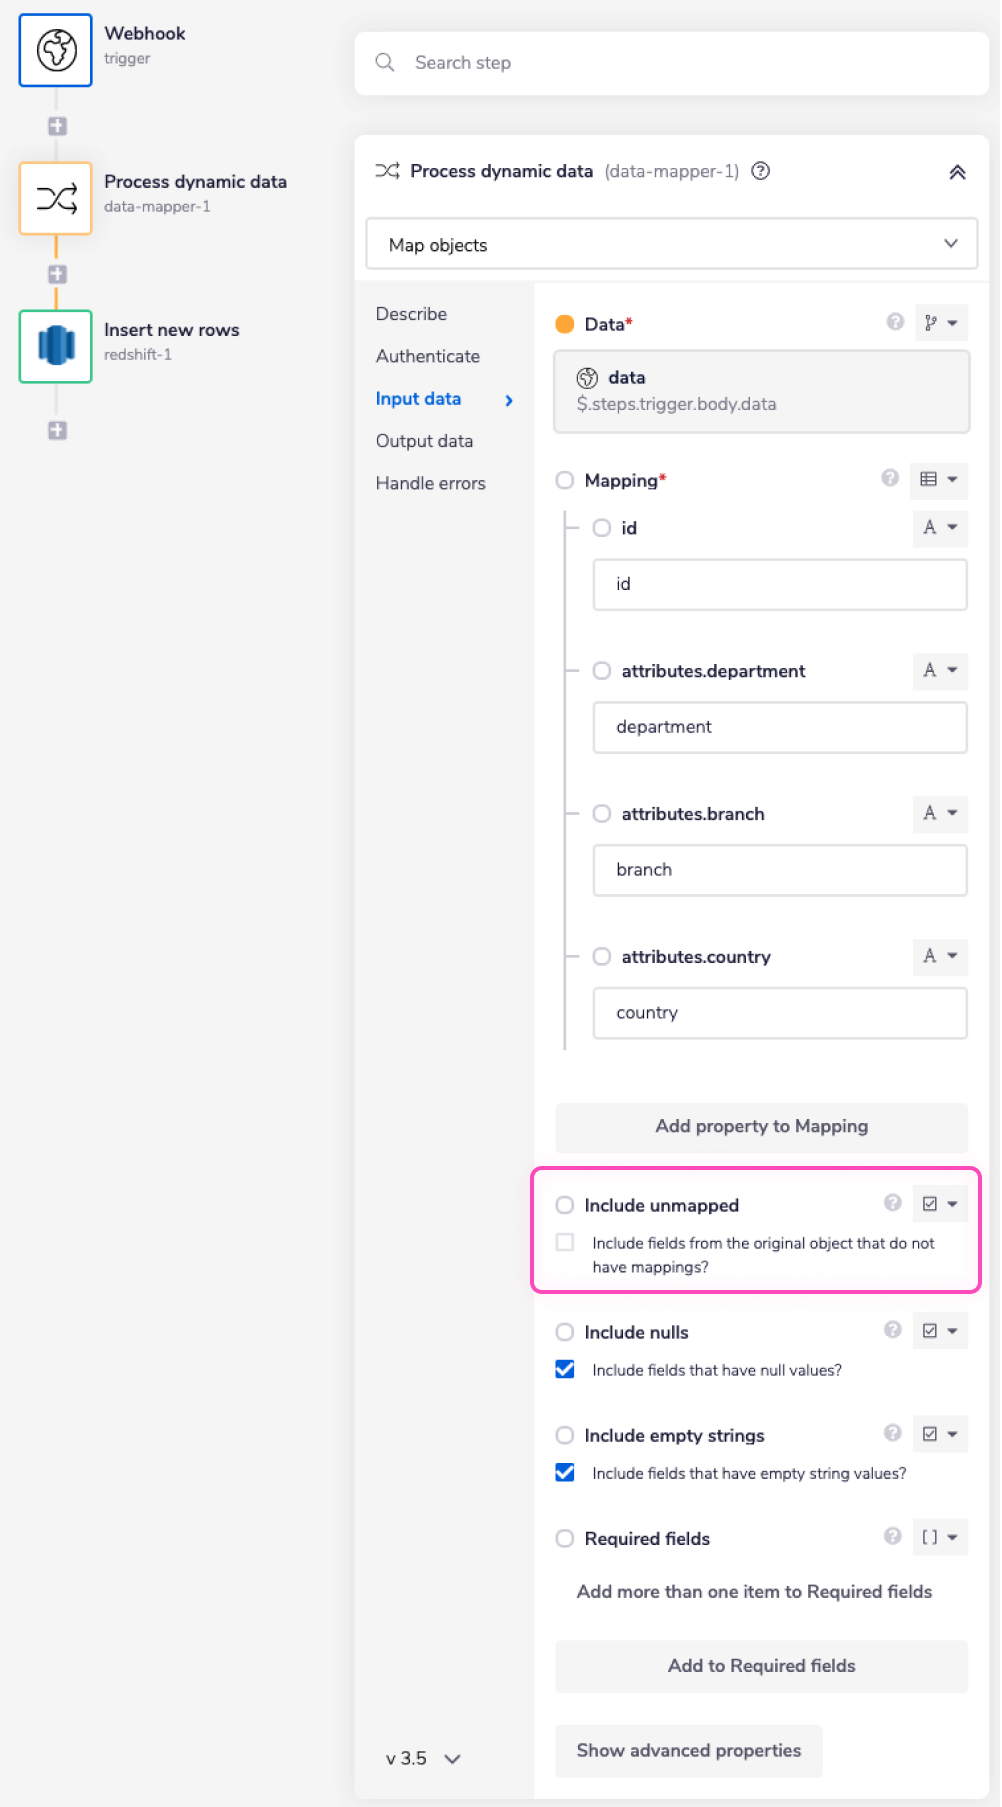 Make sure to uncheck the 'Included unmapped' field. If you do not uncheck this field, it will include the fileds from the received JSON data that you haven't listed in the Mappings field, i.e., something like this:
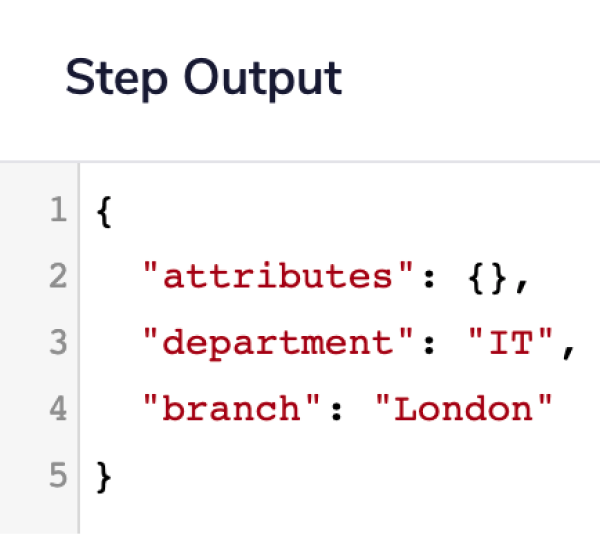 If the 'Included unmapped' field is unchecked the expected flat JSON output should look like this:
- The Insert new rows step inserts new rows based on the flatten JSON data received from the previous step
$.steps.data-mapper-1in the selected Redshift table (explained in detail below).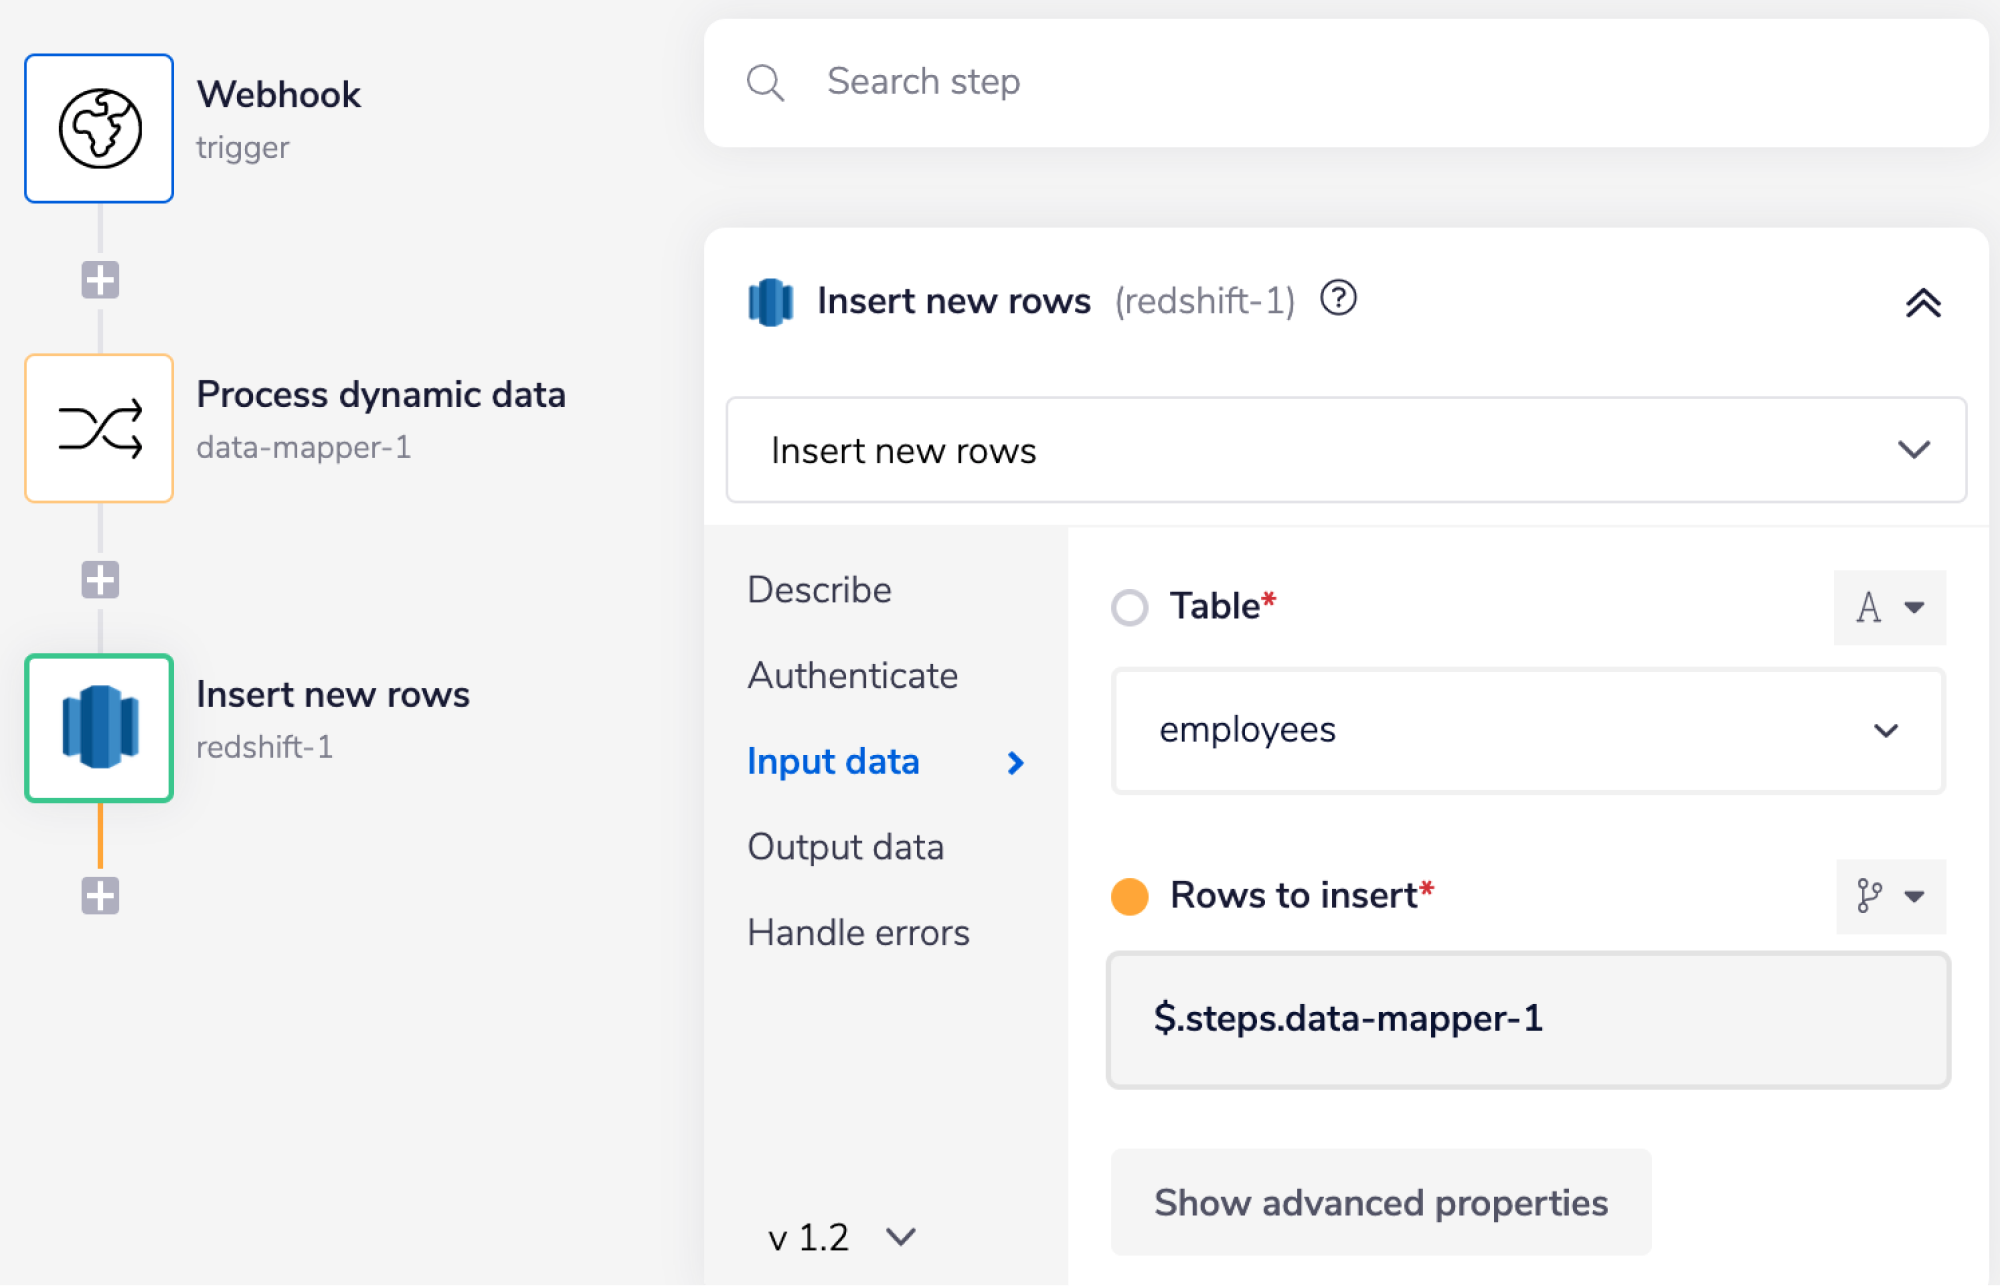
Advanced topics
Redshift bulk insert
The below example demonstrates how you could potentially insert a huge amount of records in one go into a Redshift table. We are using AWS S3 as an intermediate data storage solution before we insert the received records into Redshift. We are using S3 as intermediate storage because S3 has a large storage capacity, which helps when dealing with huge amounts of data. It is easy to transfer all the records from S3 to Redshift in one go - minimizing the number of calls made to Redshift. We can also use the Redshift COPY command, which has significant speed advantages when dealing with large amounts of data. In this example the idea is that the workflow is triggered every day at a scheduled time. Once triggered, it lists the records from the service in use. For simplicity and better understanding, we have used an Object Helpers connector that is parsing a JSON that contains a set of records. In reality this could be any service, such as Gong.io, with an operation set to 'List users' or Salesforce with the 'Find records' operation. The JSON is as follows:
[
 \\{
  "data": \\{
   "id": "6012fe453f38ecab86530e97",
   "first_name": "Brooks",
   "last_name": "Hendrix",
  \\\},
  "meta": \\{
   "event": "create",
 \\{
  "data": \\{
   "id": "6012fe454256655c4da94179",
   "first_name": "Crane",
   "last_name": "Lindsey",
  \\\},
  "meta": \\{
   "event": "create",
 \\{
  "data": \\{
   "id": "6012fe45c0d81c6f14a78c4d",
   "first_name": "Blake",
   "last_name": "Mosley",
  \\\},
  "meta": \\{
   "event": "update",
 \\{
  "data": \\{
   "id": "6012fe45fd903b3e38f8f5ef",
   "first_name": "Francis",
   "last_name": "Mcdowell",
  \\\},
  "meta": \\{
   "event": "update",
 \\{
  "data": \\{
   "id": "6012fe4509b4461450de082c",
   "first_name": "Sue",
   "last_name": "Wilkerson",
  \\\},
  "meta": \\{
   "event": "update",
 \\{
  "data": \\{
   "id": "6012fe45150b03d02a887d2b",
   "first_name": "Berry",
   "last_name": "Riggs",
  \\\},
  "meta": \\{
   "event": "update",
 \\{
  "data": \\{
   "id": "6012fe45c86ec53152c0adcd",
   "first_name": "Ray",
   "last_name": "Nichols",
  \\\},
  "meta": \\{
   "event": "update",
 \\{
  "data": \\{
   "id": "6012fe45dbfaabd167439bde",
   "first_name": "Reeves",
   "last_name": "Carrillo",
  \\\},
  "meta": \\{
   "event": "update",
   "type": "account"
  \}
 }
]
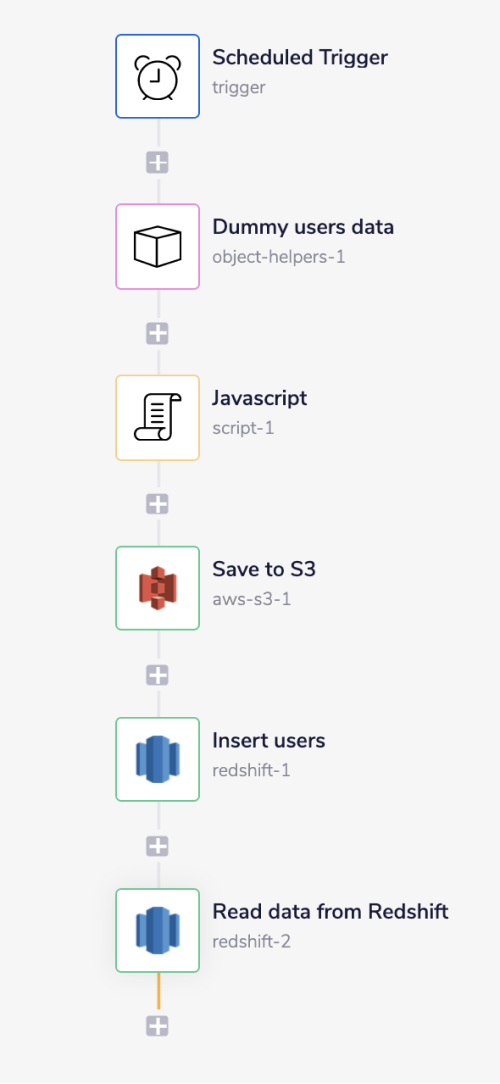
- Setup a Scheduled Trigger with custom configurations tailored as per your requirement. For example, we have configured the trigger to be fired at noon 'Every Day'.
- The Dummy users data step is an Object Helpers step with operation as 'JSON parse'. This step will parse the JSON data mentioned above.
- The Script step converts the object received from the previous step into a JSON string (explained in detail below).
- The Save to S3 step is an AWS S3 connector step that saves the JSON string received from the previous step into a specified bucket_name/file_name (explained in detail below).
- The Insert users step saves the records received from the Save to S3 step into the Redshift table.
- The Read data from Redshift step uses the 'Run SQL query' operation with
Select * from prospectquery. This query will return all the records from the specified table, i.e., prospect. This step will verify if all the received records are added to the specified Redshift table or not. It is required as the 'copy' command used in the previous step does not return the success information or total count of rows added to the Redshift table.
Script step: explanation
The Script connector using the 'Execute Script' operation converts the received object from the previous step into a JSON string.
It is necessary to stringify the JSON to store it in a file within an S3 bucket.
As you can see in the image below, the operation accepts the jsonpath for the data from the Object Helpers, i.e., the Dummy users data step as an input value: $.steps.object-helpers-1.result.
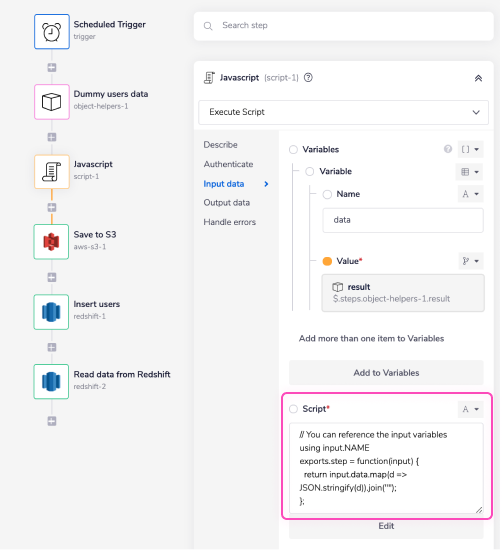 The Script connector using the following script converts the received JSON data into a JSON string:
// You can reference the input variables using input.NAME
exports.step = function(input) \{
 return input.data.map(d => JSON.stringify(d)).join("");
\};
Save to S3: explanation
In this step, we are storing the JSON string received from the Script step into a specified file within an S3 bucket.
To do so, we are using the S3 connector's 'Put Object (Text)' operation.
The 'Bucket name' field accepts the name of the S3 bucket which you wish to use for this operation.
The 'Object Key' is a complete path of the file you wish to store the received JSON string into. In this case it is: tray-prospects/prospects. tray-prospects/ is a bucket name and prospects is a file name.
'Content' is nothing but the JSON string that you wish to store in the S3 bucket. In this case it is a jsonpath of the result from the Script step: $.steps.script-1.result.
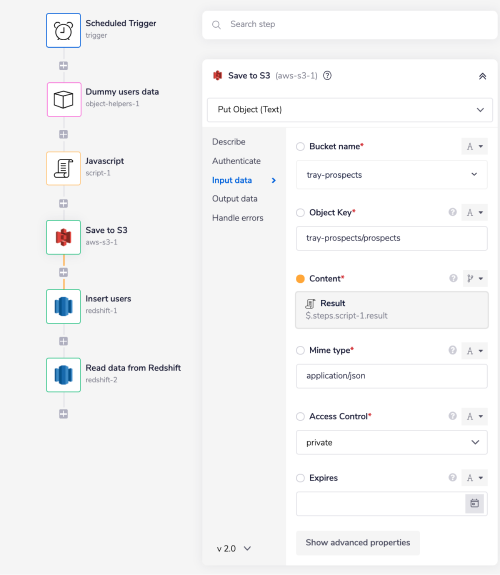 As a result this step will store the JSON string received from the previous step into S3 at this location:
 tray-prospects/prospects.
Insert users: explanation
The Redshift connector using the 'Run SQL query' operation will store the data received from the S3 connector into the specified redshift table. The query used to do so is as follows:
begin;
copy prospect from 's3://tray-prospects/prospects' format as json 's3://tray-prospects/prospectJsonPath.json' iam_role 'arn:aws:iam::312938373754:role/s3-redshift-readonly';
end;
The SQL query uses the 'copy' command to copy the entire data from the within the S3 bucket to the Redshift table. To understand the copy command in detail, refer to the Using the COPY command to load from Amazon S3 document.
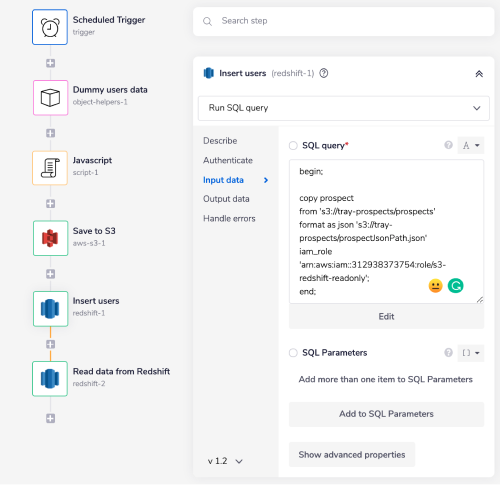 There are several parts to the above query, let's understand them line by line:
- copy prospect: The first line within the query mentioned above specifies the destination you wish to copy the records to, i.e., the Redshift table name.
It involves the copy operation and the valid [Redshift table name], i.e.,
prospectin this case. - from '
**s3://tray-prospects/prospects**': The second line specifies the data source, i.e., the complete path of the file within the S3 bucket. It involves the from operation and the the complete path of the file within the S3 bucket:**s3://[S3_bucket_name]/[file_name]**. - format as json '
**s3://tray-prospects/prospectJsonPath.json**': Here, you need to provide the structure of the JSON object in use. The 'format as json' operation helps you specify the file name containing the JSON structure. In this case, we have created a file in the 'tray-prospects' S3 bucket with the name 'prospectJsonPath.json'. This file contains the below-mentioned JSON structure. This structure is based on the sample JSON mentioned above.
 \{
   "jsonpaths": [
   "$.data.id",
   "$.data.first_name",
   "$.data.last_name",
   "$.data.phone"
   ]
 \}
To know more about JSON format refer to the COPY from JSON format document.
- iam_role '
**arn:aws:iam::312938373754:role/s3-redshift-readonly**': In this copy operation the AWS S3 service is accessing Amazon Redshift features on your behalf. For this, you need to create an IAM role with special permissions to allow the S3 to access Redshift. Follow the instructions mentioned in the Authorizing Amazon Redshift to access other AWS services on your behalf document to create the IAM role. Once done, you can mention the newly created IAM role beside the iam_role operation as done in the query above.