Notes on using Salesforce
Accessing Fields Not Listed in Dropdown
Due to the number of Salesforce API endpoints all potential fields will not necessarily be drop down options. Even if your desired dropdown option is not listed in most cases you can still use Salesforce formula directly within the field value itself to retrieve your desired endpoint.
Handling Leads in Salesforce
You can find a list of records from Salesforce, using the "Find Records" operation.
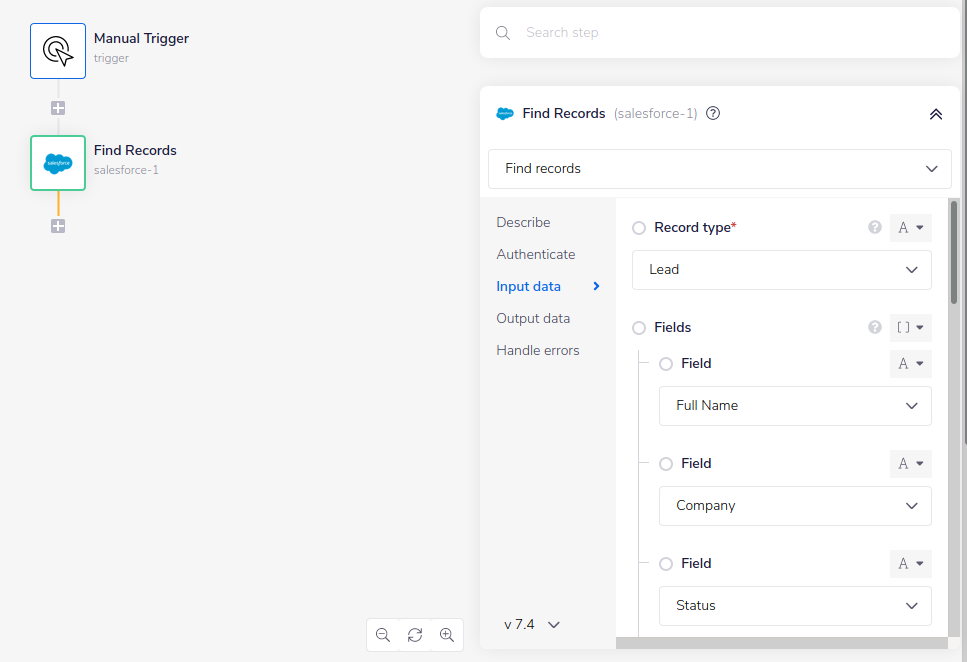 Once a lead is converted, you cannot update them in any way, and they are no longer available in the Salesforce interface.
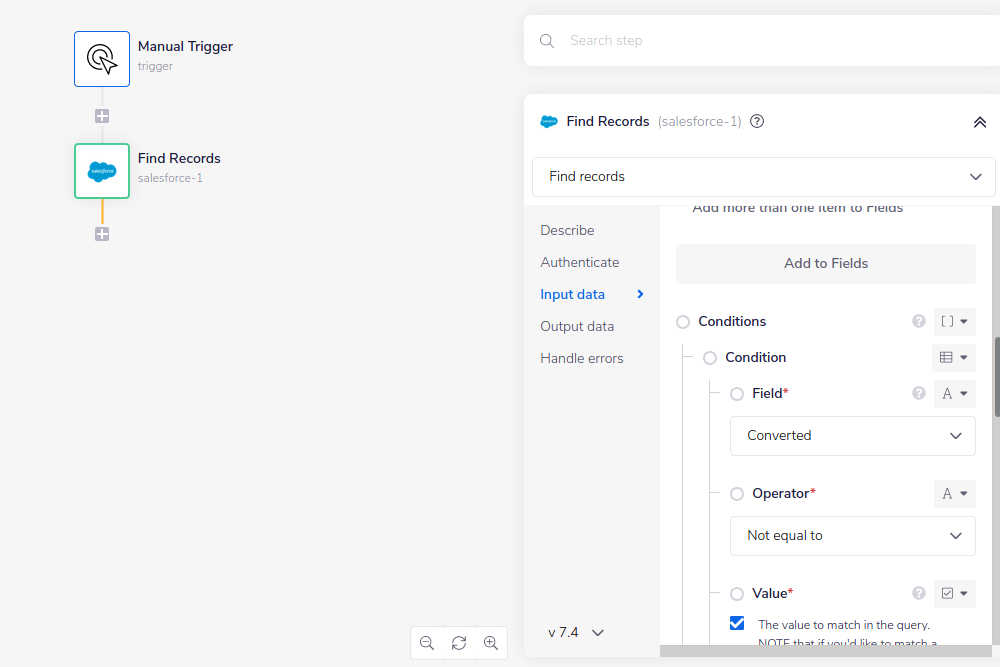
Behind the scenes in the API, Salesforce uses a "Converted" field which is either true or false. You can use this in the Salesforce connector to get a list of leads who haven't been converted yet, for example.
Once a lead is converted, you cannot update them in any way, and they are no longer available in the Salesforce interface.
Behind the scenes in the API, Salesforce uses a "Converted" field which is either true or false. You can use this in the Salesforce connector to get a list of leads who haven't been converted yet, for example.
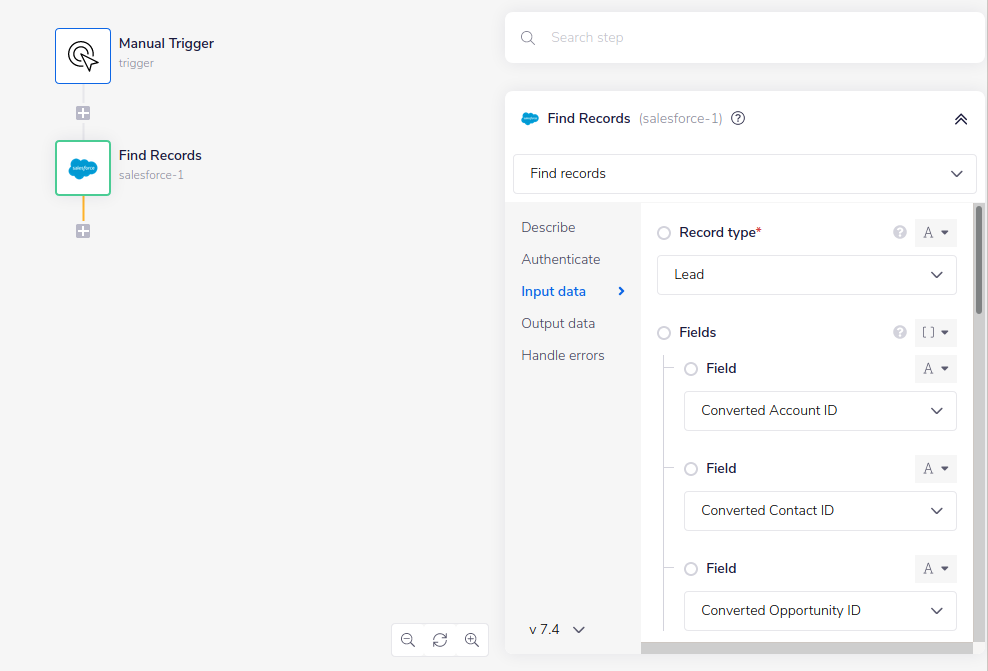
 Going a step further, leads can be converted into Contacts, Opportunities, and Accounts. In tray it's possible to get the "ID" of the relevant new converted objects using the "Converted Account ID", "Converted Opportunity ID" and "Converted Contact ID" fields.
Data processing
When using Salesforce in production workflows, you will likely be dealing with large amounts of data - processing hundreds or thousands of rows. In this case, you will likely need to make use of callable workflows to send data for sub-processing. Learn more about this in our course on callable workflows from the Tray Academy. You also may need to use our CSV Editor as an intermediate storage medium, before making use of the batch/bulk operations. When dealing with large amounts of data in Salesforce it is important to be aware of:
- What are the API limits according to your account, in terms of how many API calls can be made per day. Please the Salesforce API limits page for guidance on this
- How can you use Tray to manage the amount of API calls that are being made? In order to address the second point, you will see that certain operations for pulling data from Salesforce offer pagination options which allow you to grab batches of data in one and then loop through them with Tray, instead of making repeated single calls. The section below on Pulling data and pagination takes you through this in detail. When pushing data to Salesforce you may need to make use of the batch create / update and bulk upsert operations. These allow you to reduce hundreds of record updates to a single call, and so are extremely important in terms of managing your API limits. Please the section on Pushing data and batch / bulk operations for detailed explanations of this.
Batch Operations input structure
The input structure for batch operations varies depending on which operation is being used:
Create &/ Update Flow Names
These operations will automatically set up your Salesforce Flows for you.
- **On Record Create **
- On Record Update
- On Record Create or Update Be aware that your Flow name will be autogenerated. Your Flow will be available to view in the All Flows page. The name of your Flow will be based on the **Object prefix **(which is automatically set to "Tray"), the name of the operation itself, and will include a random hash following it. Note that the Object prefix can be changed under the Show Advanced Properties button in the trigger's property panel.
SOQL Query & SOSL Query operations
The Salesforce Object Query Language (SOQL) and Salesforce Object Search Language (SOSL) APIs can be used to search your organisation’s Salesforce data. Generally speaking when using these query operations, you should use SOQL to query one operation at a time, and SOSL when you want to search text, email, phone fields, etc (basically when searching multiple objects simultaneously). This is why the latter is better to use when querying a relationship between objects and such. Here are some points you need to consider when choosing between the two query operations: Use SOQL when you know which objects the data resides in, and you want to:
- Retrieve data from a single object or from multiple objects that are related to one another.
- Count the number of records that meet specified criteria.
- Sort results as part of the query.
- Retrieve data from number, date, or checkbox fields. Use SOSL when you don’t know which object or field the data resides in, and you want to:
- Retrieve data for a specific term that you know exists within a field. Because SOSL can tokenize multiple terms within a field and build a search index from this, SOSL searches are faster and can return more relevant results.
- Retrieve multiple objects and fields efficiently where the objects might or might not be related to one another.
- Retrieve data for a particular division in an organization using the divisions feature.
- Retrieve data that’s in Chinese, Japanese, Korean, or Thai. Morphological tokenization for CJKT terms helps ensure accurate results.
The language used is crucial for your search patterns. In principal, it is extremely similar to SQL in text style.
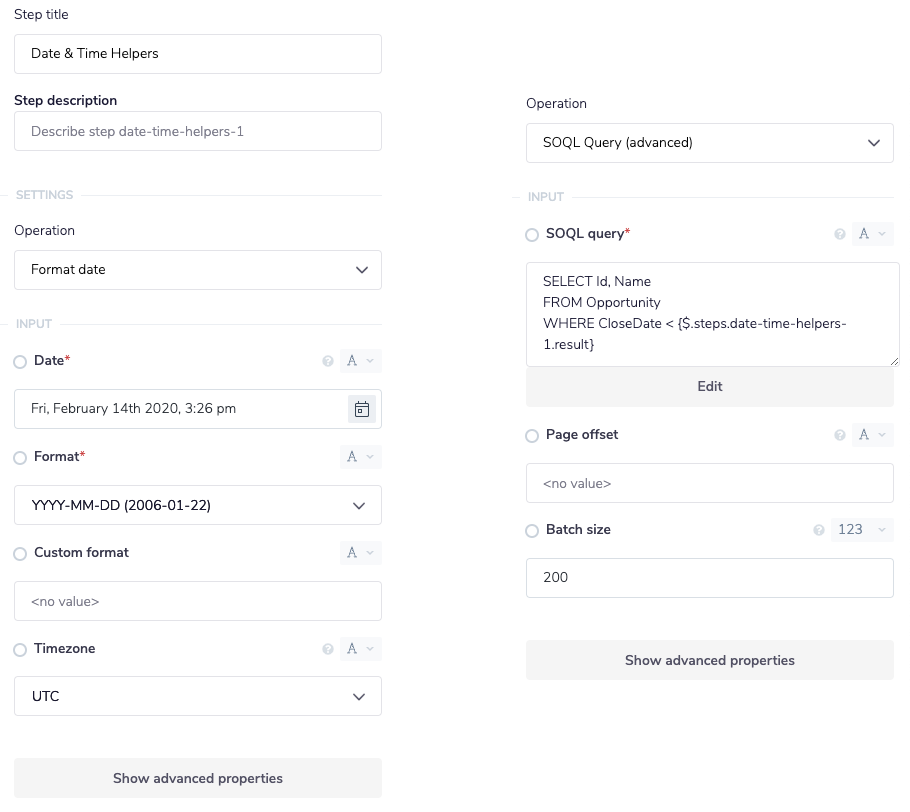
With the above taken into consideration, below is an example of a SOQL query, which also involves using the Date & Time helper connector (notice how the 'Format' has been deliberately set up to suit Salesforce protocols):
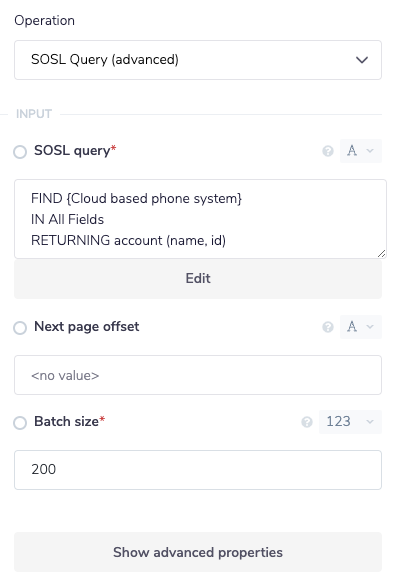
 This image demonstrates the way one may use the SOSL query operation to run through 'All Fields' available, in order to return any and all account names and IDs found (unlike the above query example, this is tailored towards multiple )
 For further information regarding the Salesforce Object Query Language (SOQL) and Salesforce Object Search Language please see their API Documentation site for more details.
Managing API limits
Pulling data and pagination
When using certain operations such as the 'Find Records' operation, you will find there are 'pagination' options which allow you to pull results from Salesforce in batches.
This means you can limit the number of API calls you make - e.g. you can retrieve 3 batches of 2000 records which match your criteria, instead of making 6000 individual calls for each record.
The following workflow shows a basic pagination system where we are pulling batches of leads from Salesforce with a rating of 'warm' in order to loop through them and send them to another third-party service:
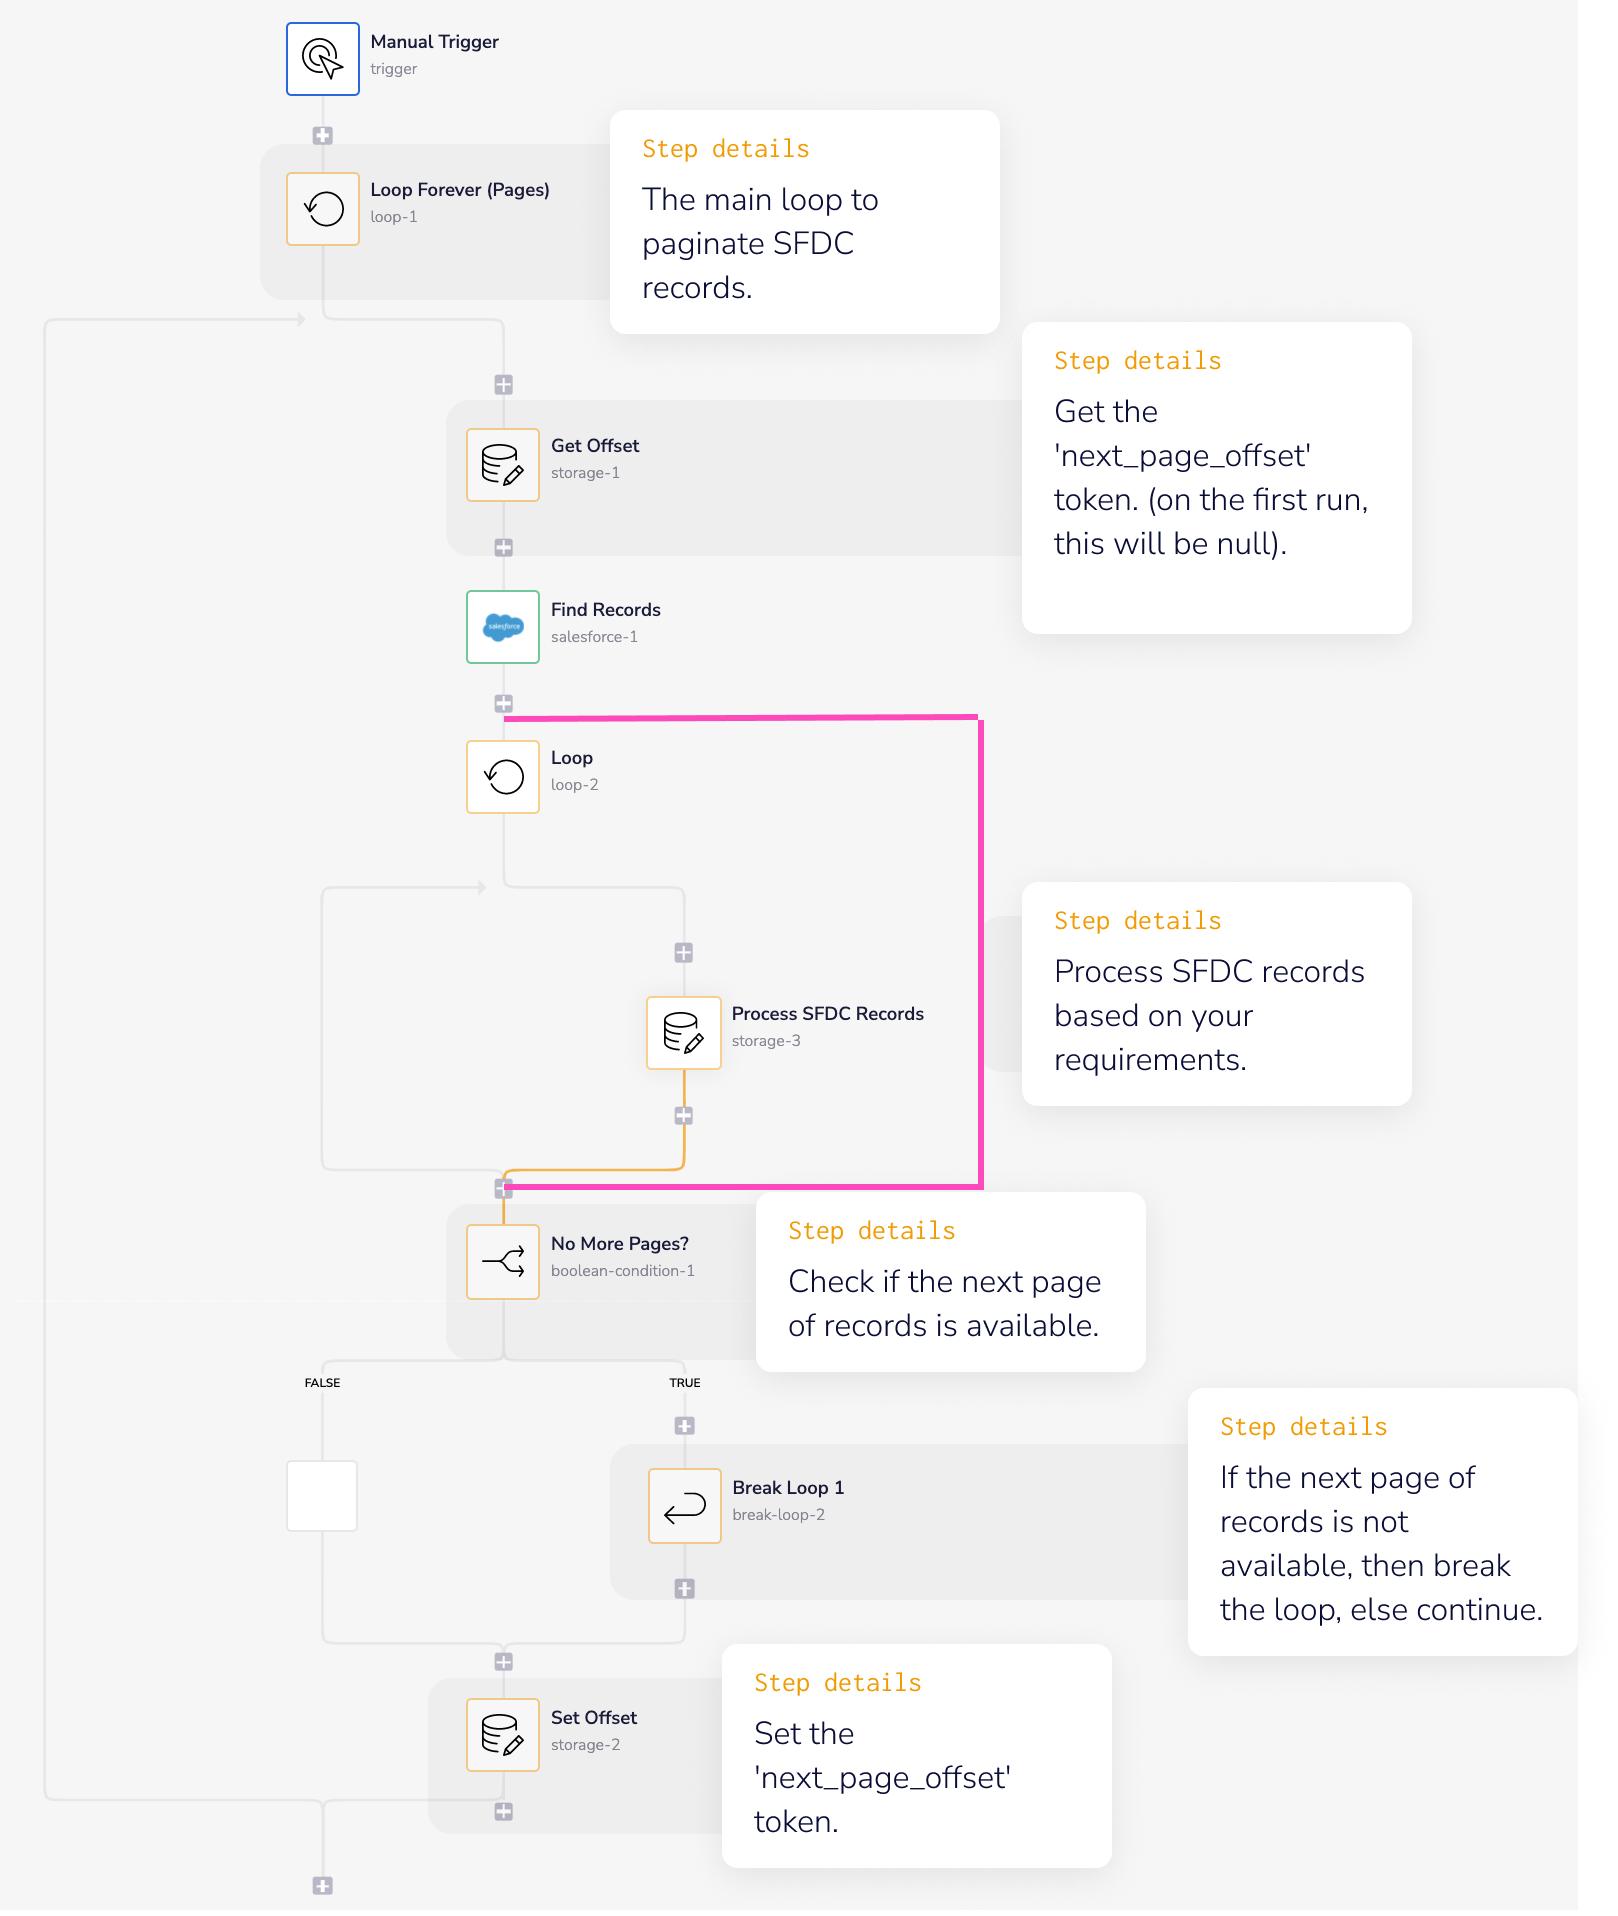 For a full explanation and pre-built pagination workflow please see our 'Paginate through Salesforce Records' template:
You can adjust this template to your exact needs any time you need to paginate through batches of pulled SFDC records.
For a full explanation and pre-built pagination workflow please see our 'Paginate through Salesforce Records' template:
You can adjust this template to your exact needs any time you need to paginate through batches of pulled SFDC records.
Pushing data and batch / bulk operations
As mentioned above, when you are pushing large batches of data to Salesforce, you will need to control the rate at which you do so in order not to exceed your API limits.
- 'Bulk upsert' is effectively two operations in one - if a record of a particular type (e.g. 'lead') is found then it will be updated, if it is not found then a new one of that type (e.g. 'lead') will be created
- 'Batch Update' / 'Batch Create' can be used together when, in the case of a record of a particular type (e.g. 'account') not being found, you wish to create a record of a different type (e.g. 'lead')
Bulk upsert
The Salesforce bulk upsert operation only accepts data as a CSV file. The following workflow screenshot shows how you can do this. It demonstrates what you need to do in order to process a json array of data so that it is in CSV file and meets the Salesforce input schema requirements:
- It uses the data mapper to make sure that all keys are in the correct format (e.g. maps
first_nametoFirstName - It uses a script step to convert the json array to CSV
- It uses the File Helpers 'create file from content' operation to create a csv file
- It uses the output from the File Helpers step as the input for the CSV file field in the Salesforce Bulk upsert step
 So this process could convert a json array such as:
[
  \{
    "first_name": "Sonny",
    "last_name": "Castella",
    "email": "scastella0@pbs.org"
  \},
  \{
    "first_name": "Krystyna",
    "last_name": "Hannaby",
    "email": "khannaby1@homestead.com"
  \},
  \{
    "first_name": "Mel",
    "last_name": "Plumb",
    "email": "mplumb2@si.edu"
  \}
]
To a CSV file such as:
FirstName,LastName,Email\nSonny,Castella,scastella0@pbs.org\nKrystyna,Hannaby,khannaby1@homestead.com\nMel,Plumb,mplumb2@si.edu
And send it to the Salesforce Bulk API for processing.
Polling a bulk upsert
When a bulk operation is used, Salesforce does not process the data immediately, instead it starts a bulk data load job. The time in which it takes for this job to finish depends on resources available in your Salesforce instance.
When you use a bulk data operation it receives a Job ID (or just ID as shown in the connector step output).
This job ID can then be used to poll for the status of the job. Only when the job shows a status of JobComplete has the data been successfully processed in Salesforce.
The following workflow shows a Bulk Upsert job has been started - pulling a CSV file from a trigger:
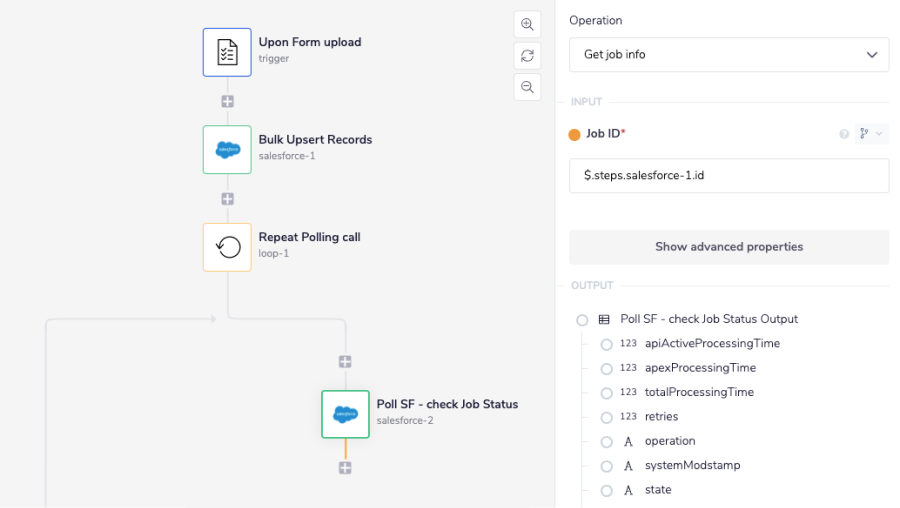 The Repeat polling call step uses the 'Loop Forever' operation.
The Poll SF - check job status step uses the 'Get job info' operation. It pulls in the 'Job ID' using the
The Repeat polling call step uses the 'Loop Forever' operation.
The Poll SF - check job status step uses the 'Get job info' operation. It pulls in the 'Job ID' using the $.steps.salesforce-1.id jsonpath
On each iteration of the Loop, we check if the job has succeeded by looking at the state field. If the job has completed it will show a status of JobComplete:
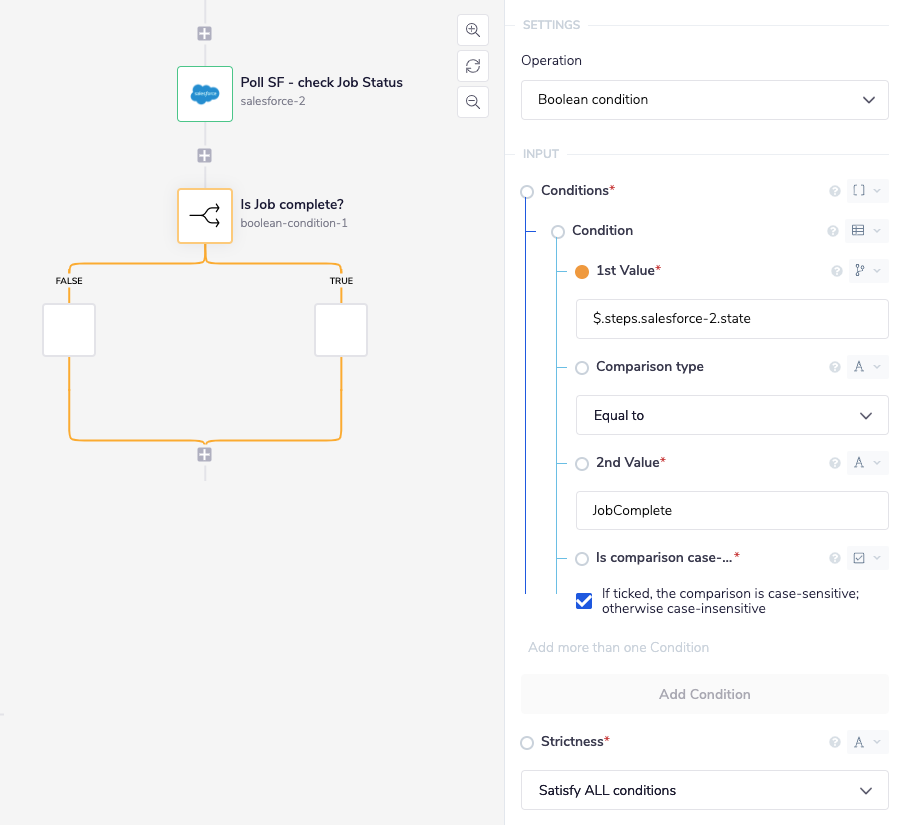 Is job complete? is a boolean step which checks if
 $.steps.salesforce-2.state is equal to JobComplete.
 The TRUE branch of the boolean contains the Break loop step (referring to the correct loop! 'loop-1' in this case).
The FALSE branch of the boolean has the Delay and repeat loop step:
The TRUE branch of the boolean contains the Break loop step (referring to the correct loop! 'loop-1' in this case).
The FALSE branch of the boolean has the Delay and repeat loop step:
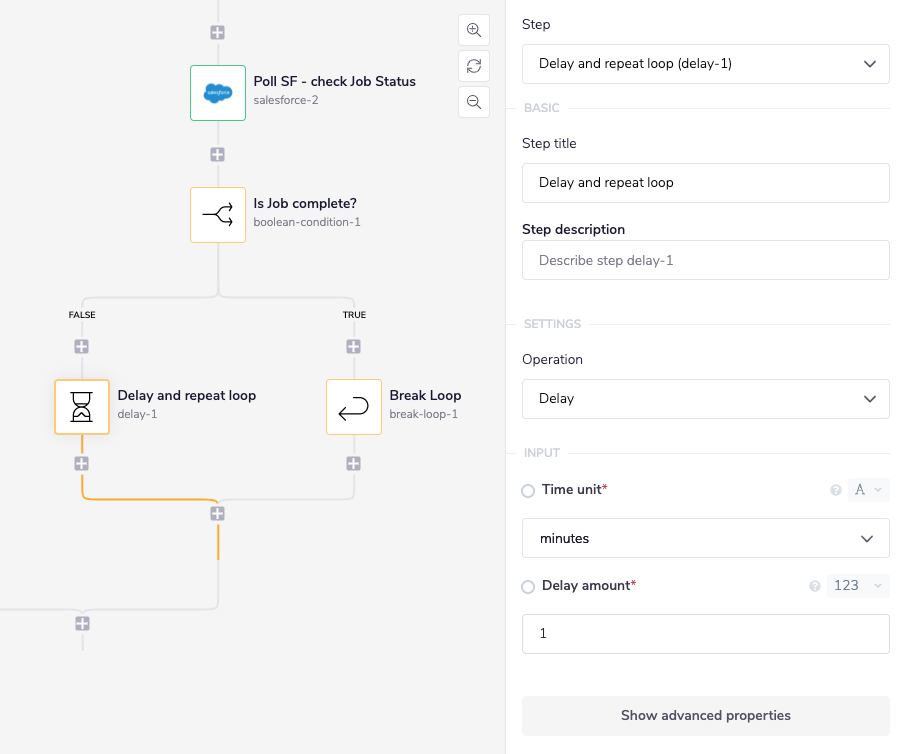 You can set the delay to be e.g. 1 minute before the next check.
A key point here is that each check is an API call, so if you are running a large update job you don't want to be checking every 10 seconds!
Get Job Information
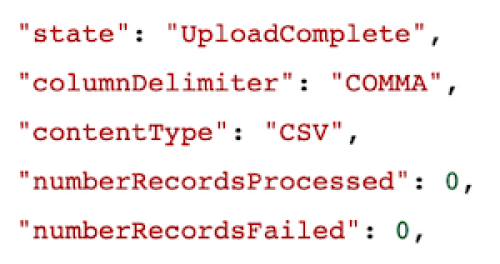
Add a final Salesforce connector step to your workflow. This is used to gather the job information (how many file uploads, which failed, time taken etc). Set the operation to 'Get job info' and the 'Job ID' to:
You can set the delay to be e.g. 1 minute before the next check.
A key point here is that each check is an API call, so if you are running a large update job you don't want to be checking every 10 seconds!
Get Job Information
Add a final Salesforce connector step to your workflow. This is used to gather the job information (how many file uploads, which failed, time taken etc). Set the operation to 'Get job info' and the 'Job ID' to: $.steps.salesforce-1.id.
In your Debug panel you should see results similar to below:
Batch update / batch create
As mentioned above, there may be a bulk upload scenario where, if a record is not found then you want to create a record of a different type (which is not possible with 'Bulk upsert'). This section will be a very simple demo of using a combination of the 'Batch update records' and 'Batch create records' operations to achieve this.
IMPORTANT! The Salesforce API will only receive batch update / create lists in an exact format, as explained in the above note on batch operations input structure. The below example shows a way of formatting your input using the Object Helpers 'JSON parse' operation.
IMPORTANT! When processing batches of data using Data Storage lists, you need to be conscious of the fact that the storage limit under one key is 400K. One way to handle this is for batches to be sent for parallel processing to a callable workflow which uses 'current run' data storage that is cleared after each run (as discussed in our guide to workflow threads ). Another approach might be to use the CSV Editor .
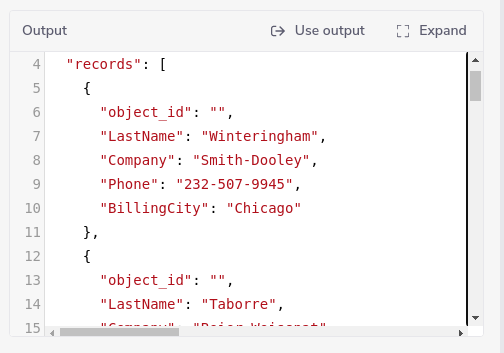
The scenario is that a callable workflow is receiving batches of data such as the following:
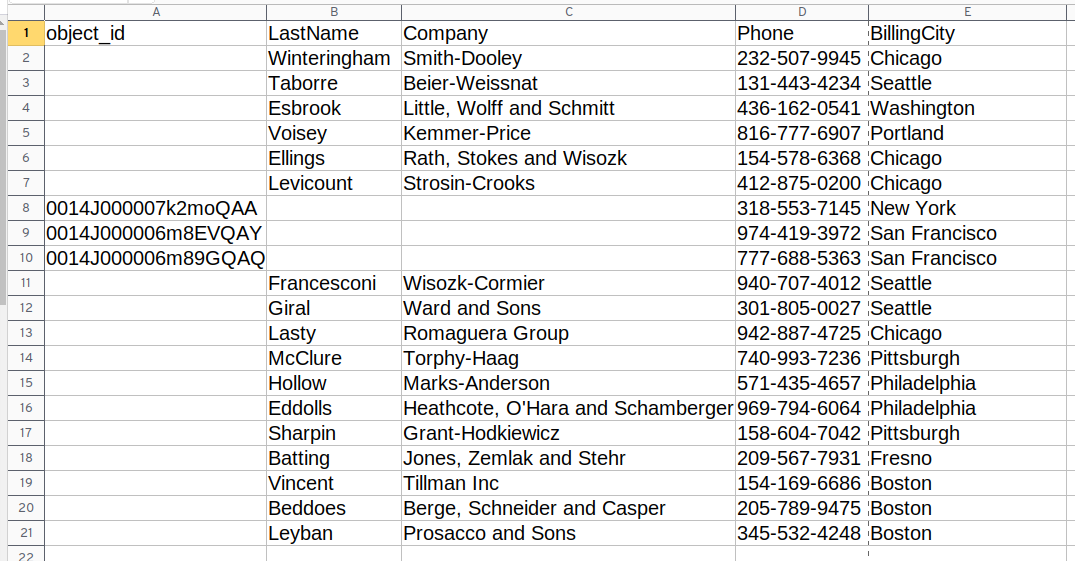 The idea is that all records with an object_id are pre-existing Salesforce Accounts that need to be updated with Phone and BillingCity.
While records without an object_id do not yet exist in Salesforce and we need to turn them into Leads which might become Accounts at a later stage.
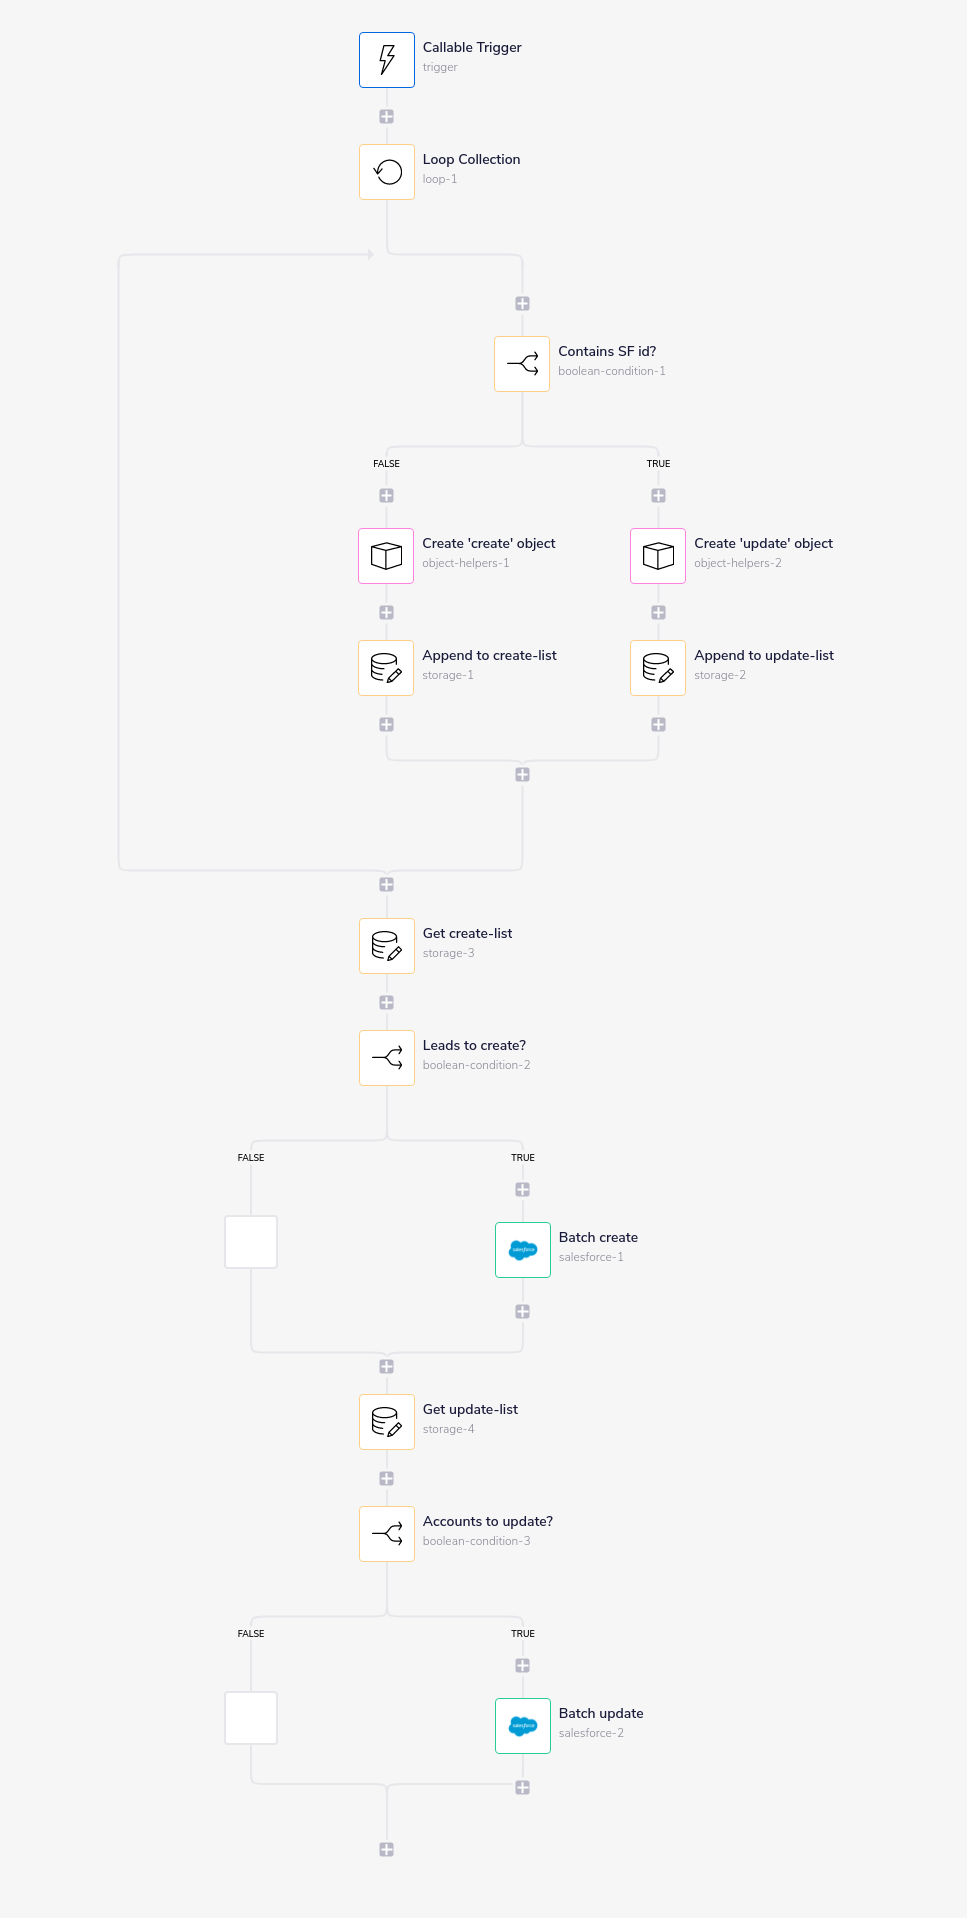
The screenshot below shows a callable workflow which is receiving these batches of records:
The idea is that all records with an object_id are pre-existing Salesforce Accounts that need to be updated with Phone and BillingCity.
While records without an object_id do not yet exist in Salesforce and we need to turn them into Leads which might become Accounts at a later stage.
The screenshot below shows a callable workflow which is receiving these batches of records:
 The data being received by the Callable Trigger is in json format:
 The following steps are taken through the course of the workflow:
Duplicating & Merging
Deduplicating & merging Salesforce Records
Over time you may find that duplicate records build up in your Salesforce database.
The following workflow imagines a scenario whereby new leads being created need to be checked for pre-existing duplicates:
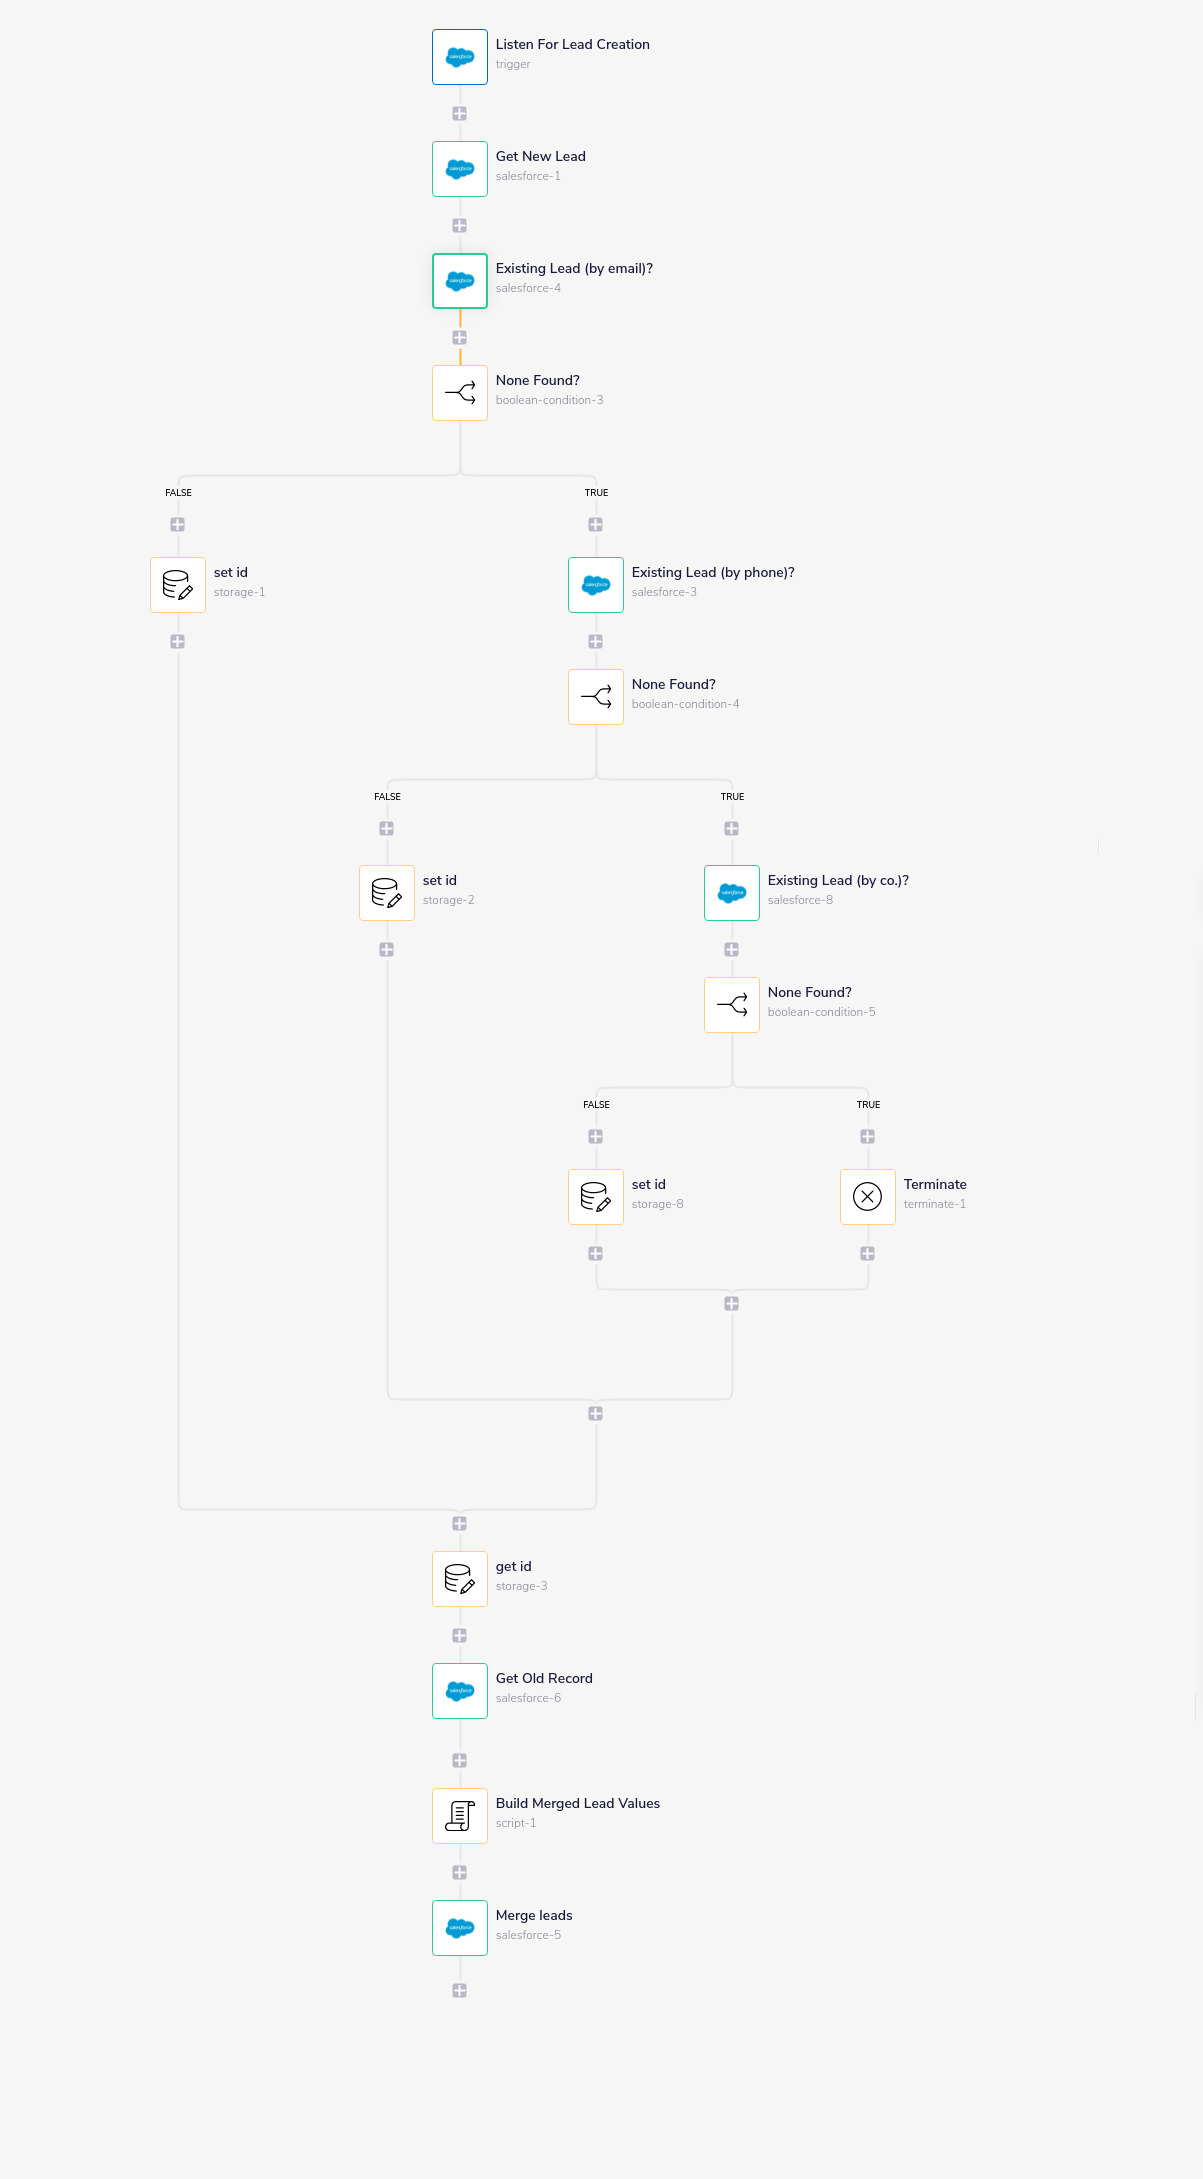
- The Listen for Lead Creation triggers the workflow when a new lead is created in Salesforce
- Get New Lead uses the 'Find records' operation, using the
$.steps.trigger.events[0].Idjsonpath to retrieve the newly created lead, including all the relevant associated fields (FirstName, LastName, Email, Phone, Lead ID, Company etc.) - We then conduct a series of 3 checks to see if this lead already exists as a duplicate (explained in detail below)
- If any of these checks find a duplicate, the Salesforce id for the duplicate lead is stored using a Data Storage set id step ('Set Value operation'), and the workflow moves on to the de-duplicating stage
- If all 3 checks fail to find a duplicate then the workflow is terminated, as no action needs to be taken
- If deduplicating is required, the Data Storage get id step uses 'Get Value' to retrieve the id of the duplicate lead
- Get Old Record is a 'Find Records' operation which uses
$.steps.storage-3.valueto retrieve the duplicate lead, including all the relevant associated fields (FirstName, LastName, Email, Phone, Lead ID, Company etc.) - Build Merged Lead Values is a script which then replaces all the old duplicate values for name, email, etc. with the values from the new lead. If they are not present for the new lead then the original old values will be used
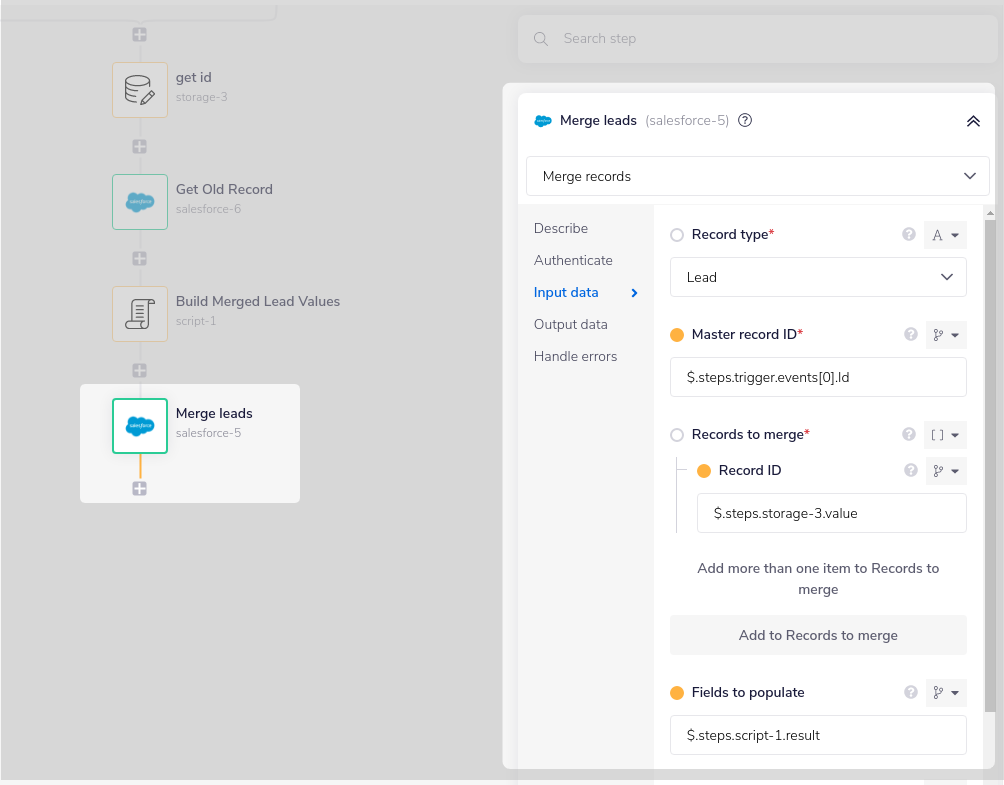
- Merge Leads finally uses the Salesforce 'Merge Records' operation with the new Lead ID (
$.steps.trigger.events[0].Id) as the Master record ID and the old Lead ID ($.steps.storage-3.value) as the 'Record to merge'. The 'Fields to populate' come from the result of the merged values script ($.steps.script-1.result)
The duplicate checks explained
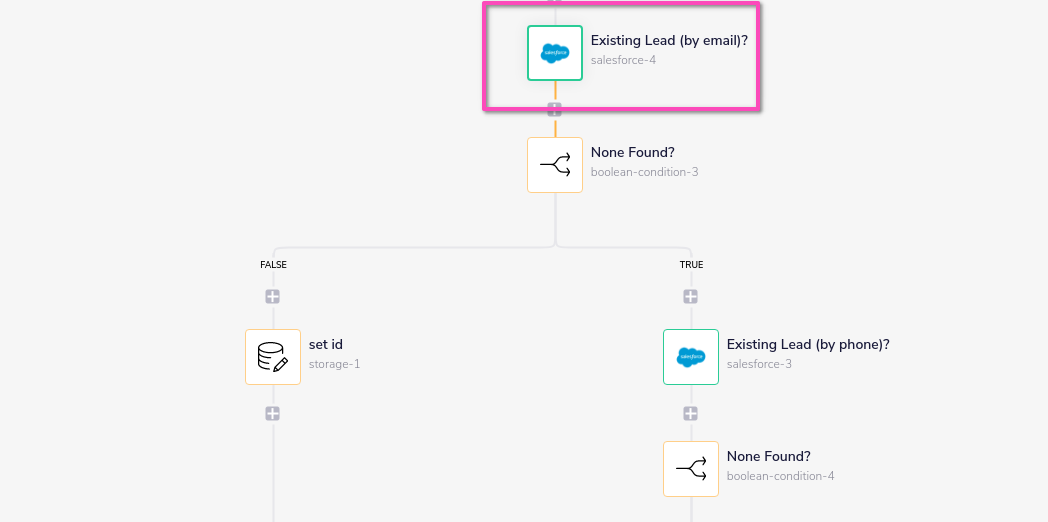
When making the above duplicate checks, we are making a series of checks of varying degrees of certainty.
The first check is by email:
 Looking at the properties panel, we can see how this check is set up:
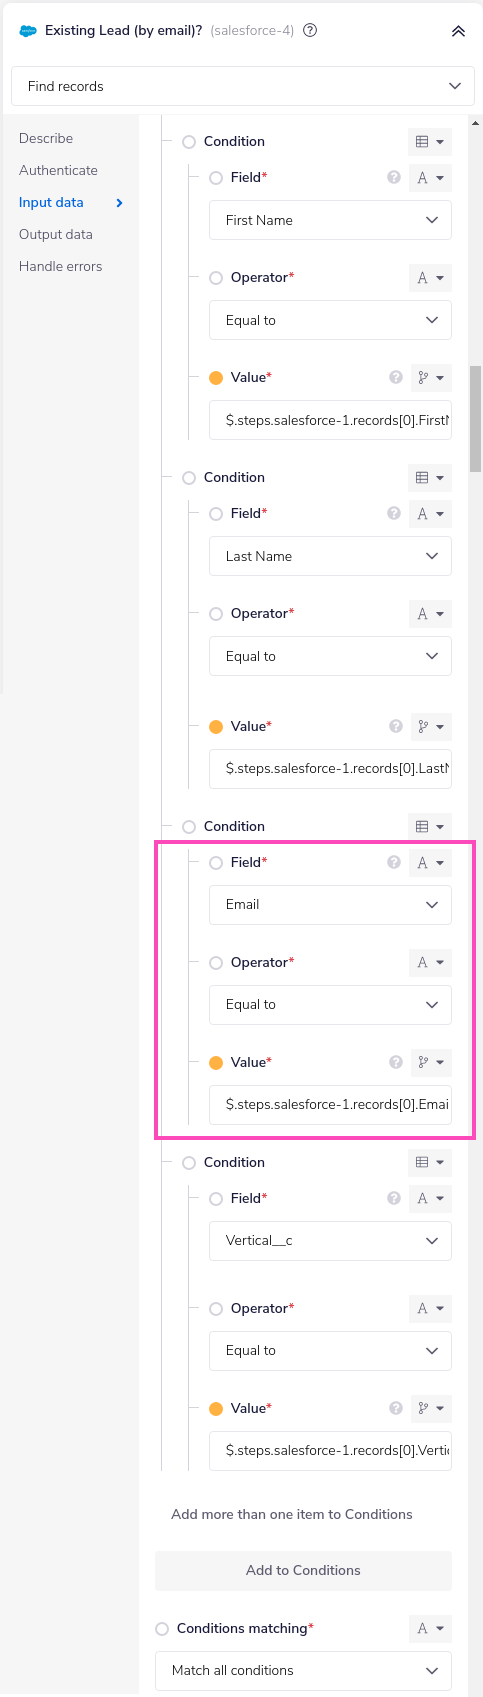 You can see that while a check is being made to see if any existing leads match this new lead by email, we are also checking for First Name, Last Name and Vertical (i.e. automotive, banking, consumer etc.)
The subsequent checks by phone and company use the same conditional setup, replacing email with phone and company.
By the end of this process we will have checked with approx 99% degree of certainty for pre-existing duplicates (these aren't absolute failsafes as there could be a typo in each field we are checking)
You can see that while a check is being made to see if any existing leads match this new lead by email, we are also checking for First Name, Last Name and Vertical (i.e. automotive, banking, consumer etc.)
The subsequent checks by phone and company use the same conditional setup, replacing email with phone and company.
By the end of this process we will have checked with approx 99% degree of certainty for pre-existing duplicates (these aren't absolute failsafes as there could be a typo in each field we are checking)
Merging the new and duplicate record
After using the Data Storage get id step to retrieve the id of the identified duplicate, we fetch the duplicate lead itself:
The Build Merged Lead Values script step then pulls in the old Lead values and new Lead values as variables:
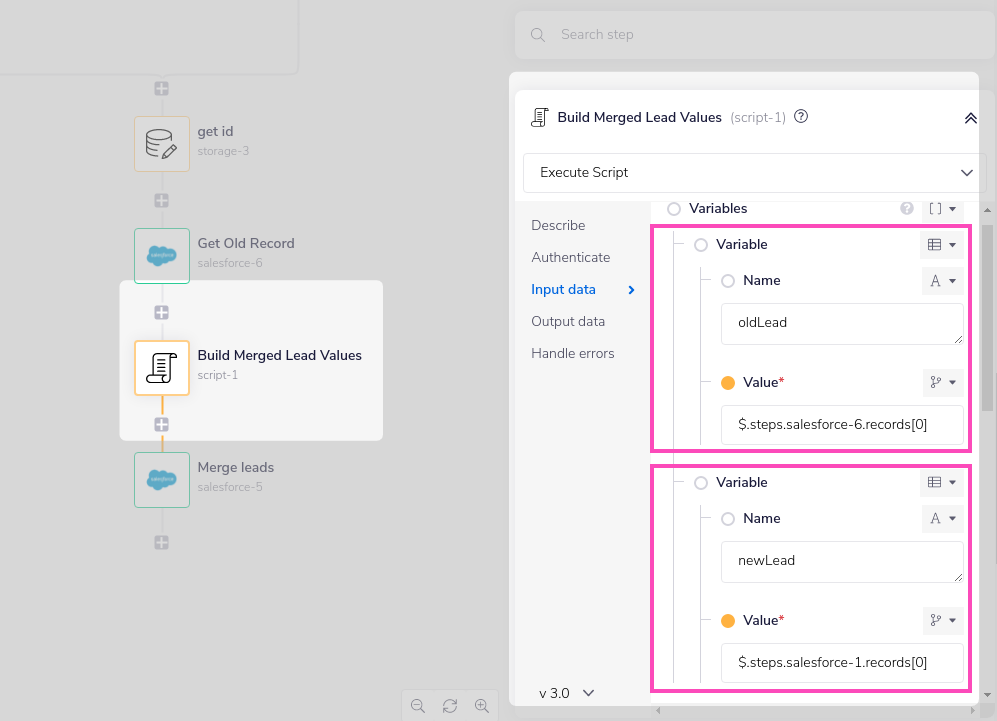 The script itself is simple:
// You can reference the input variables using input.NAME
// Parsed JSON files could be referenced as fileInput
exports.step = function(input, fileInput) {
 let values = [];

 for(let key in input.newLead){
  if(key !== "Id"){
   if(input.newLead[key] === null){
    values.push(\{
     "name": key,
     "value": input.oldLead[key]
    \});
   } else {
    values.push(\{
     "name": key,
     "value": input.newLead[key]
    \});
   }
  }
 }

 return values;
It will replace all values from the old lead with values from the new lead. If the new lead does not have a particular value, then the old lead value will be retained. The output is then in a format which will be accepted by the Salesforce schema for merging records. For example:
{
 "result": [
  \{
   "name": "FirstName",
   "value": "Roger"
  \},
  \{
   "name": "LastName",
   "value": "Ramjet"
  \},
  \{
   "name": "Phone",
   "value": "(850) 777-2436"
  \},
  \{
   "name": "Id",
   "value": "00Q1QxxxxxxYGUA3"
  \},
  \{
   "name": "Vertical__c",
   "value": "Automotive"
  \},
  \{
   "name": "Company",
   "value": "Ramjet and co"
  \},
  \{
   "name": "Email",
   "value": "info@ramjet.net"
  \},
  \{
   "name": "MobilePhone",
   "value": "(850) 755-3555"
  \}
 ],
 "console": []
}
The output of the script step can then be used in Fields to populate for the Merge leads step:
Detailed examples
Salesforce and Trello
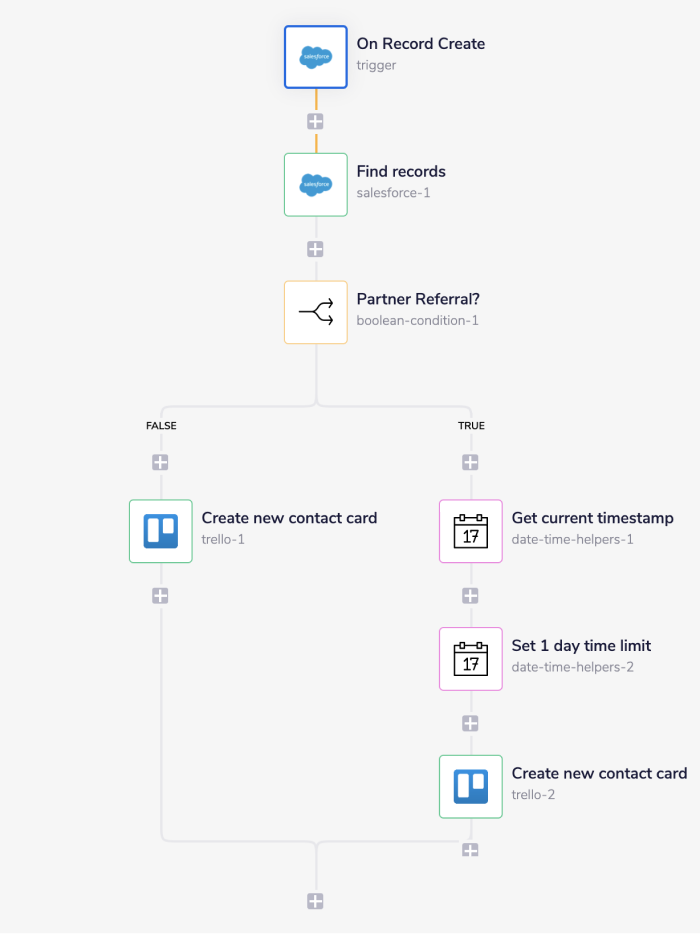
Below is an example of a way in which you could potentially use the Salesforce trigger and connector, to integrate with Trello. In this imagined scenario, upon creation of a Salesforce record, the workflow checks who created said card and if it was a Partner referral. Should this be the case, the Tray workflow will set a time limit for contact to be made. The steps will be as follows:
- Setup the trigger and the first connector step in order to get the new record information.
- Create a boolean condition to base your output on.
- If a partner referral is not confirmed, create a Trello card as standard.
- If a partner referral is confirmed, set a contact due date on said Trello card.
The final outcome should look like this:
Using the Raw HTTP Request ('Universal Operation')
IMPORTANT!: Please note that the Raw HTTP Request only works with REST API endpoints. You cannot make requests to SOAP API endpoints.
As of version 7.5, you can effectively create your own operations. This is a very powerful feature which you can put to use when there is an endpoint in Salesforce which is not used by any of our operations. To use this you will first of all need to research the endpoint in the Salesforce API documentation, to find the exact format that Salesforce will be expecting the endpoint to be passed in. Note that you will only need to add the suffix to the endpoint, as the base URL will be automatically set (the base URL is picked up from the value you entered when you created your authentication).
IMPORTANT!: Accessing the base URL: If you need to access the base URL (e.g. for making a Full URL Raw HTTP requests) then the following information will be useful. The base URL for Salesforce is your Salesforce instance URL. It will most likely be similar to: 'https://abc123.salesforce.com' where 'abc123' is your Salesforce instance name. You may access your Salesforce instance URL within a workflow by using jsonpath to extract it from the authentication parameters** '$.auth.instance_url'**.
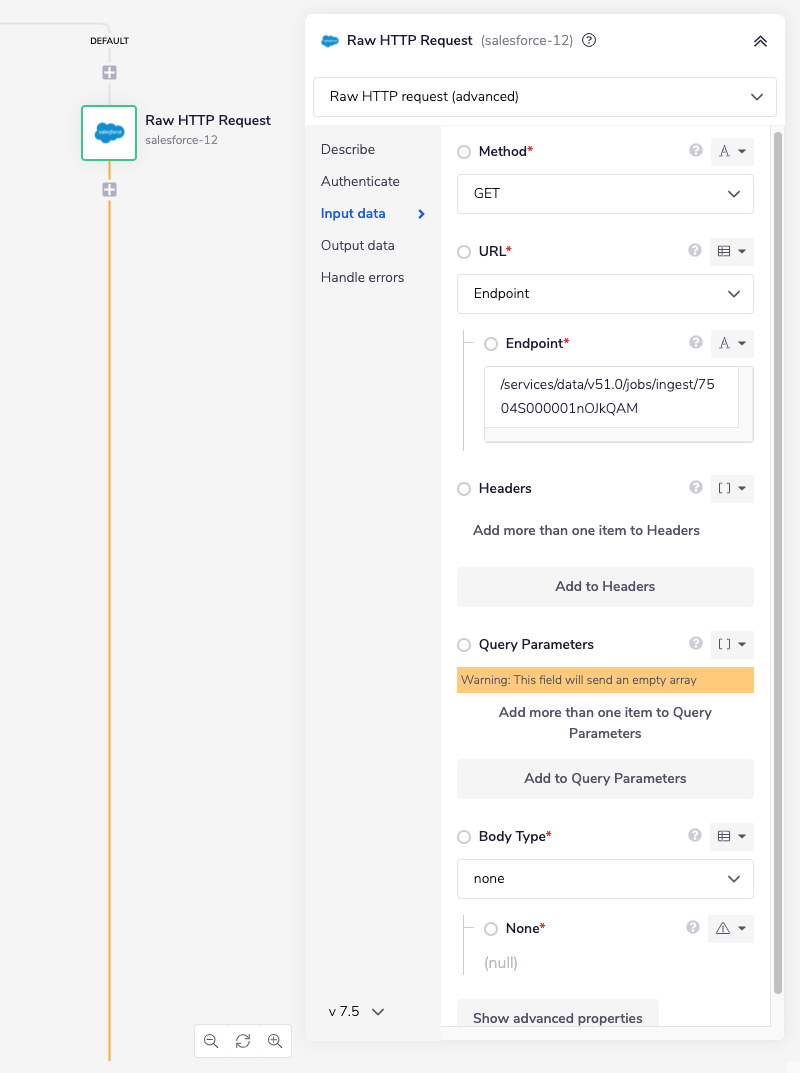
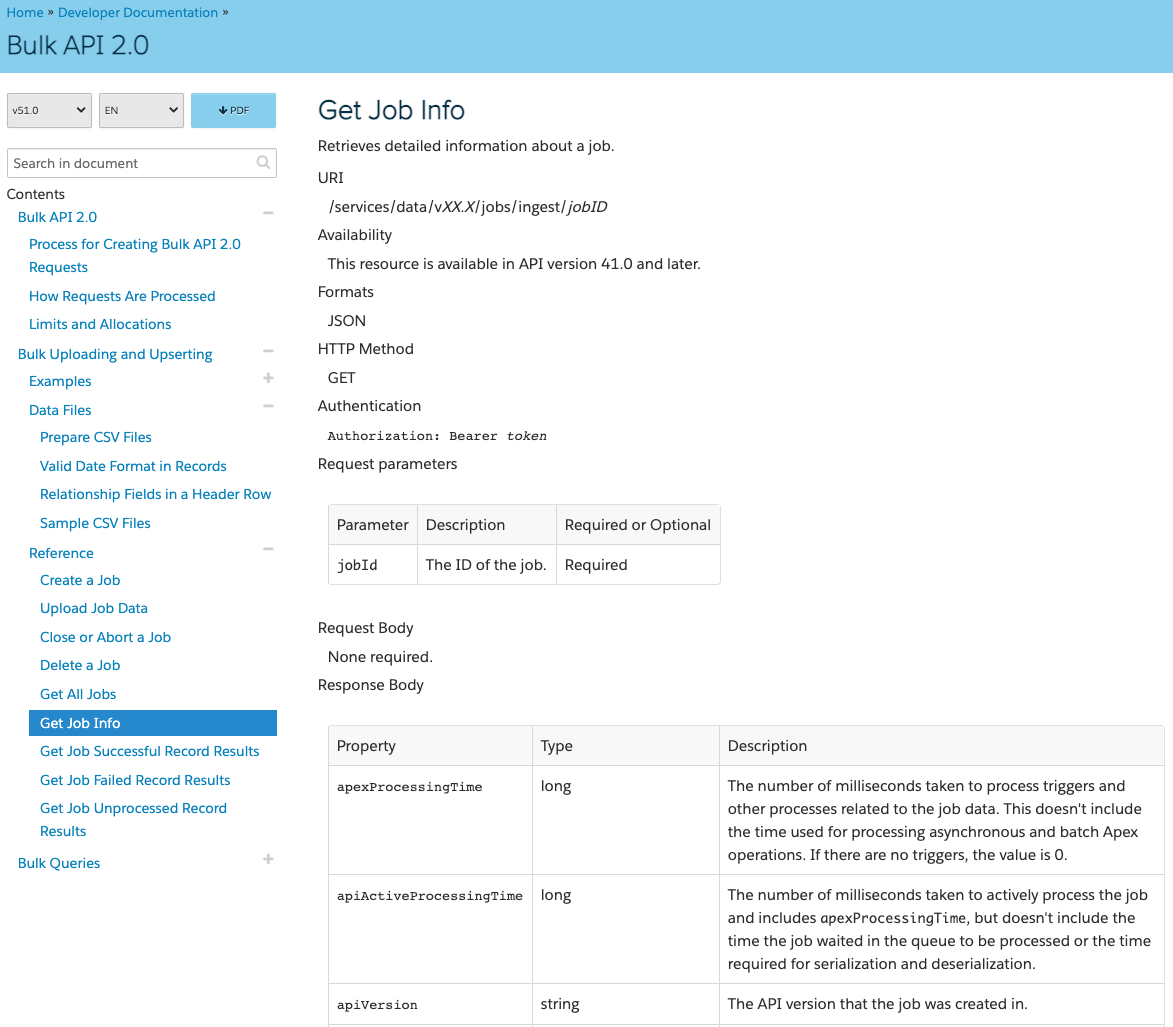
For example, say that the 'Get Job Info' operation did not exist in our Salesforce connector, and you wanted to use this endpoint, you would use the Salesforce API docs to find the relevant endpoint - which in this case is a GET request called: /services/data/vXX.X/jobs/ingest/jobID.
PLEASE NOTE: You will need to enter the correct API version (e.g. 'v51.0') and the correct job ID (e.g. '7504S000001nOJkQAM') in order to build a valid endpoint for the URL.
More details can be found here.
 So if you know what your method, endpoint and details of your query parameters are, you can get the Salesforce job information with the following settings:
Method:
So if you know what your method, endpoint and details of your query parameters are, you can get the Salesforce job information with the following settings:
Method: GET
Endpoint: /services/data/v51.0/jobs/ingest/7504S000001nOJkQAM
Query Parameters: None
Body Type : None : null
Final Example outcome being: https://abc123.salesforce.com/services/data/v51.0/jobs/ingest/7504S000001nOJkQAM