Snowflake
Snowflake makes it easy to amass all your data, enable rapid analytics, and derive data-driven insights for all your business users.
Overview
Snowflake makes it easy to amass all your data, enable rapid analytics, and derive data-driven insights for all your business users.
Connector version 4.2 adds Programmatic Access Token (PAT) authentication alongside the existing OAuth 2.0 and key-pair (private key) methods. This is an additive, non-breaking change: existing authentications continue to work unchanged. Snowflake is deprecating single-factor password-based authentication before October 2026, and PAT is a supported token-based alternative. See the Programmatic Access Token (PAT) authentication section below for setup instructions.
IMPORTANT!: Snowflake has the option of implementing a Network Policy in order to restrict access based on IP addresses.
If you are not using a Network Policy, then your database is publicly accessible. If you have enabled a Network Policy, then you will need to enable Tray to connect to your database by white listing ALL the Tray public IP addresses based on your region. Refer to the Tray public IPs document for complete list of the Tray public IP addresses. Please also be aware of our other on-prem options.
Authentication
PLEASE NOTE: You can now also authenticate the Snowflake connector using Okta. Please refer to the Snowflake (Okta) documentation for instructions on how to set this up.
IMPORTANT: Before proceeding, please ensure that your authentication setup includes a user with the appropriate role permissions for accessing Warehouses, Databases, Schemas, and Tables. Additionally, you can connect using either key-pair authentication or a Programmatic Access Token (PAT). To use a PAT instead of a private key, see the Programmatic Access Token (PAT) authentication section below. You can generate a key pair and assign it to a user by following Snowflake’s documentation.
Note: Tray currently requires the unencrypted version of the private key.
When operating in the context of ACCOUNTADMIN within your Snowflake account dashboard, you will need to have run a sequence of commands such as follows:
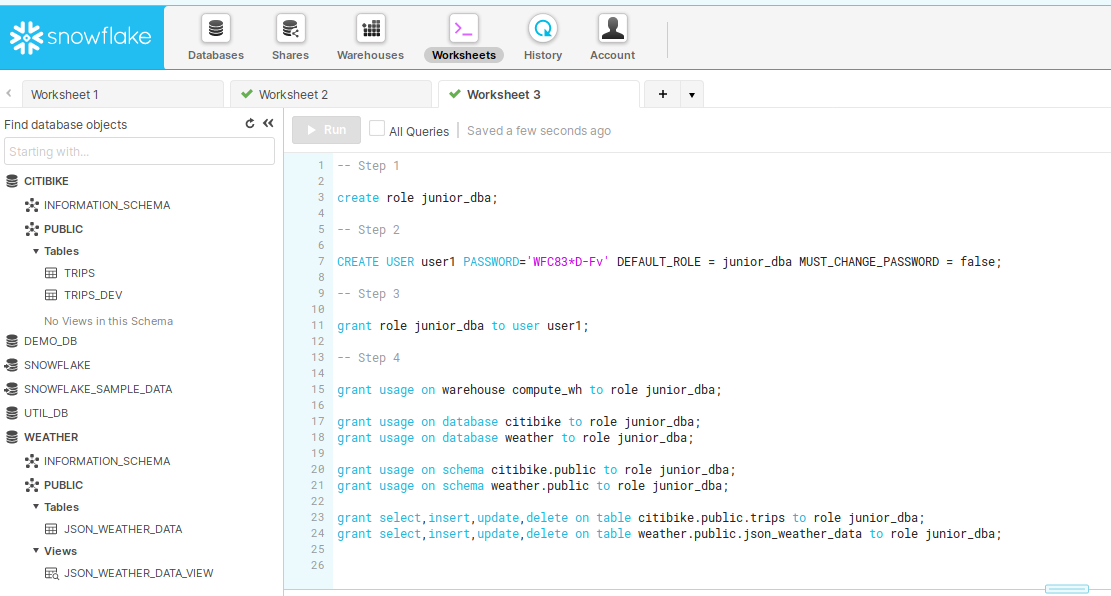 Please note that the privileges granted are to a warehouse, then to the databases, then their schemas and individual tables.
This must be done to allow access to the tables. The exact table permissions (select, insert etc.) can be set according to what tasks you wish to carry out with the Tray connector.
When using the Snowflake connector, the first thing you will need to do is go to your Tray account page, and select the relevant workflow. Once in the workflow dashboard itself, search and drag the Snowflake connector from the connectors panel (on the left hand side) onto your workflow.
With the new Snowflake connector step highlighted, in the properties panel on the right, click on 'Create new authentication' which is located under the 'Authentication' heading.
Please note that the privileges granted are to a warehouse, then to the databases, then their schemas and individual tables.
This must be done to allow access to the tables. The exact table permissions (select, insert etc.) can be set according to what tasks you wish to carry out with the Tray connector.
When using the Snowflake connector, the first thing you will need to do is go to your Tray account page, and select the relevant workflow. Once in the workflow dashboard itself, search and drag the Snowflake connector from the connectors panel (on the left hand side) onto your workflow.
With the new Snowflake connector step highlighted, in the properties panel on the right, click on 'Create new authentication' which is located under the 'Authentication' heading.
 This will result in a Tray authentication pop-up window. The first page will ask you to name your authentication appropriately, and state which type of authentication you wish to make ('Personal' or 'Organisational').
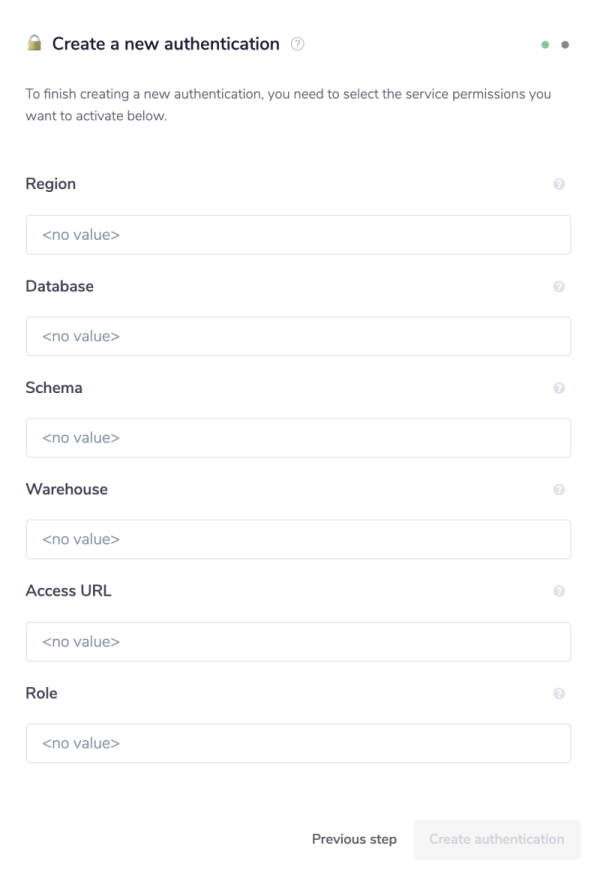
As you can see, the next page asks you for your 'Account', 'Username' and 'Unencrypted Private Key' credentials, which are required. You will also be asked for your 'Warehouse', 'Database', 'Schema', 'Role', and 'Access URL' values should you choose to provide them.
This will result in a Tray authentication pop-up window. The first page will ask you to name your authentication appropriately, and state which type of authentication you wish to make ('Personal' or 'Organisational').
As you can see, the next page asks you for your 'Account', 'Username' and 'Unencrypted Private Key' credentials, which are required. You will also be asked for your 'Warehouse', 'Database', 'Schema', 'Role', and 'Access URL' values should you choose to provide them.

Programmatic Access Token (PAT) authentication
As of connector version 4.2, you can authenticate using a Snowflake Programmatic Access Token (PAT) instead of a private key. A PAT is a token-based credential that you generate in Snowflake and supply directly in the Tray authentication. It is a supported method for programmatic and service access ahead of Snowflake's deprecation of single-factor password authentication.
Generating a Programmatic Access Token in Snowflake
PATs are issued to a Snowflake user (a TYPE = SERVICE user is recommended) and must be governed by a network policy. The following steps use Snowsight, run while signed in with the ACCOUNTADMIN role.
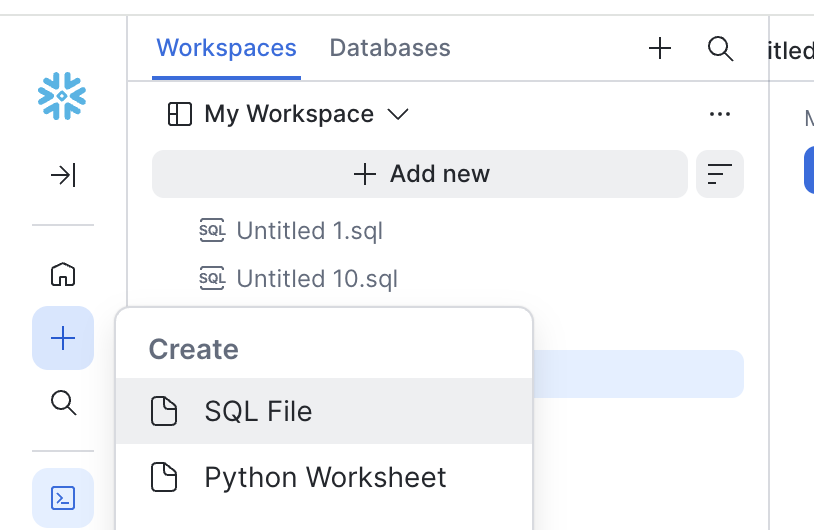
- In Snowsight, open the Workspaces panel, select Add new, and choose SQL File.
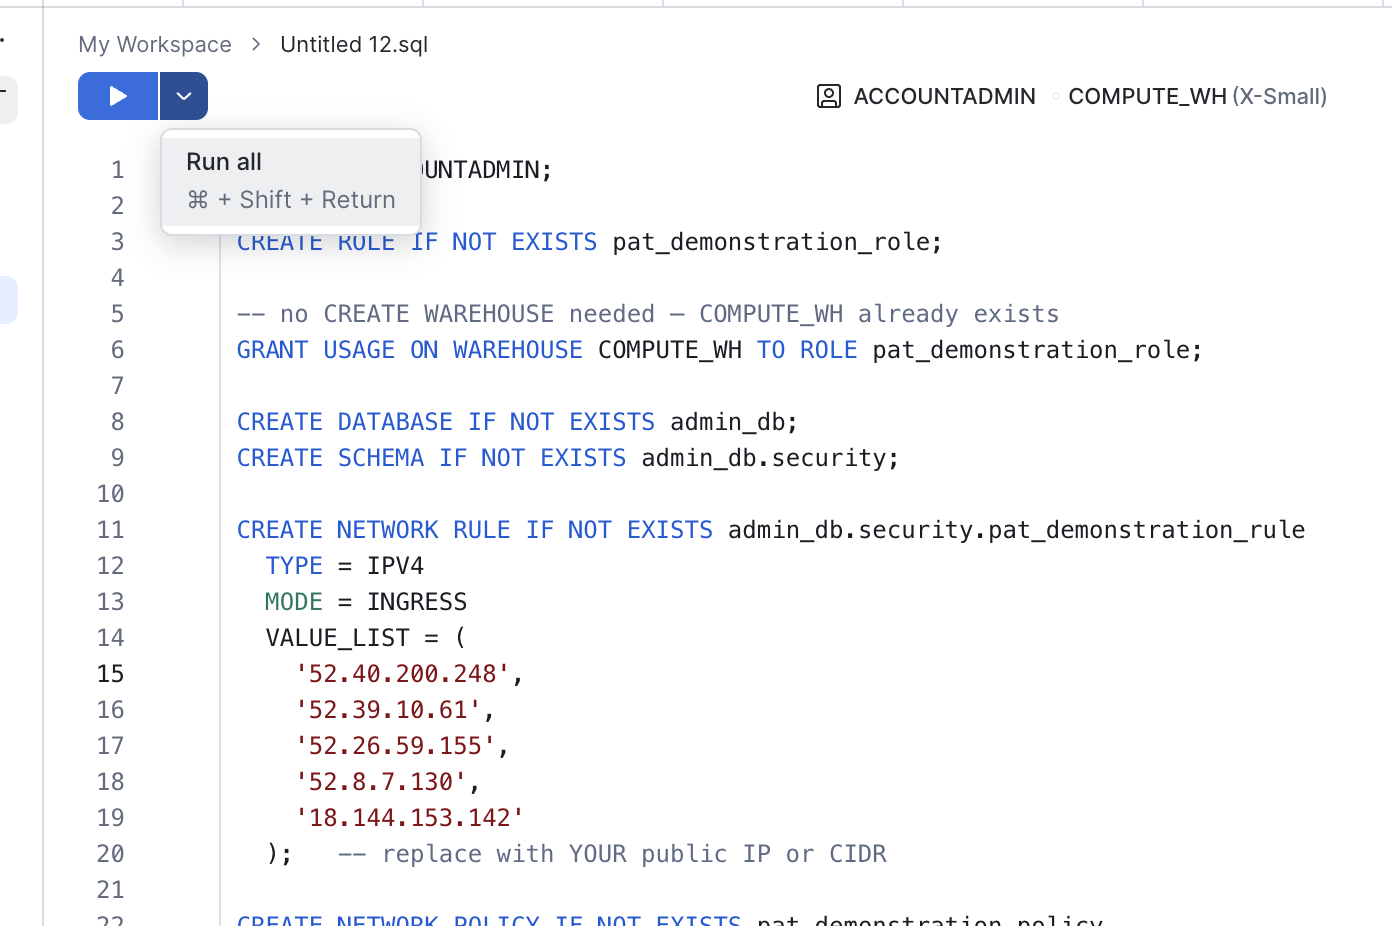
- Paste the setup script below, replacing the network rule
VALUE_LISTwith the Tray public IPs for your region, then choose Run all.
USE ROLE ACCOUNTADMIN;

CREATE ROLE IF NOT EXISTS pat_demonstration_role;

GRANT USAGE ON WAREHOUSE COMPUTE_WH TO ROLE pat_demonstration_role;

CREATE DATABASE IF NOT EXISTS admin_db;
CREATE SCHEMA IF NOT EXISTS admin_db.security;

CREATE NETWORK RULE IF NOT EXISTS admin_db.security.pat_demonstration_rule
  TYPE = IPV4
  MODE = INGRESS
  VALUE_LIST = (
    '52.40.200.248',
    '52.39.10.61',
    '52.26.59.155',
    '52.8.7.130',
    '18.144.153.142'
  );   -- replace with the Tray public IPs for your region

CREATE NETWORK POLICY IF NOT EXISTS pat_demonstration_policy
  ALLOWED_NETWORK_RULE_LIST = ('admin_db.security.pat_demonstration_rule');

CREATE USER IF NOT EXISTS pat_demonstration_user
  TYPE = SERVICE
  DEFAULT_ROLE = pat_demonstration_role
  DEFAULT_WAREHOUSE = COMPUTE_WH
  NETWORK_POLICY = pat_demonstration_policy
  COMMENT = 'Service user for PAT auth';

GRANT ROLE pat_demonstration_role TO USER pat_demonstration_user;

ALTER USER IF EXISTS pat_demonstration_user
  ADD PROGRAMMATIC ACCESS TOKEN pat_demonstration_token
  ROLE_RESTRICTION = 'PAT_DEMONSTRATION_ROLE'
  DAYS_TO_EXPIRY = 30
  COMMENT = 'Test token';
- The
ADD PROGRAMMATIC ACCESS TOKENcommand returns the token in the results grid astoken_nameandtoken_secret. Copy thetoken_secretvalue.
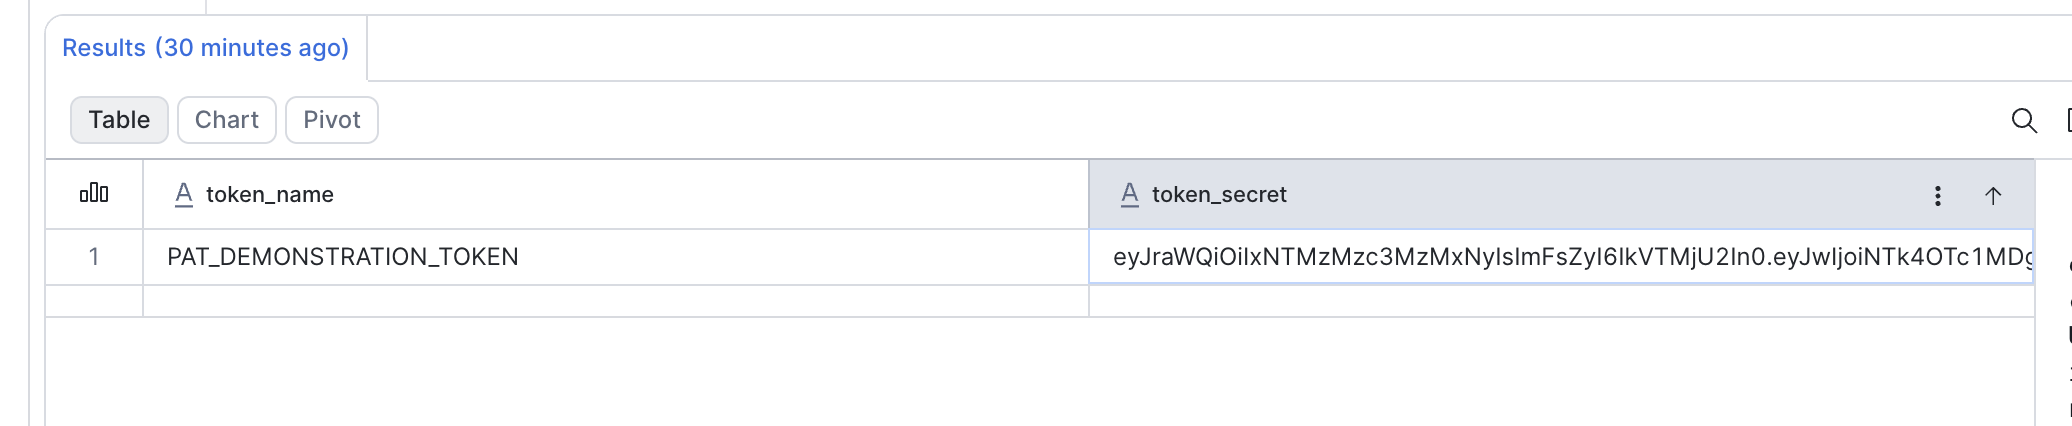
The token_secret is displayed only once, at creation time. Copy and store it securely before leaving the page. The token also expires according to its DAYS_TO_EXPIRY value, after which you must generate a new one.
Adjust the role name, warehouse, database, schema, and DAYS_TO_EXPIRY to match your environment. The network policy is required, as Snowflake only issues PATs to users governed by a network policy. Grant the role the warehouse, database, schema, and table privileges your workflows require, following the privilege sequence described earlier in this section.
Configuring PAT authentication in Tray
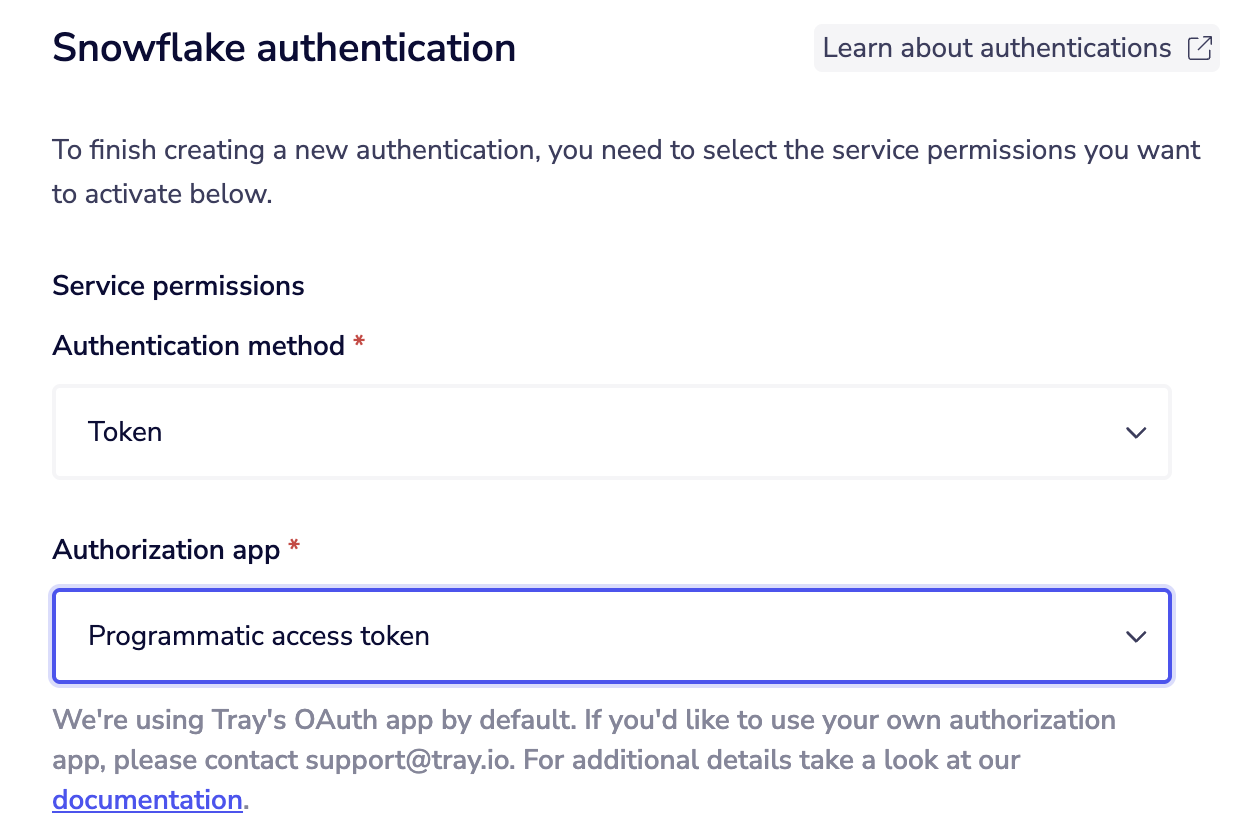
- On the Snowflake connector step, create a new authentication. Set Authentication method to Token and Authorization app to Programmatic access token.
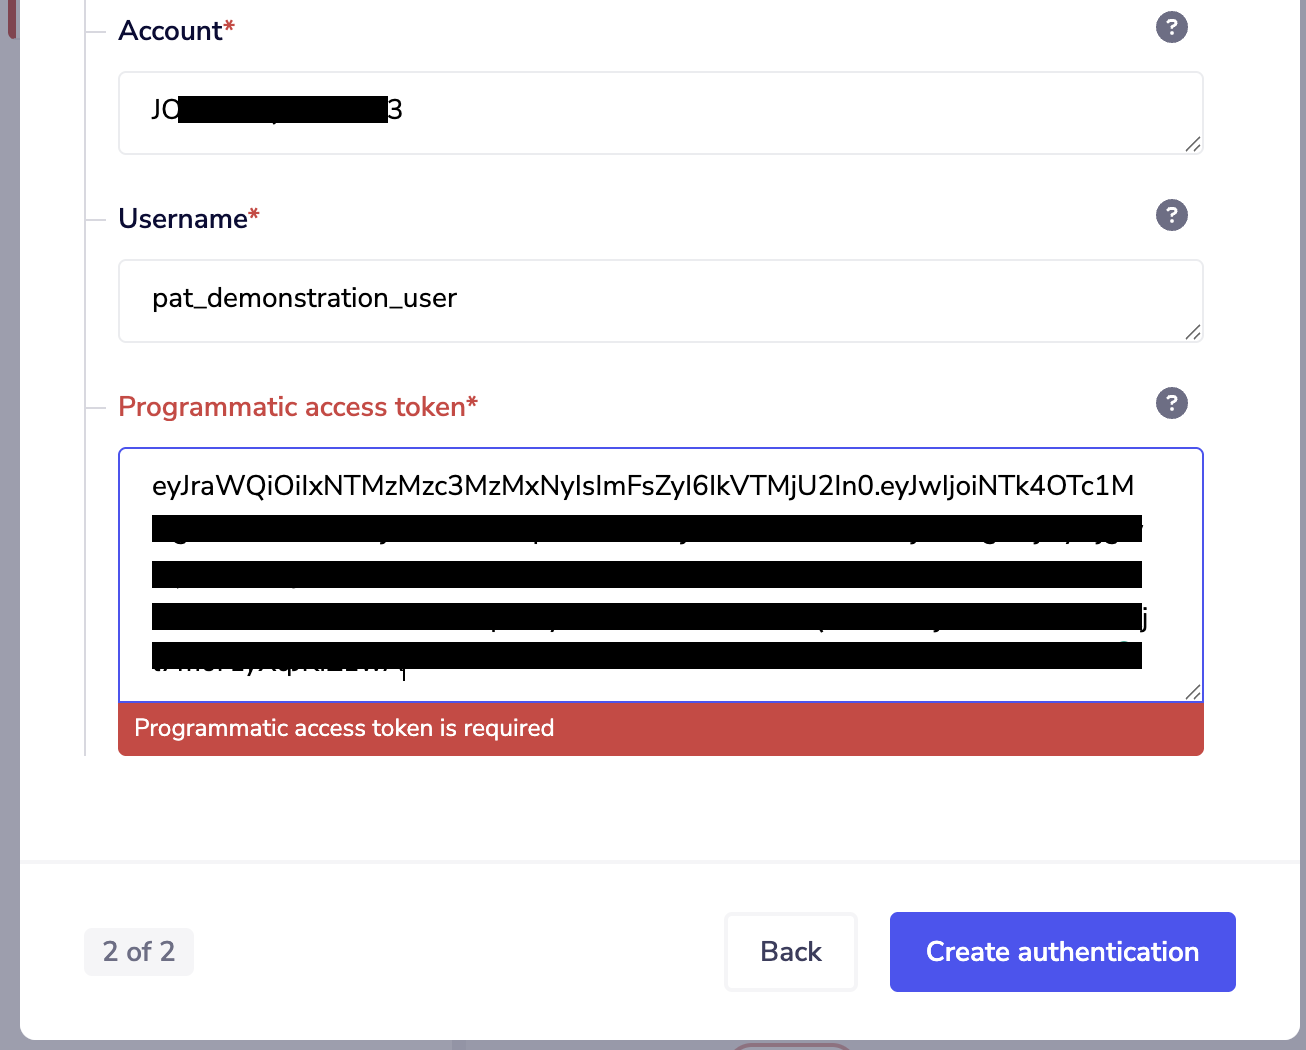
- On the next page, provide your Account and the Username of the Snowflake user the token belongs to, then paste the token into the Programmatic access token field. Click Create authentication.
The Account and Access URL formats are the same as described in the Account and Access URL section above. Once the authentication is created, select it on your Snowflake operations. No operation inputs change when using PAT authentication, so all existing operations continue to work unchanged.
Account and Access URL
There are two ways you could fill in the 'Account' and 'Access URL' authentication fields within the authentication modal.
Preferred
- **Account: **The preferred method is '
<organisation_name>-<account_name>'. Note that when using this format you do not need to provide an access URL, but should use a global, region-less URL if providing one. For SQL commands/operations the format is '<org_name>.<account_name>'. You can view more information on these endpoints here. - **Access URL: **Providing an access URL should not be required, but if providing one the preferred URL format is a global region-less format, '
https://<org_name-account_name>.snowflakecomputing.com'.
Legacy
For accounts created before the release of 'Organizations'.
- **Account: **The use of 'Account locators' continue to be supported, but this is no longer the preferred method.
For regions other than AWS US West (Oregon), the format is '
<account_locator>'.For all other regions, the format is '<account_locator>.<region>'or '<account_locator>.<region>.<cloud>'.You can view more information on this here. - **Access URL: **Where ‘account locator’ is used in the account name, the format for AWS US West (Oregon) is '
https://<account>.snowflakecomputing.com'though this will be automatic so providing it is not required. For all other regions, the format is 'https://<account>.<region>.snowflakecomputing.com'.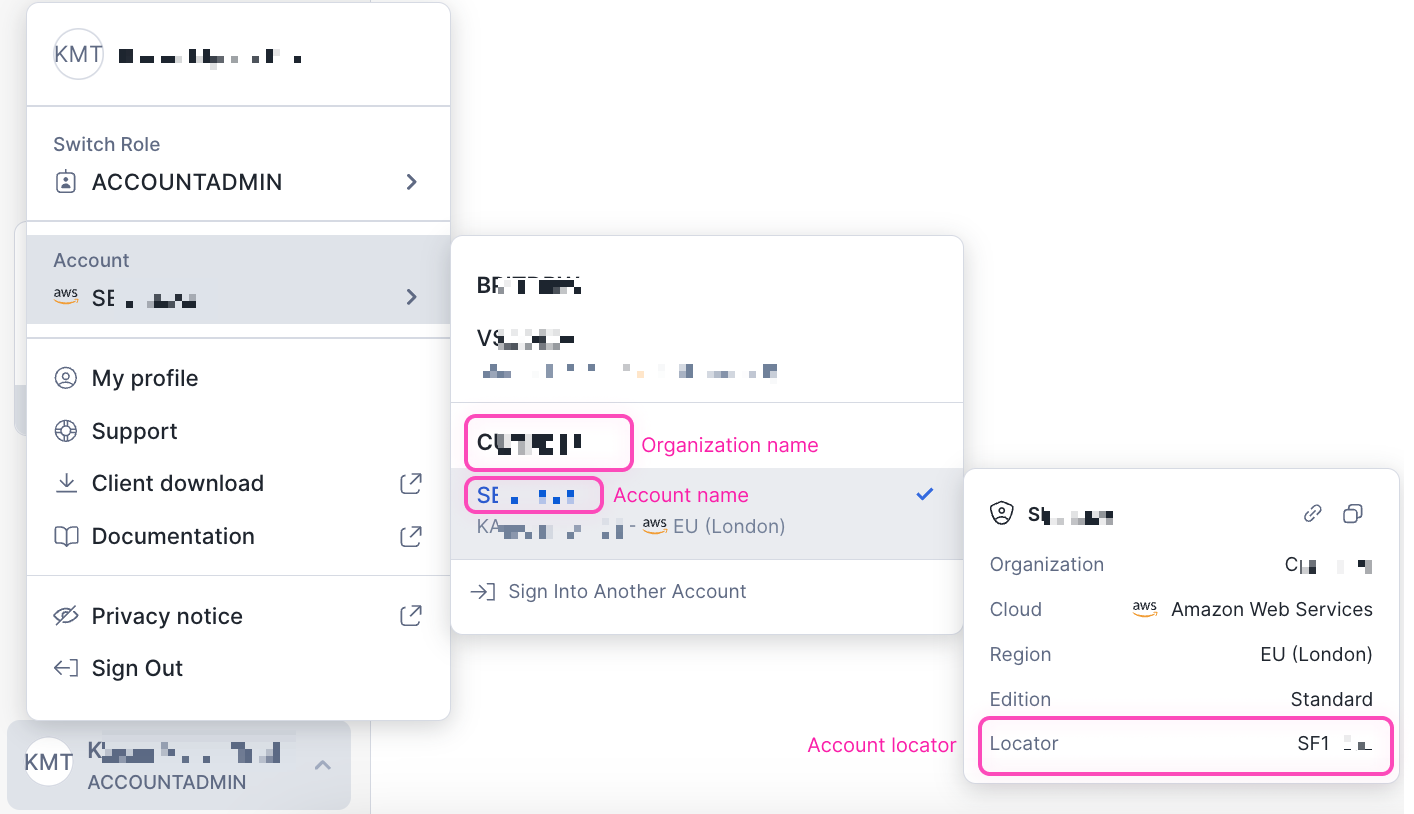
Other authentication inputs
The 'Username' and the 'Password' are the same as the username and password for your Snowflake account.
There are several other authentication settings you can set up, while most are use case specific, be sure to set a default Warehouse for your authentication, as this needs to be picked up automatically when you are running Snowflake operations.
A Warehouse in Snowflake terms is a set of computing resources you have assigned to manage your databases and tables, which can be adjusted depending on the power and capacity that is required.
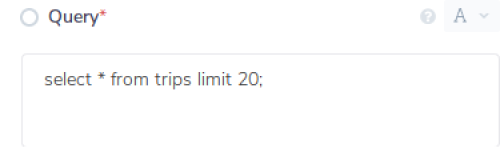
 If you set a default 'Database' and 'Schema' then you can run queries and statements by directly referencing the table themselves:
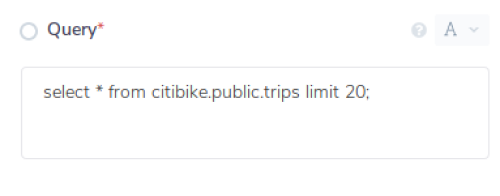
 If you do not set a default 'Database' and 'Schema' then you will need to enter them "fully-qualified", something in the form of the following:
 <db_id>.<schema_id>.<object_id>:
 Once you have clicked the 'Create authentication' button, go to back to your authentication field (within the workflow dashboard properties panel from earlier), and select the recently added authentication from the dropdown options now available, if not already selected.
Your connector authentication setup should now be complete.
Once you have clicked the 'Create authentication' button, go to back to your authentication field (within the workflow dashboard properties panel from earlier), and select the recently added authentication from the dropdown options now available, if not already selected.
Your connector authentication setup should now be complete.